
The Kadence Pattern Hub plugin gives you the ability to host your own pattern library. Pattern Hub libraries consist of a Connection Key and Connection URL that can be connected to using the Kadence Design Library. Once you are connected to a Pattern Hub library, you can use the Kadence Design Library to directly import patterns from that library.
Note: The Kadence Pattern Hub plugin is available if you have the Ultimate Plan or can be purchased individually. See Kadence Pattern Hub pricing for details.
Before You Begin
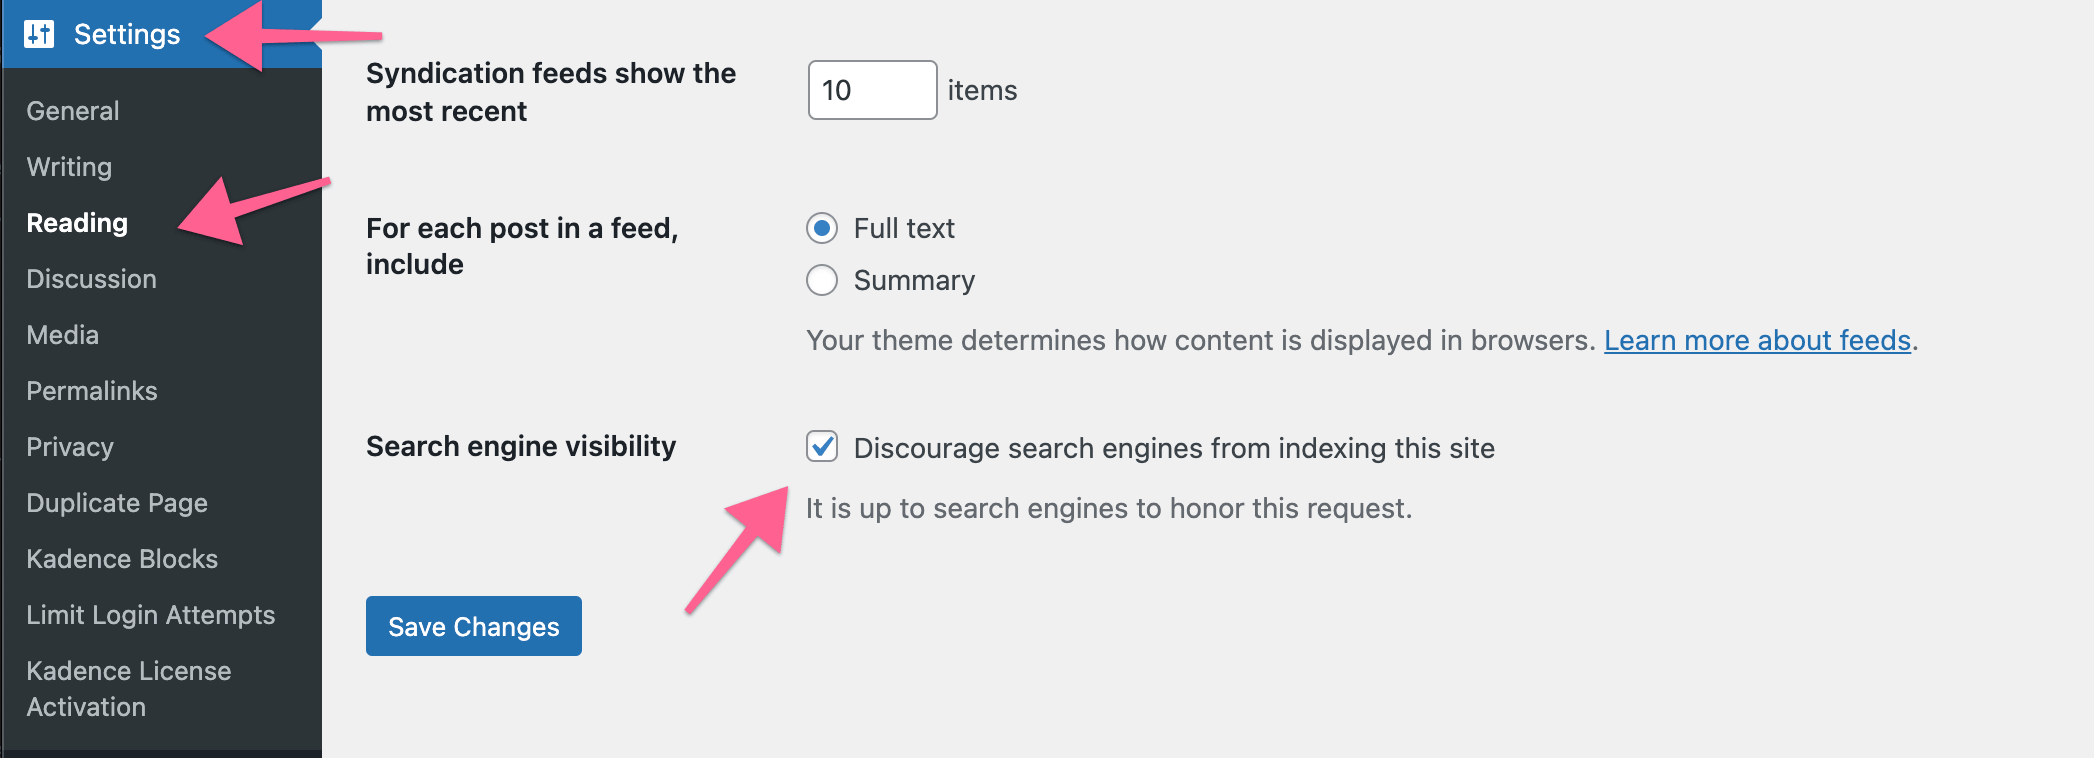
Search Engine Visibility
You should install the Kadence Pattern Hub plugin on a publicly accessible site. This can be a subdomain or its own domain. When creating this site, if its only purpose is to host your Pattern Hub, we suggest enabling the option to discourage search engines from indexing this site. You can do this in your Dashboard → Settings → Reading. Check the option to discourage search engines from indexing the website. Click here to read more about Pattern Hub Indexing.
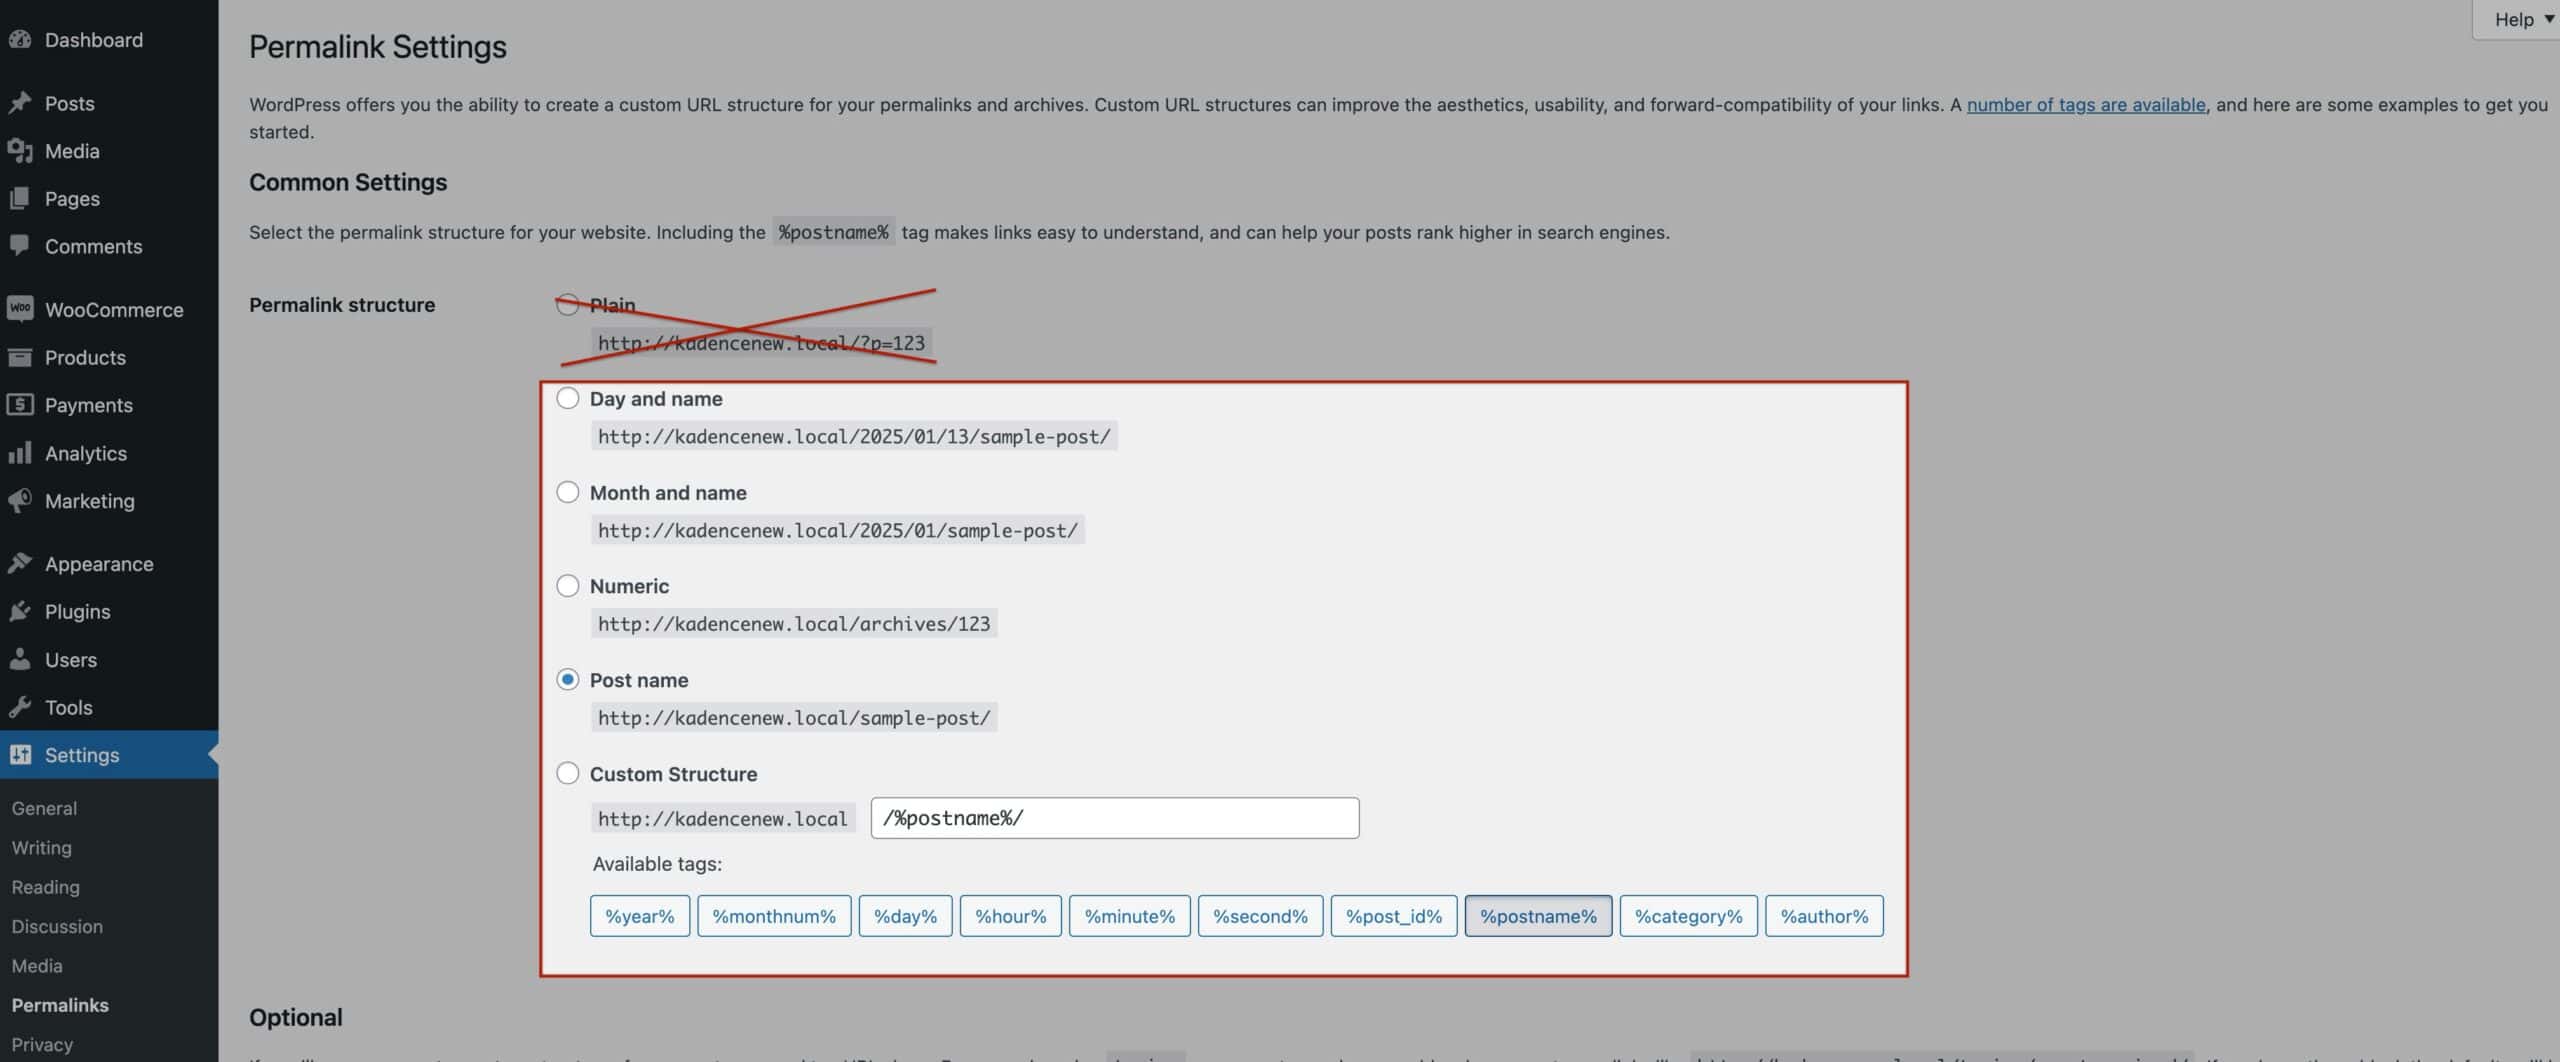
Permalink Structure
Websites that host a Pattern Hub should use a permalink structure other than the WordPress default structure (i.e. Plain). If your Pattern Hub site uses the Plain Permalink Structure, then the connection data may not be available.
Overview Video
Below is an excellent video created by our good friend Adam with WP Crafter. Watch to get an overview of how to create your own hub.
Creating a Pattern Hub with Kadence Pattern Hub
Creating your own Kadence Pattern Hub is easy. The first step will be to install, activate, and license the Kadence Pattern Hub plugin on your website.
Step 1. Activating Kadence Pattern Hub
Installing, activating, and licensing the Kadence Pattern Hub plugin is easy. Just follow the steps below to get started.
You can get started by logging into your KadenceWP Account.
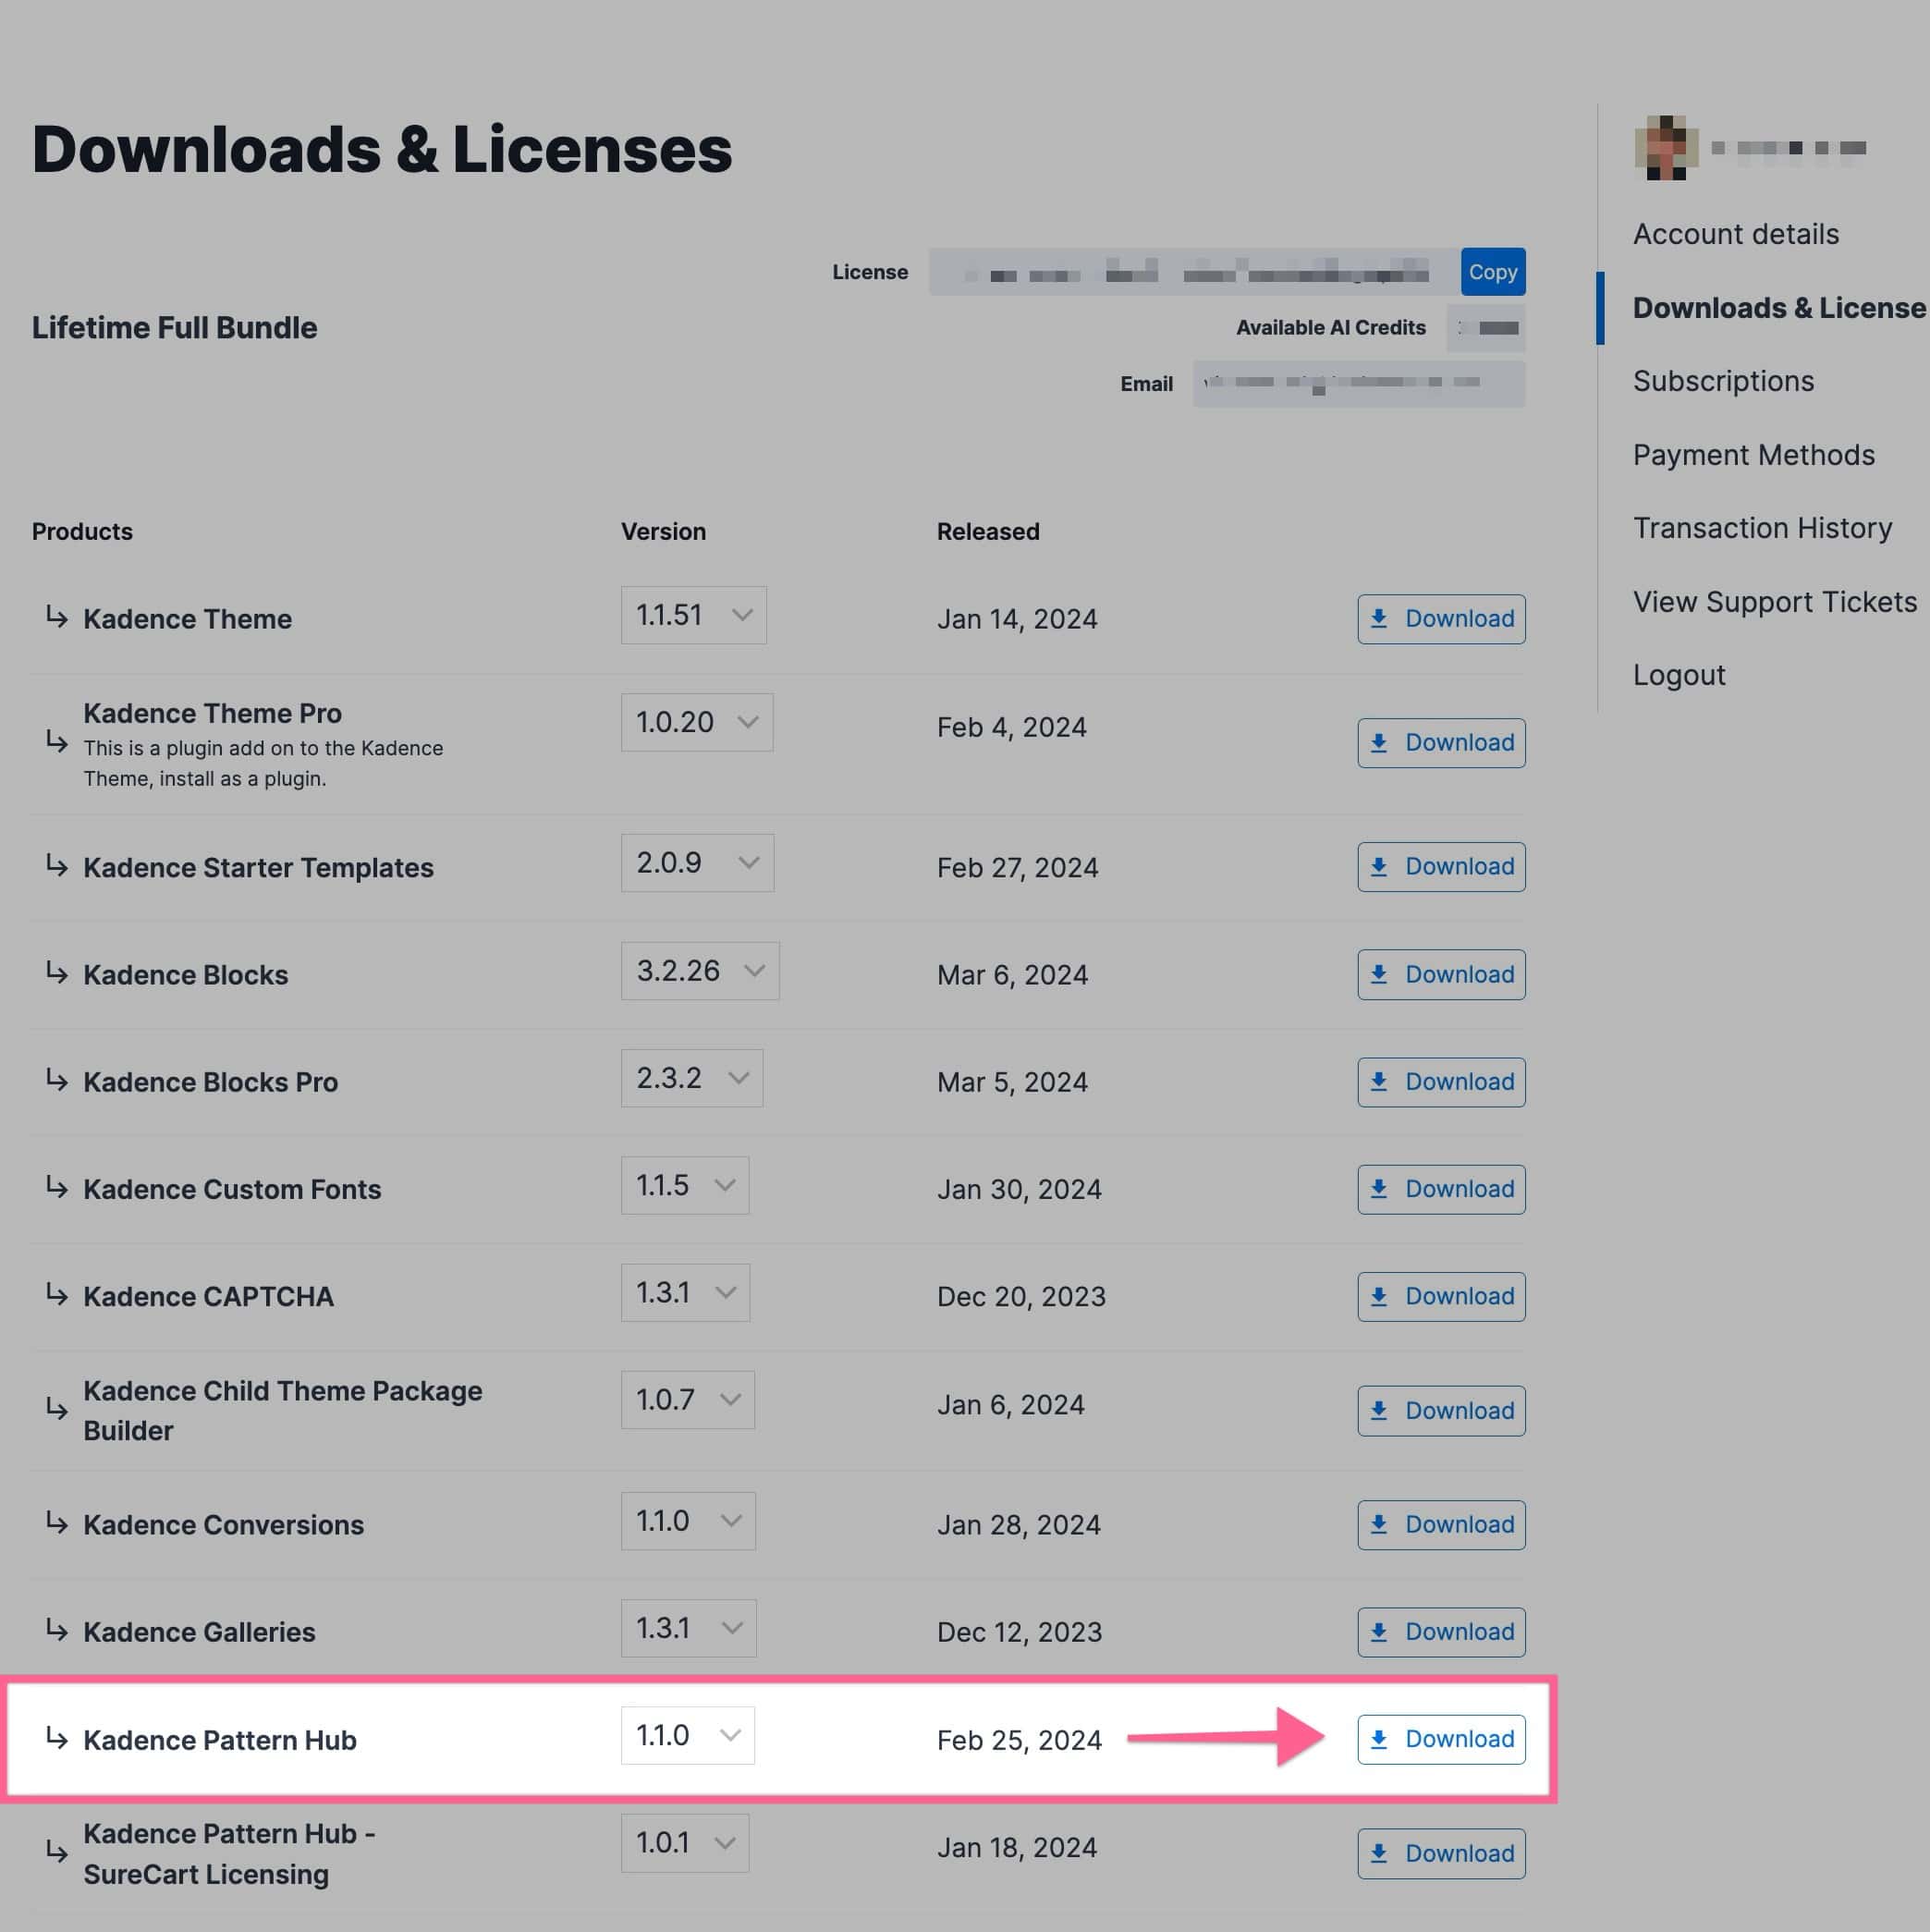
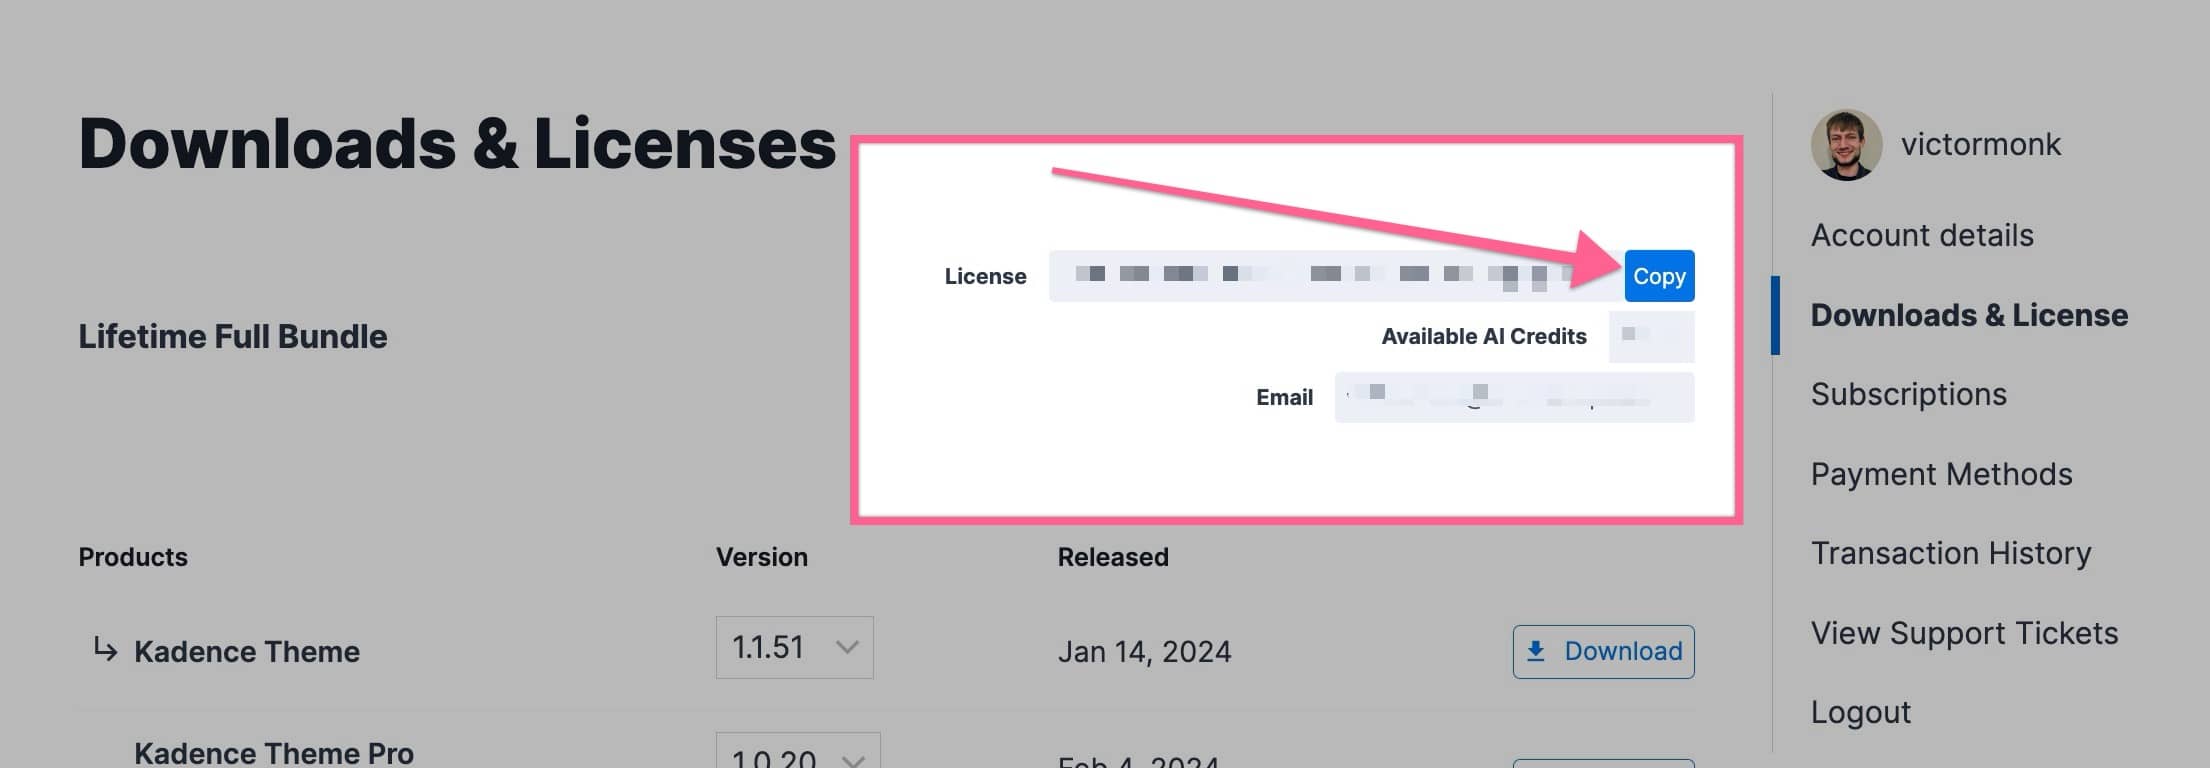
Then, click go to the Downloads & License page to access your downloadable products and Licence Key.

Download the Kadence Pattern Hub zip file to your preferred location. Keep this file compressed as a zip file (do not extract).
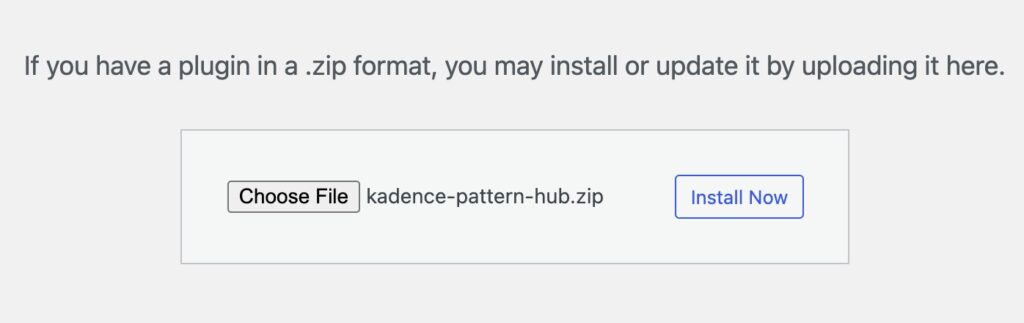
Next, navigate to your WordPress Dashboard and go to Plugins → Add New Plugin. At the top of the page, click the Upload Plugin button.

Click the Choose File button, select your Kadence Pattern Hub zip file that you previously downloaded and click the Install Now button.
After the plugin is installed, click the blue Activate Plugin button to activate your plugin. Now your Kadence Pattern Hub plugin is activated on your website, and you just need to license it.
You will get a prompt in your WordPress Dashboard that says Kadence Pattern Hub is not activated. Click here to activate. Click on the link in the prompt to get to your Kadence Pattern Hub settings.

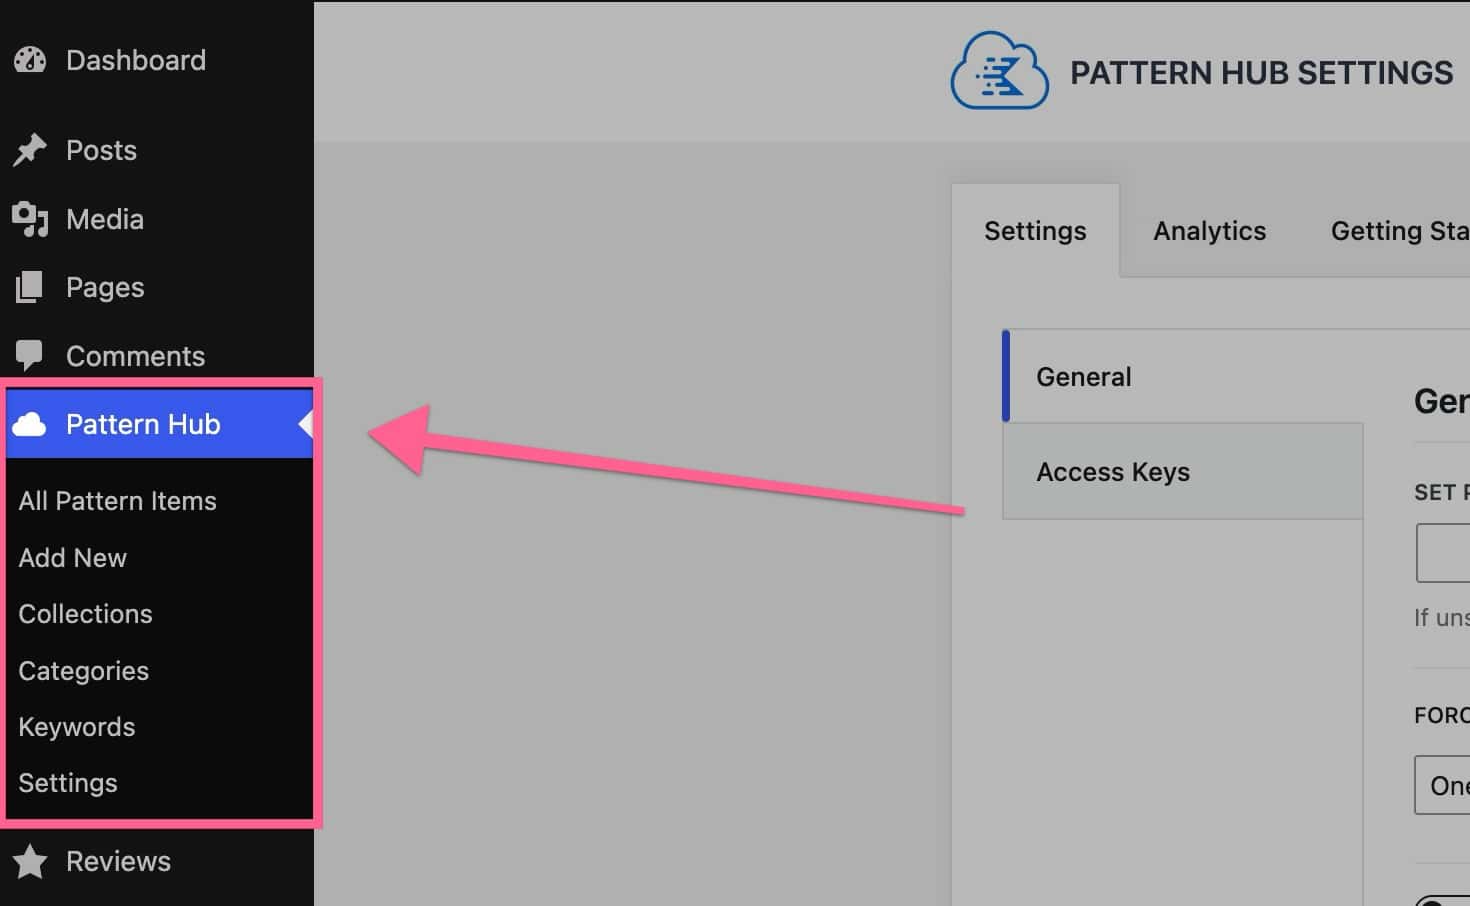
Once you click on the link, you will be brought to your Kadence Pattern Hub Settings page. If you do not get the prompt in your Dashboard, you can simply navigate to your WordPress Dashboard → Pattern Hub → Settings.
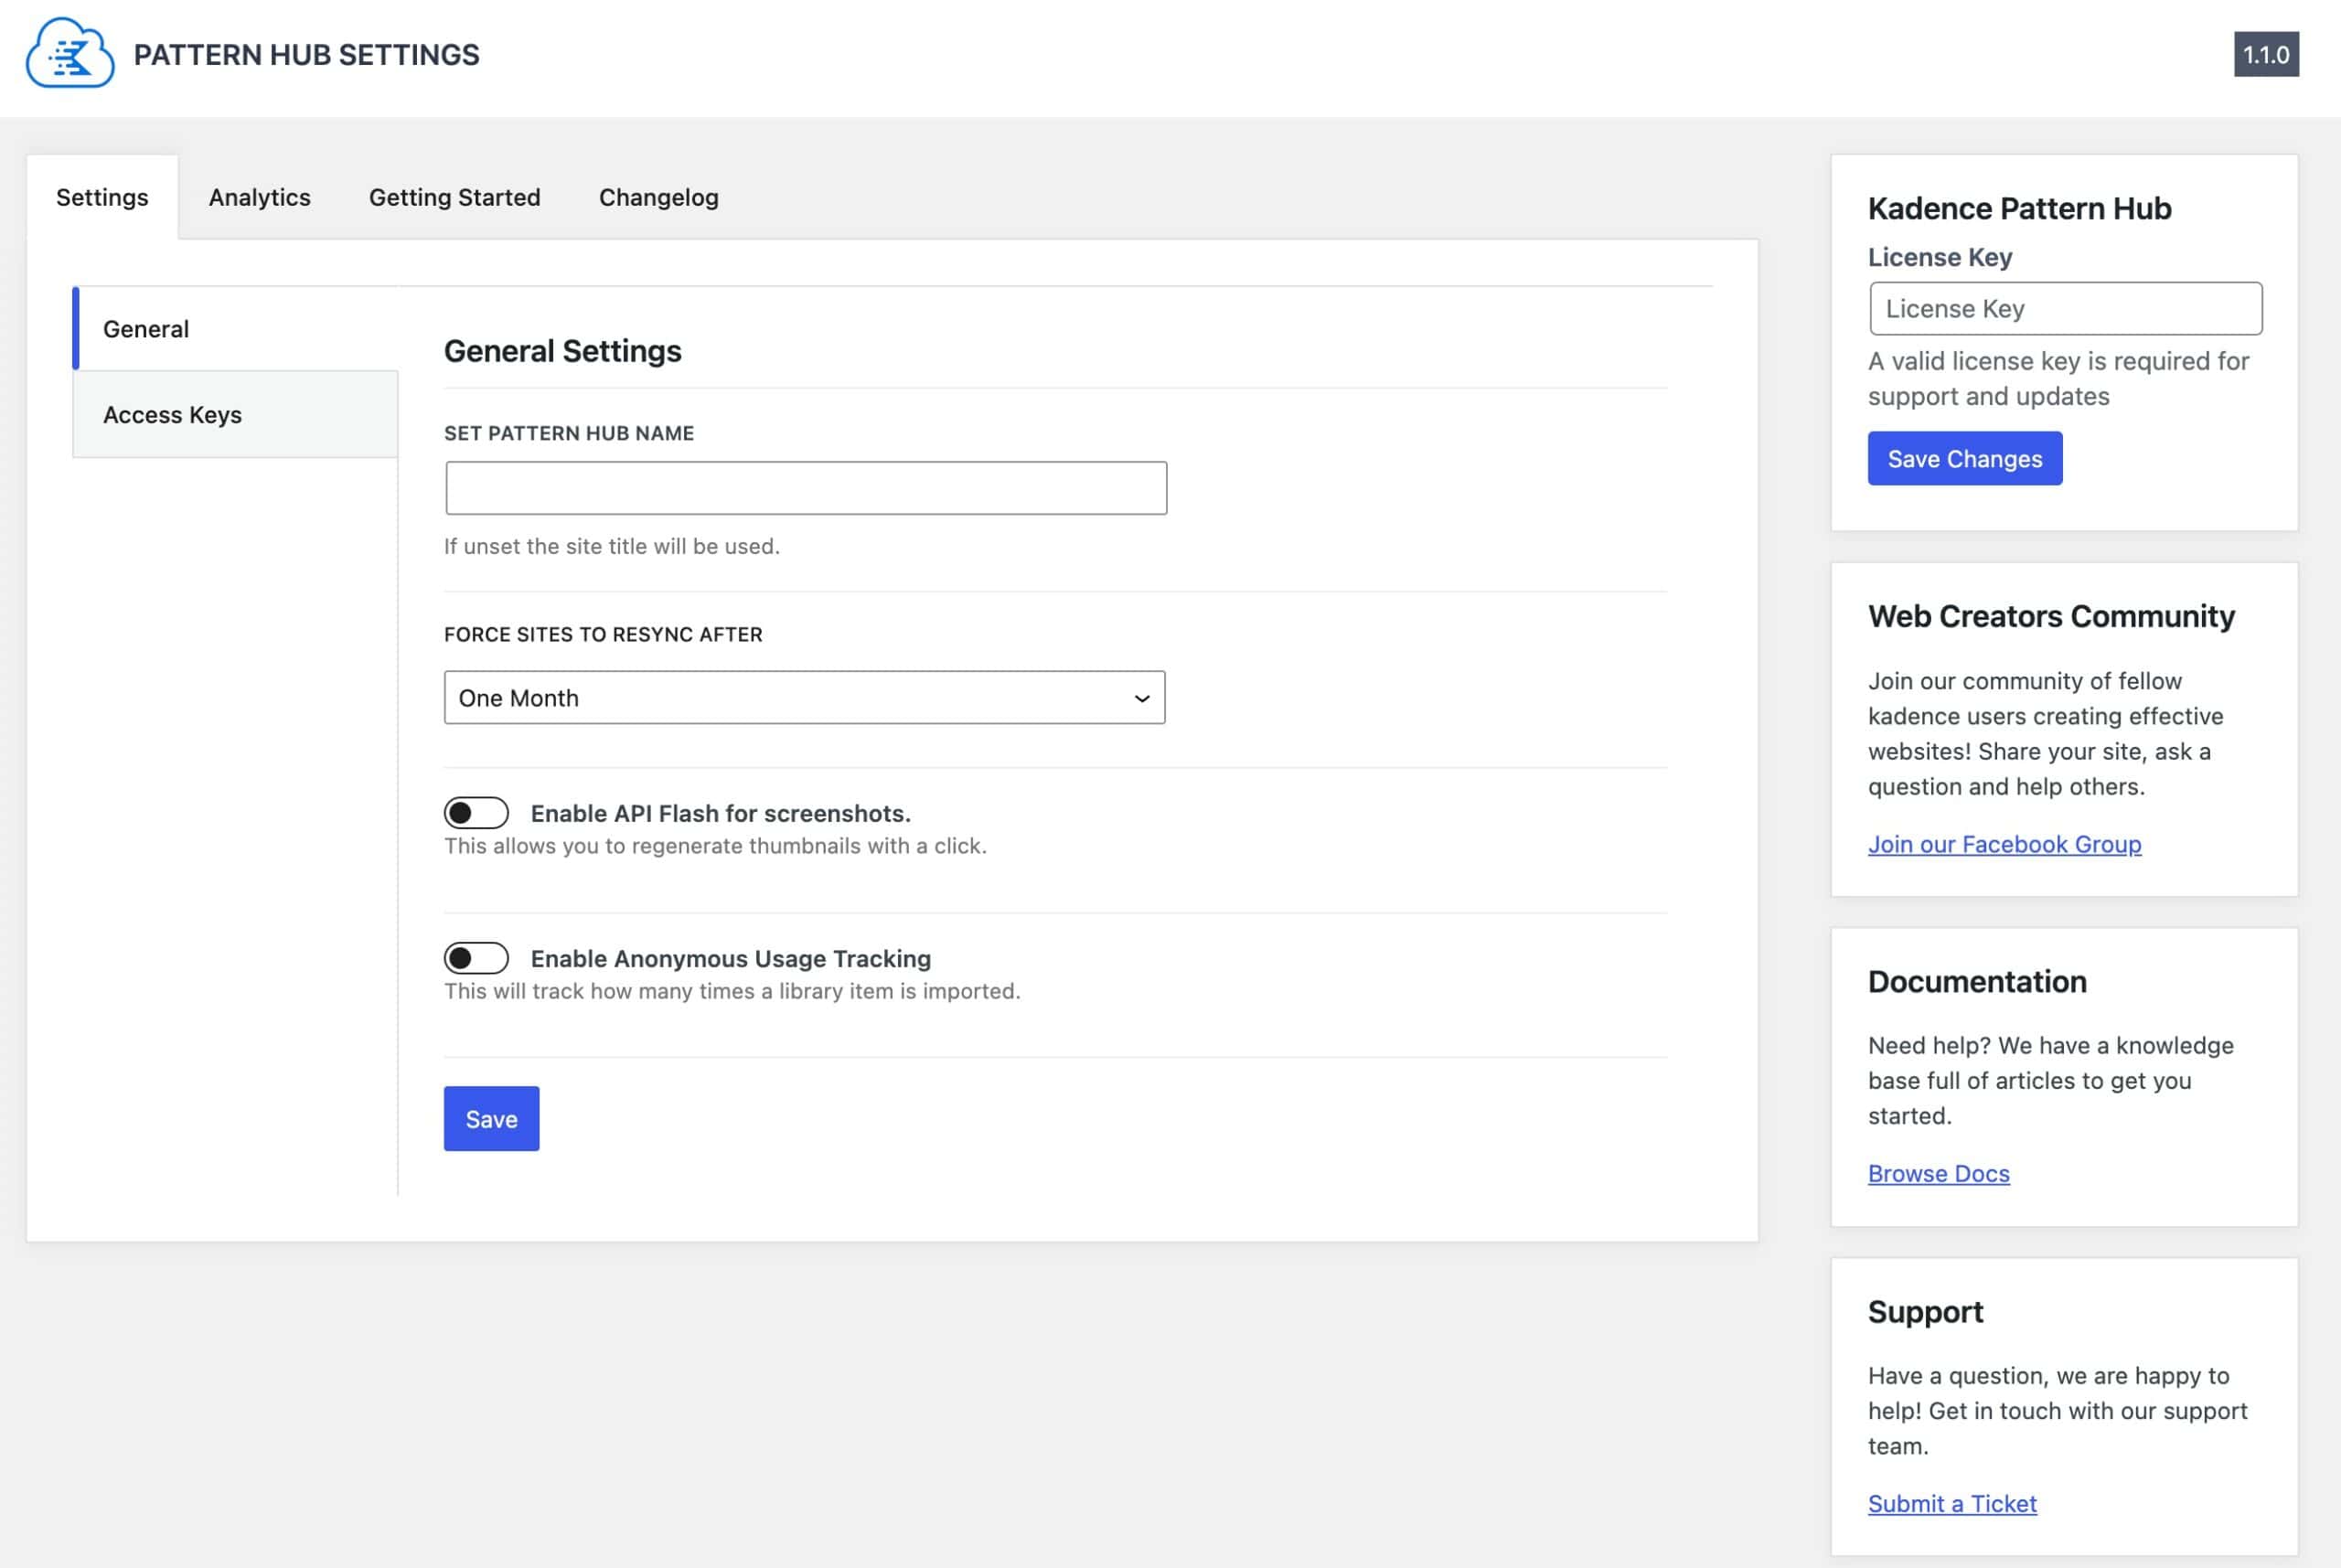
Once you are on the Pattern Hub Settings page, you can input and validate your License Key in the box to your right. To locate your License Key, go to your Kadence Account Downloads & License page. You can click on the Copy button to copy your License Key to the clipboard.
Step 2. Build your first Pattern Hub Item
Once the Kadence Pattern Hub plugin is installed and activated, you will see a new section in your admin for your Pattern Hub. You can click on the Add New option to create a new Pattern Hub item.
This will open the WordPress editor, where you can add the content you’d like to add to your pattern.
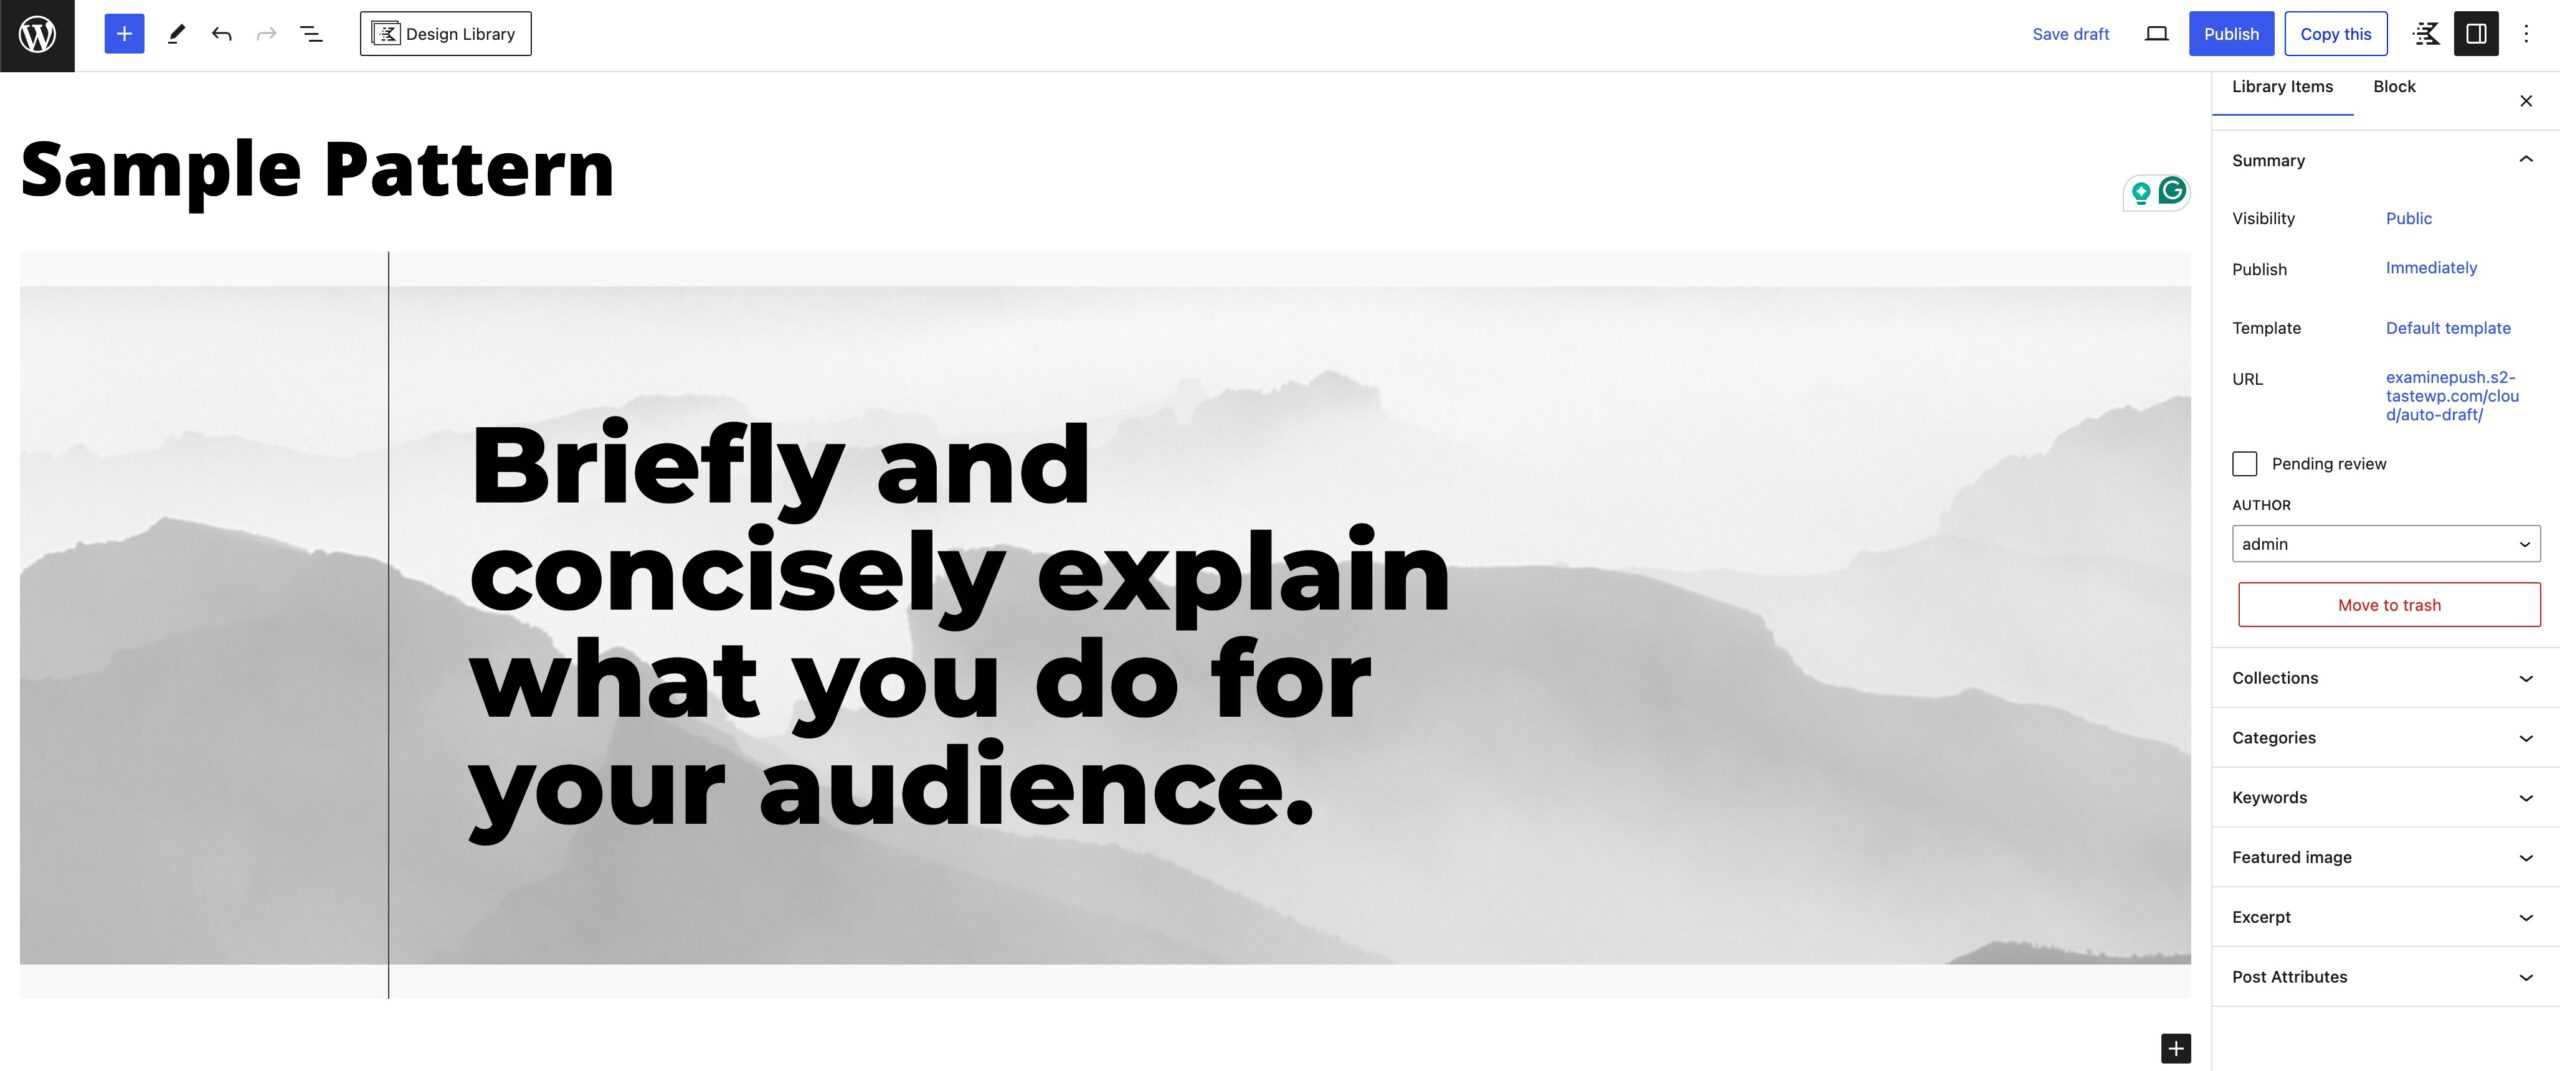
Once you’re finished creating your new pattern, you can add your preferred settings (i.e. Collections, Categories, Keywords, Featured Image, etc…) and publish it.
Step 3. Pattern Hub Settings
Under the Pattern Hub menu in your WordPress Dashboard, you will notice the Settings option. This will bring you to your main Settings Page.
On the main Settings page, you can set your Pattern Hub Name. This is the Pattern Hub name that will appear on your client sites. You can also set the amount of time you’d like it to take before sites are forced to resync to your Pattern Hub.
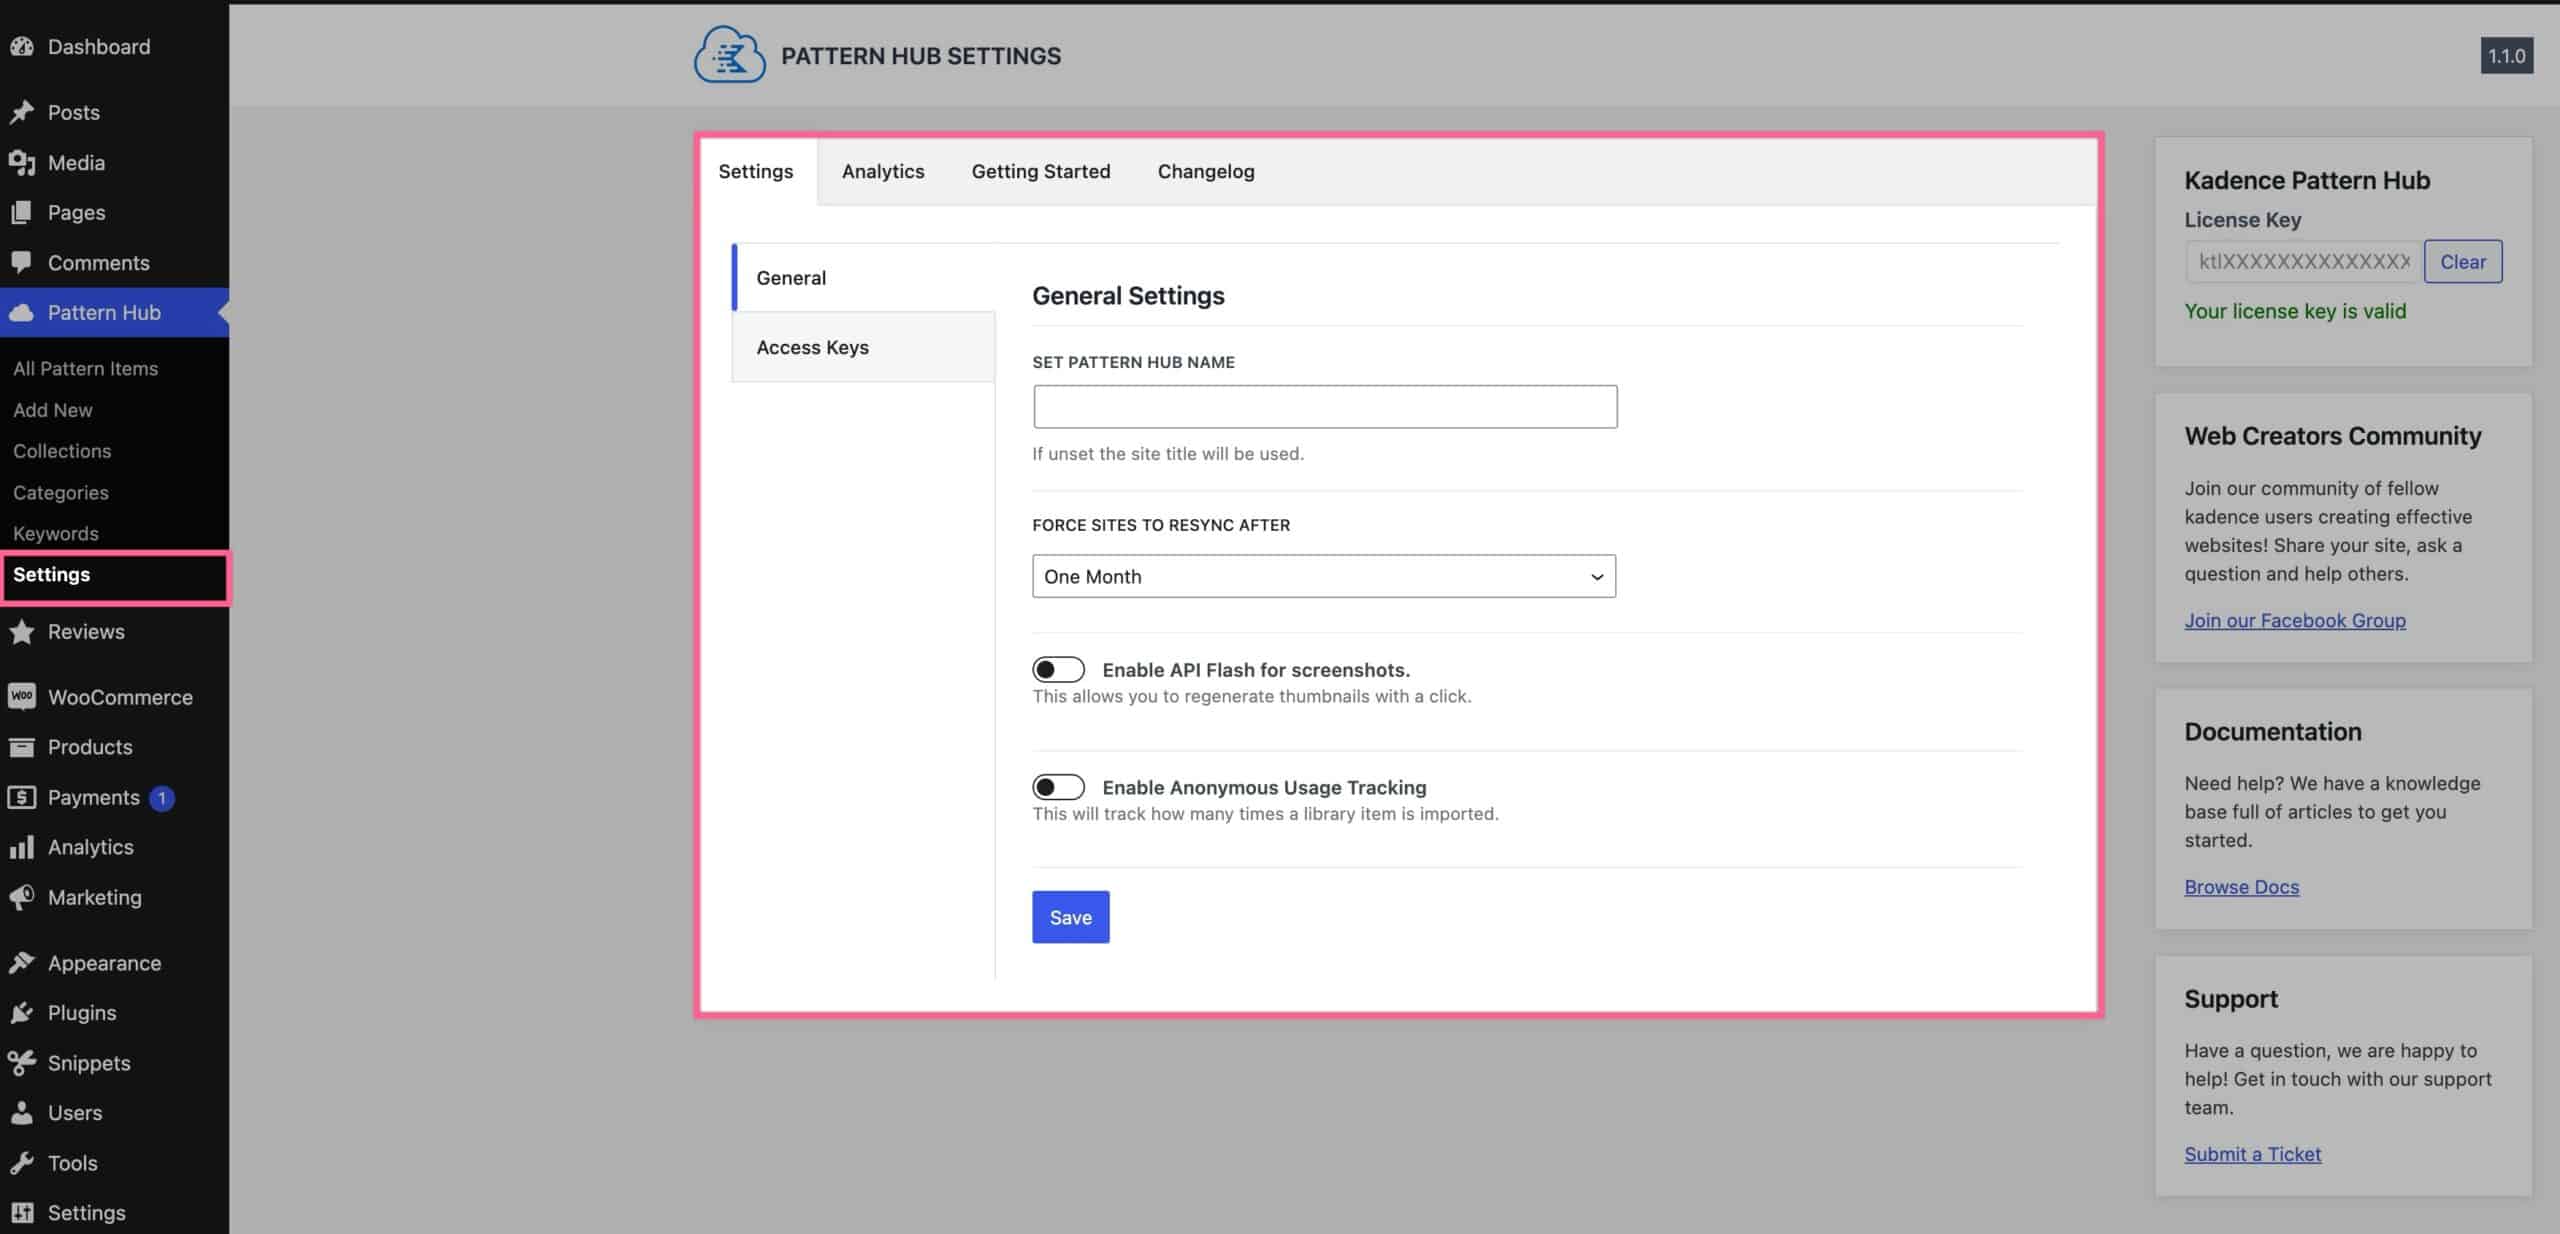
The Enable API Flash For Screenshots option allows you to regenerate thumbnails with one click. You can view the next step for how this is set up and used. The Enable Anonymous Usage Tracking option allows you to track how many times a library item is imported. This tracking information would appear in the Analytics tab.
Be sure to click the Save button to save your changes.
Step 4. Generate Thumbnails
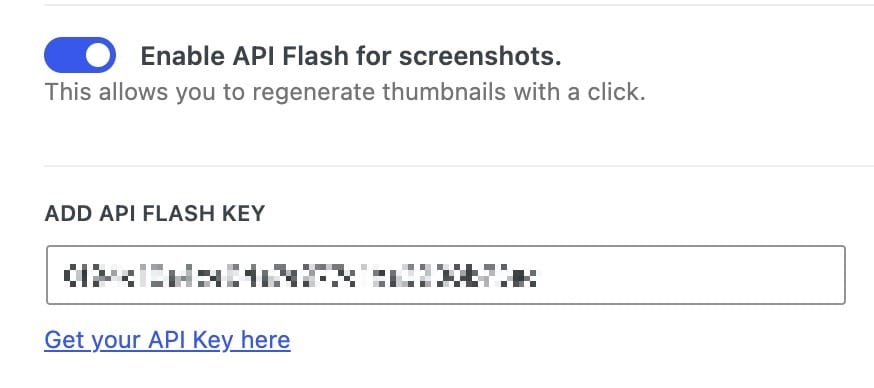
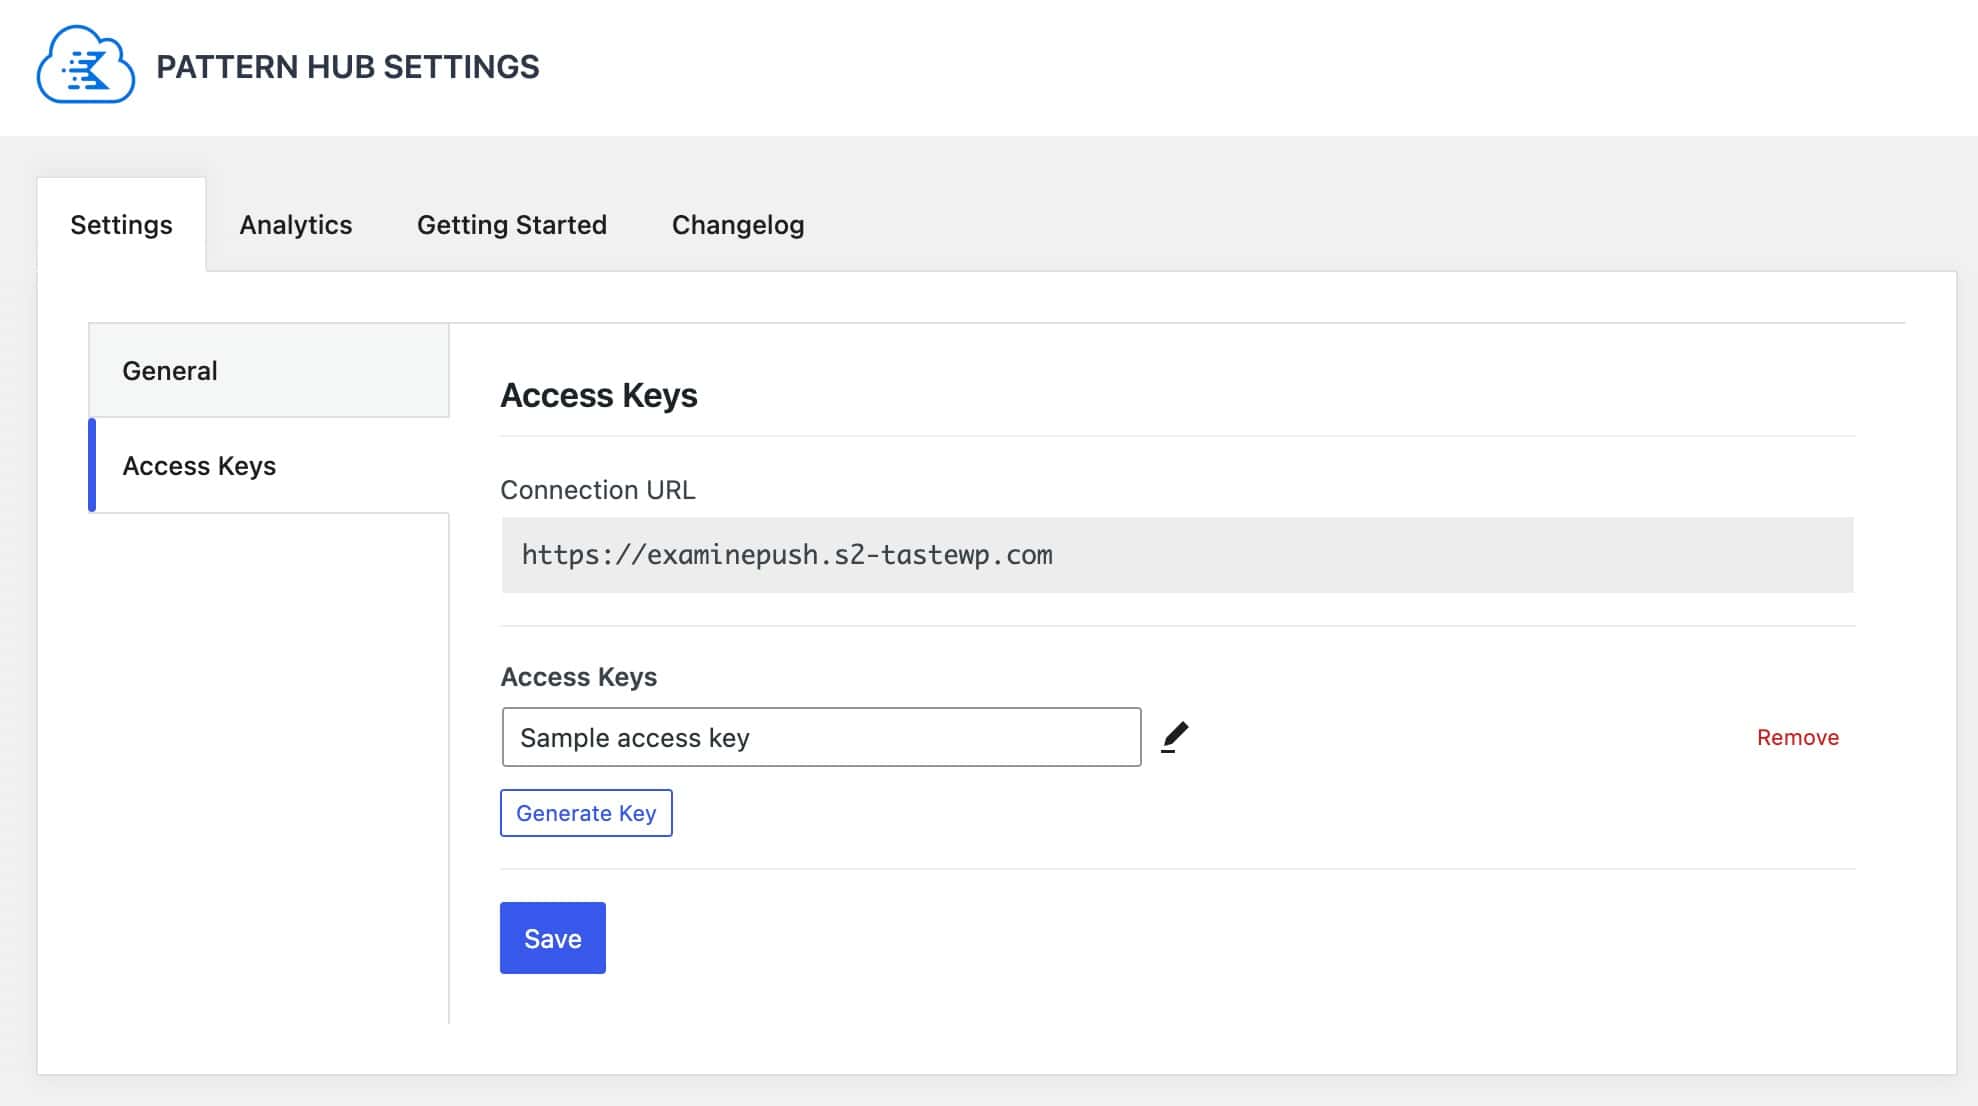
You can easily generate thumbnails with one click using API Flash. In your Pattern Hub Settings, you can enable the option to Enable API Flash. Then, you can set up an account here. Once you have an account, you can go to the Access Keys page in your API Flash Account and copy your Access Key over to your Pattern Hub Settings.
Once you’ve added your API Key for Flash, you can navigate to your Pattern Hub → All Pattern Items. You will see the Generate thumbnail option for each Pattern Hub Item. Click on the Generate Thumbnail link to automatically generate a thumbnail for the Pattern Hub Item.
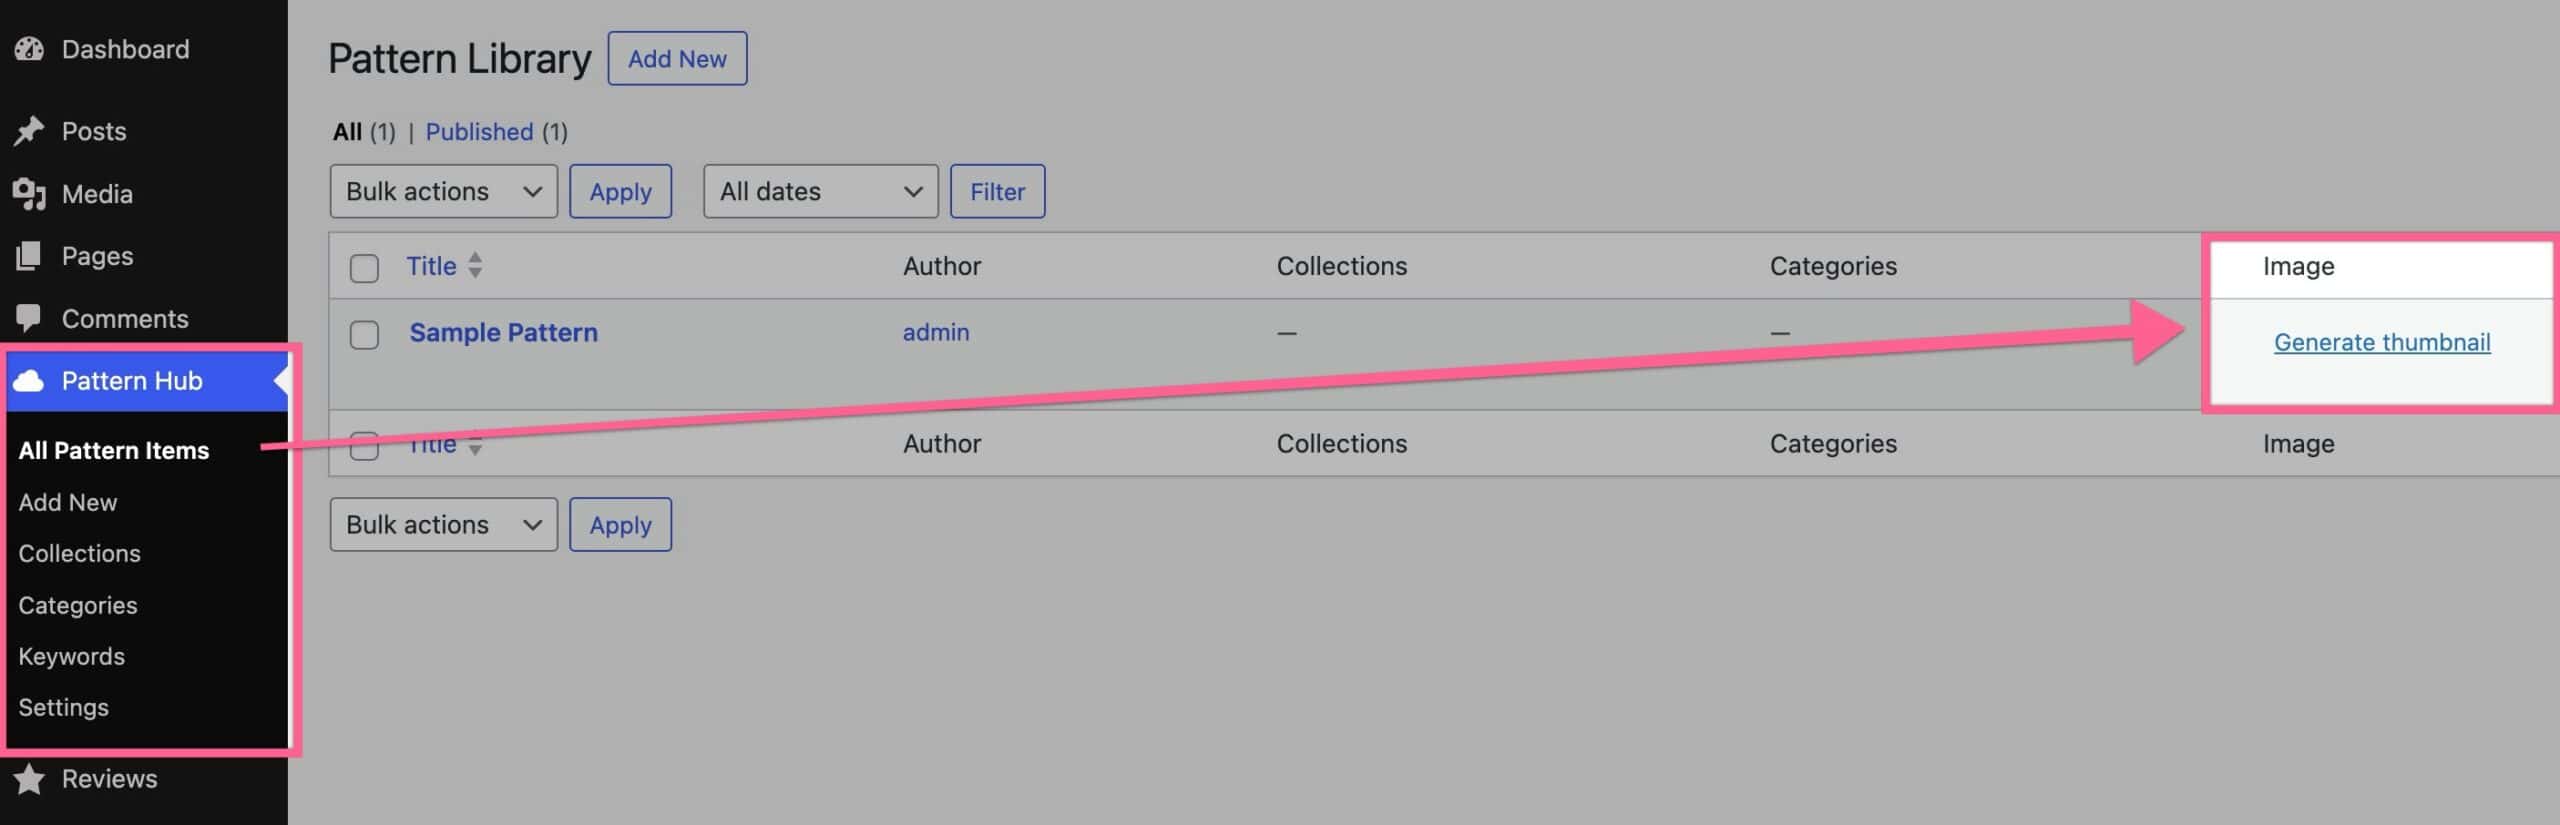
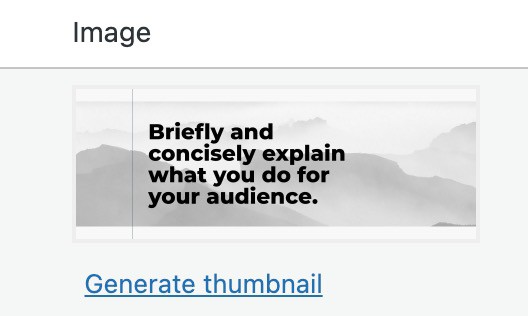
Note: If you prefer to create your own thumbnails, you can upload your custom thumbnail using the featured image section in the sidebar of each pattern.
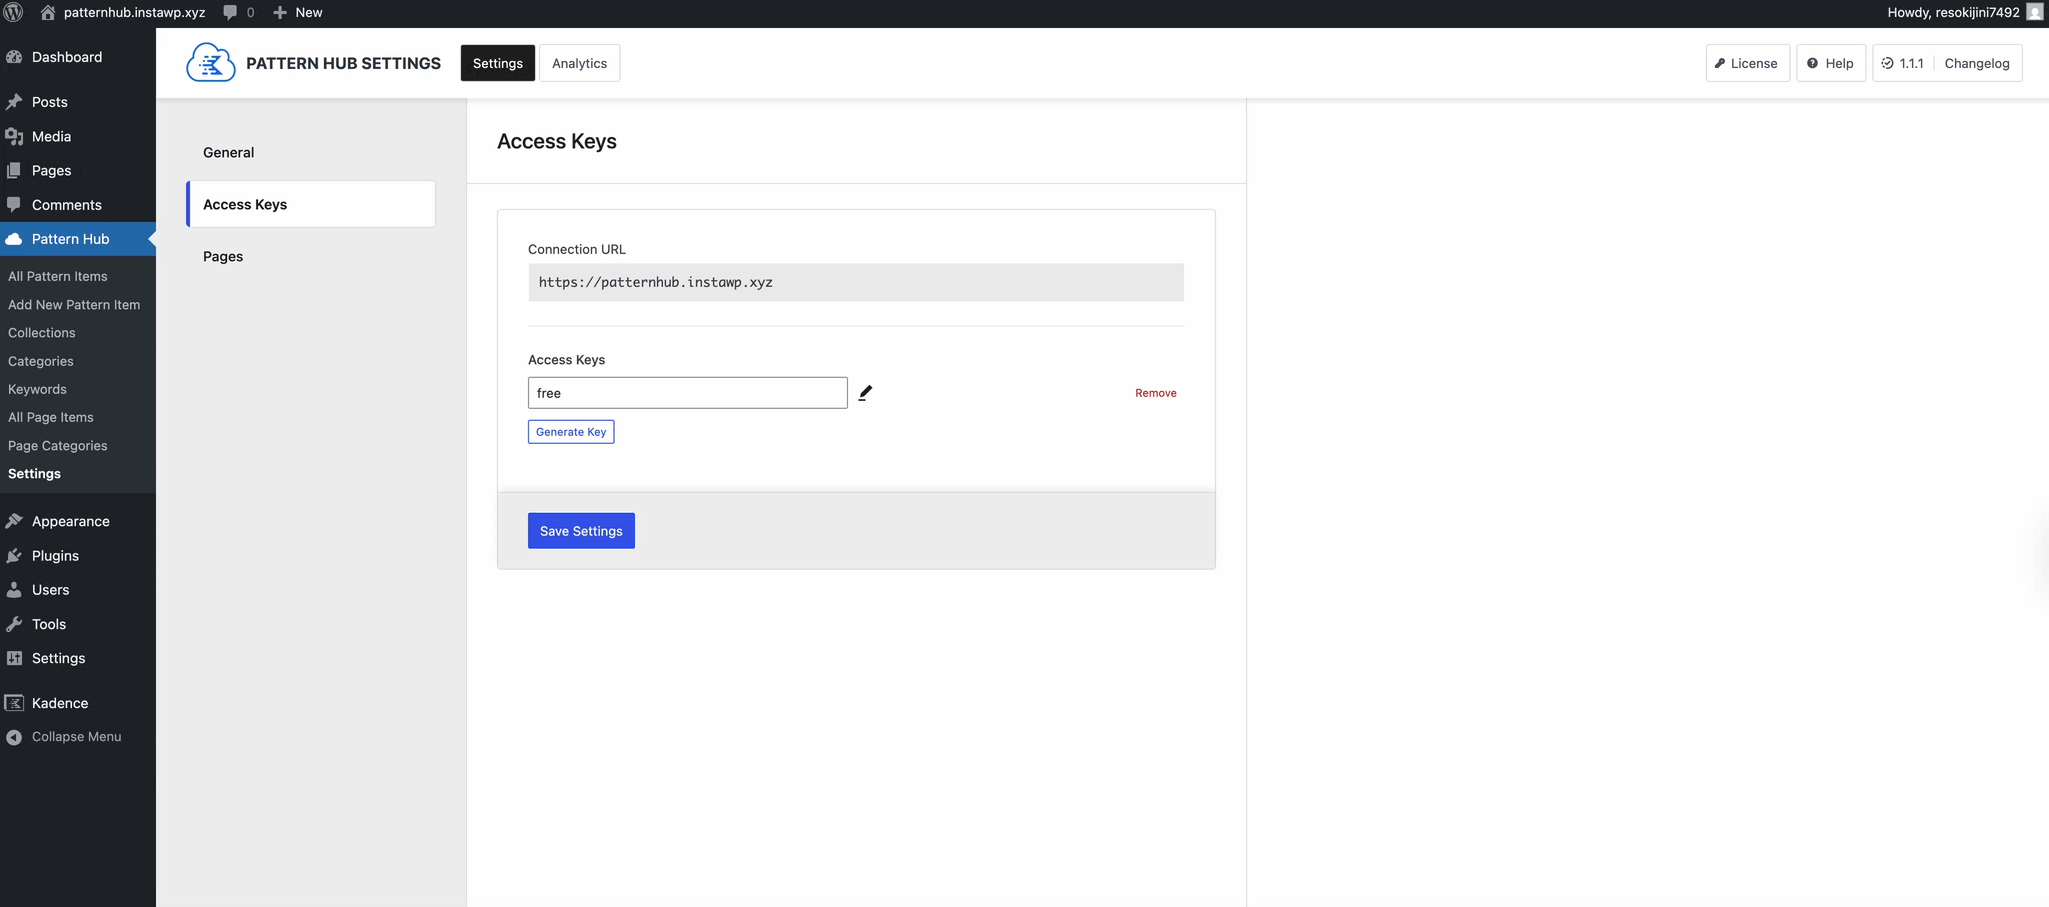
Step 5. Generate Library Access Keys
Now that you have your library created and thumbnails generated, it’s time to generate some access keys for you to use. Go to your Pattern Library → Settings → Access Keys. Here, you can generate a new Access Key for your Pattern Hub. You can generate a new key by pressing the Generate Key button. or you can modify the Access Key by clicking on the pencil icon next to it. You can also remove Access Keys by clicking the red Remove text.
Step 6. Creating and Assigning Pattern Hub Collections
By default, when you generate an access key, it gives access to all Pattern Hub items. But sometimes, you might want to give access to just a specific group of patterns; this is where Collections come into play.
A Collection is like a tag you can apply to any Pattern Hub Item or Page Item. Once items are grouped into Collections, you can choose which ones to include when creating an access key. This gives you the flexibility to share just the right content with the right keys.
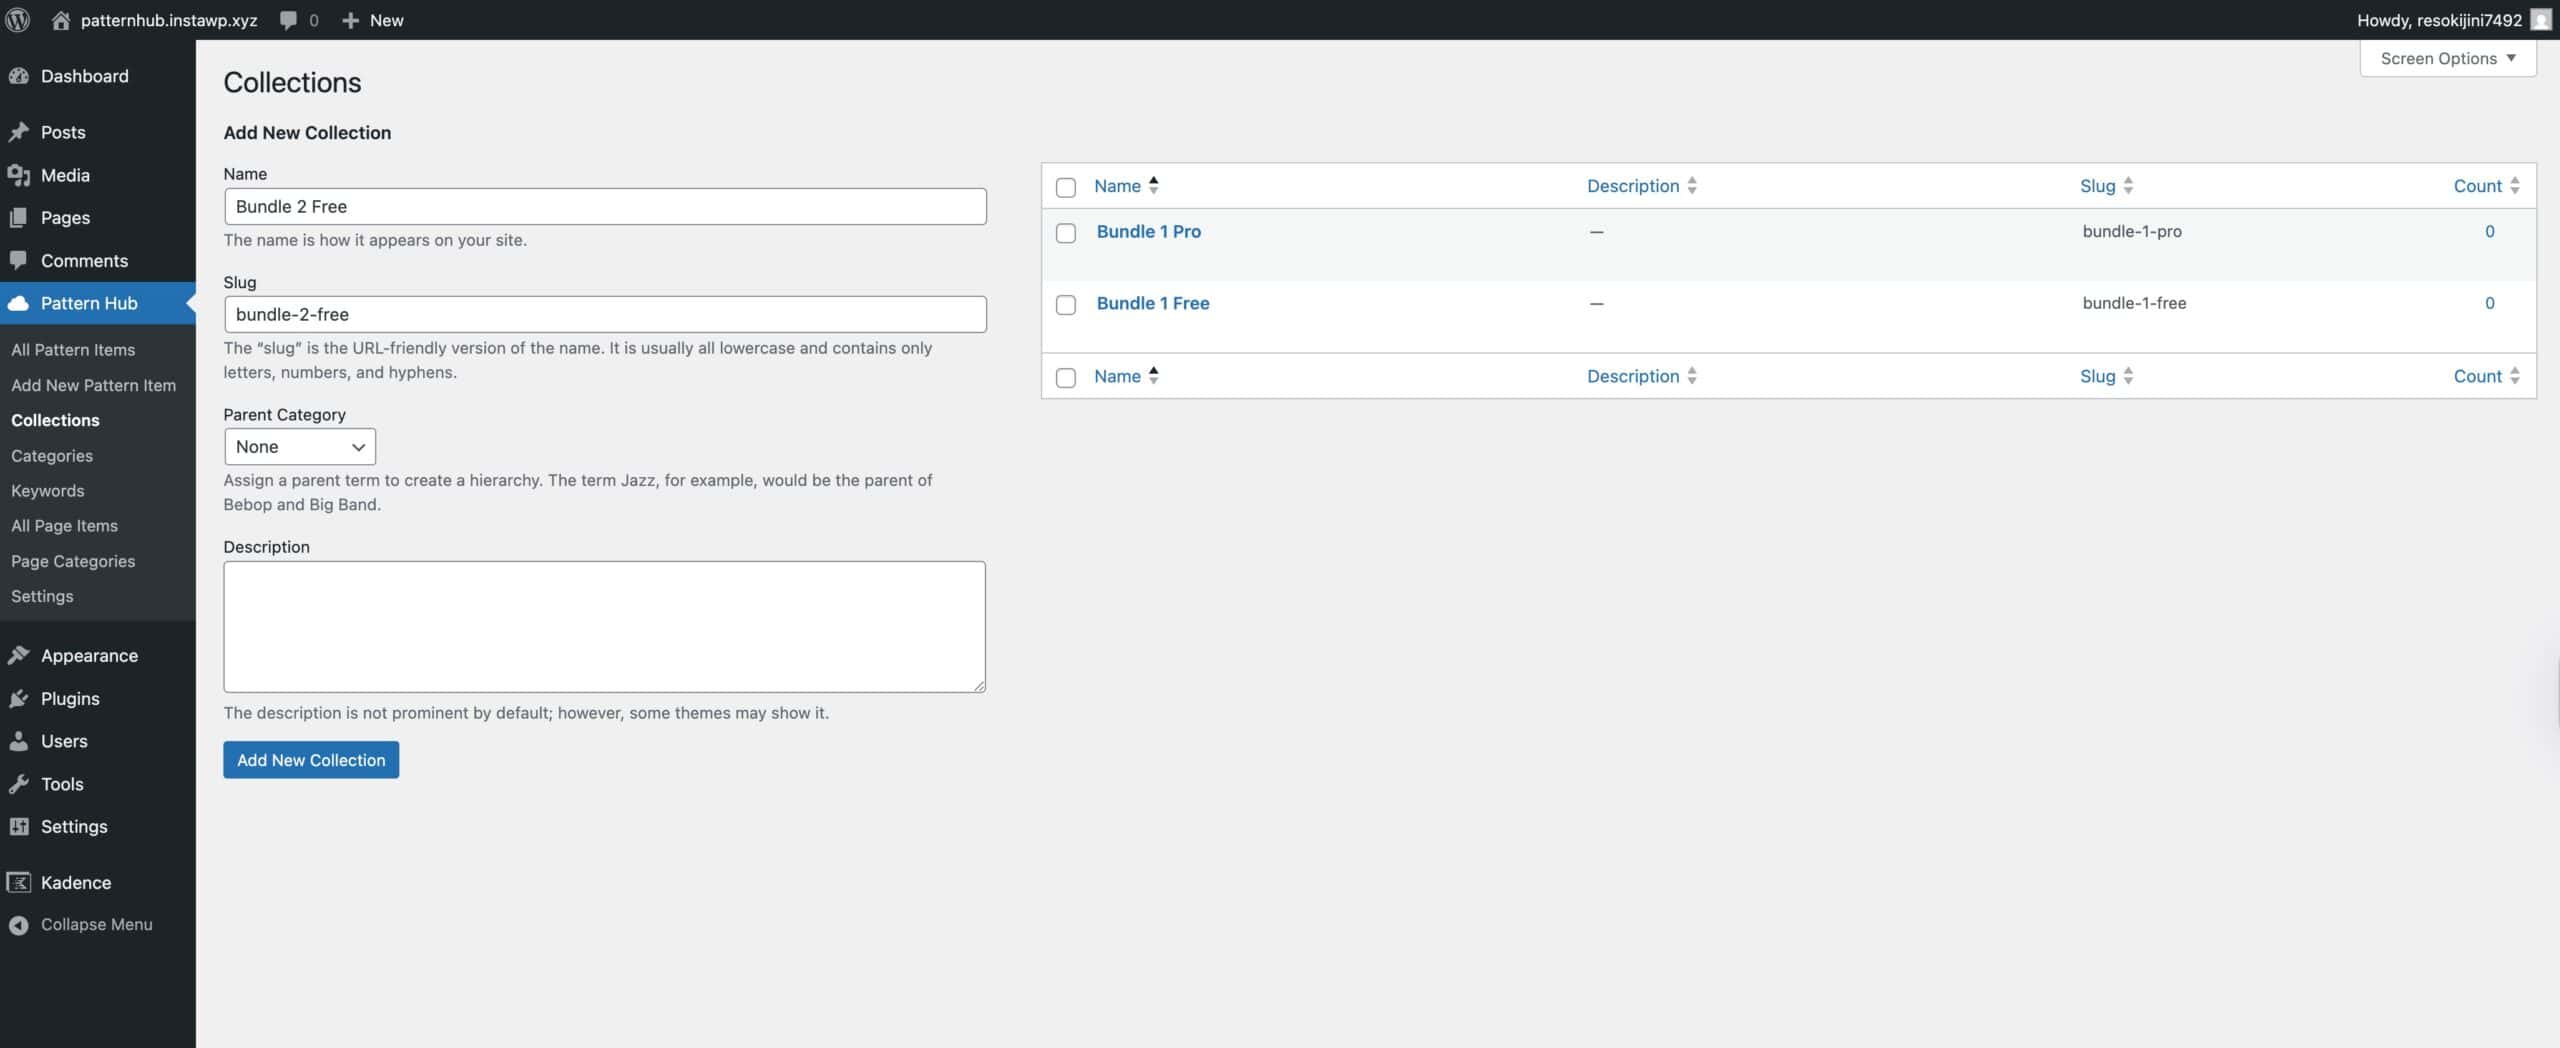
To get started, go to your WordPress Dashboard and navigate to the Pattern Hub → Collections page. From there, you can create new Collections.
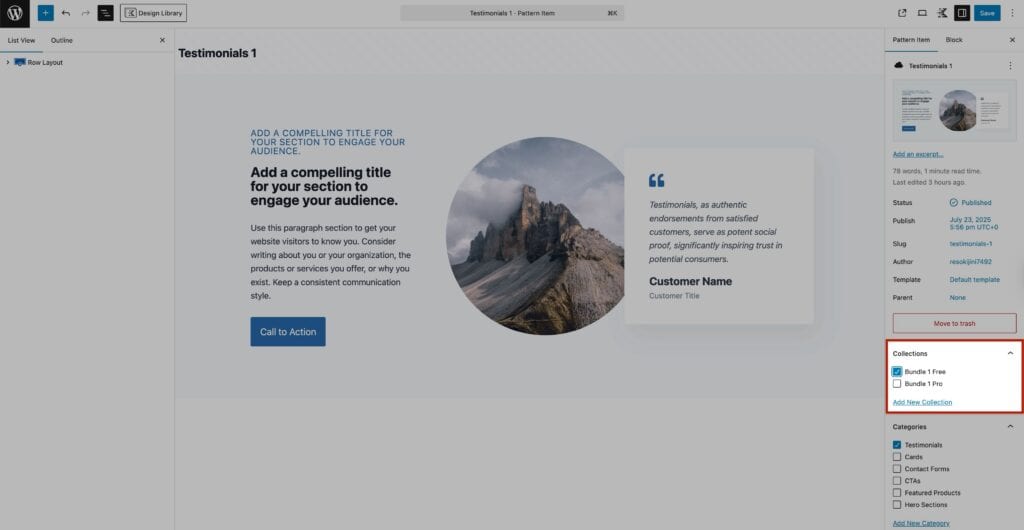
To add a Pattern to a Collection, when editing a Pattern Hub Item or Page Item, you’ll see the option to assign one or more Collections to that item.
To assign Collections to an Access Key, edit a Pattern Hub access key and click on the pencil icon to edit the Collection details. Here, you can choose the specific Collection(s) you want that key to provide access to.
Step 7. Connect to your Pattern Hub
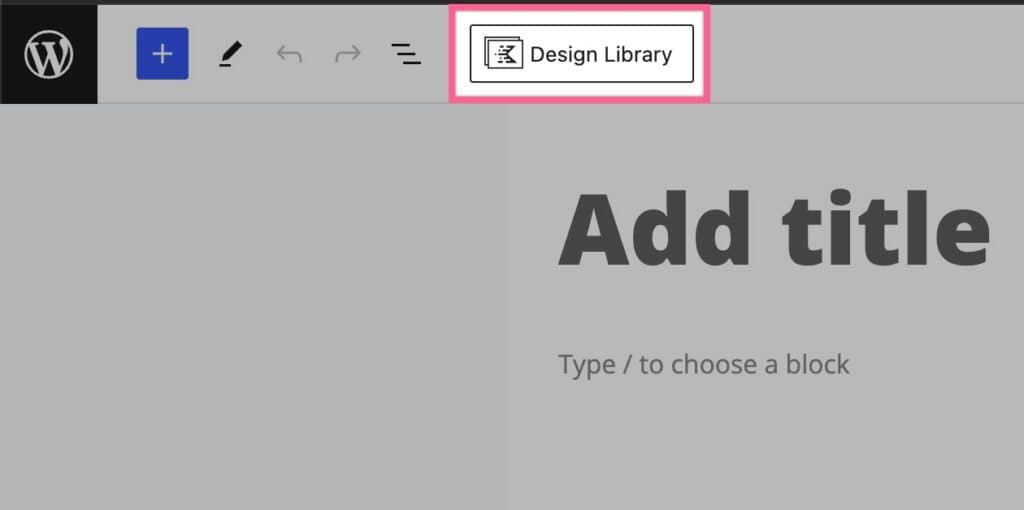
From a different WordPress website, log into the Admin Dashboard. Ensure the website has the Kadence Blocks plugin installed (it’s free). Then, open a page or post where you would like to drop in your Pattern Hub Items. Click the “Design Library” button at the top of your editor.
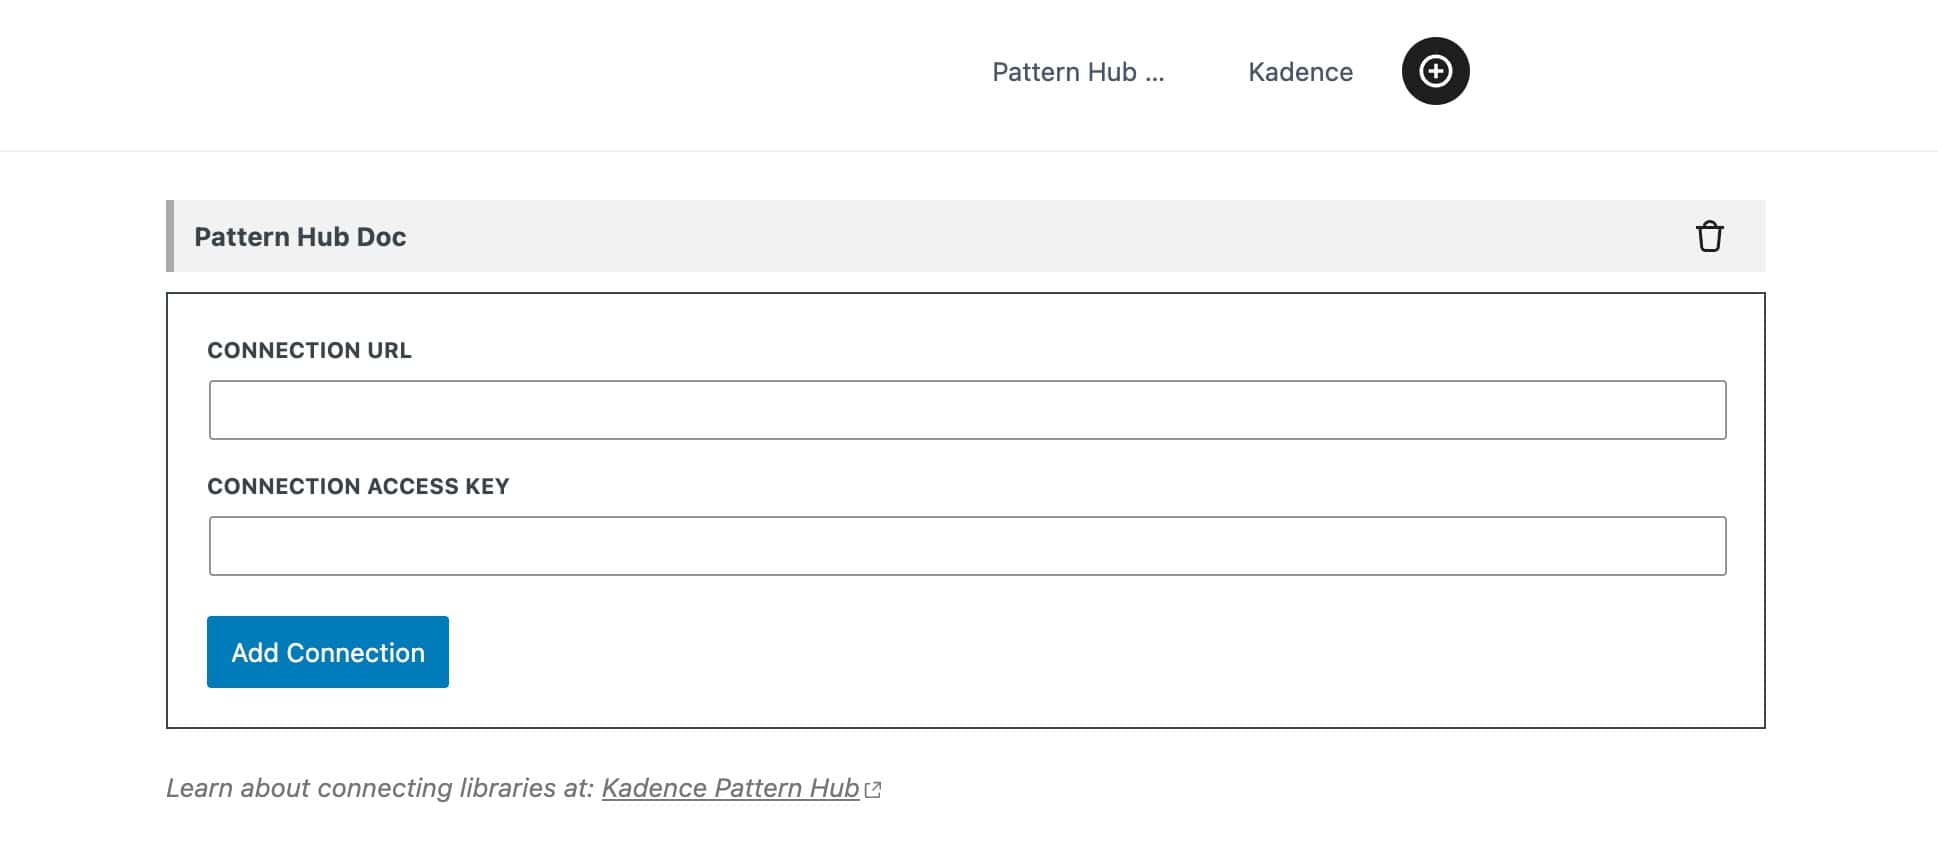
You should see a Kadence Tab. Next to that is the plus (+) icon, click that to add a new connection. On the new connection tab, enter your connection URL (i.e. the URL of your Pattern Hub website) and Access Key and click the add connection button.
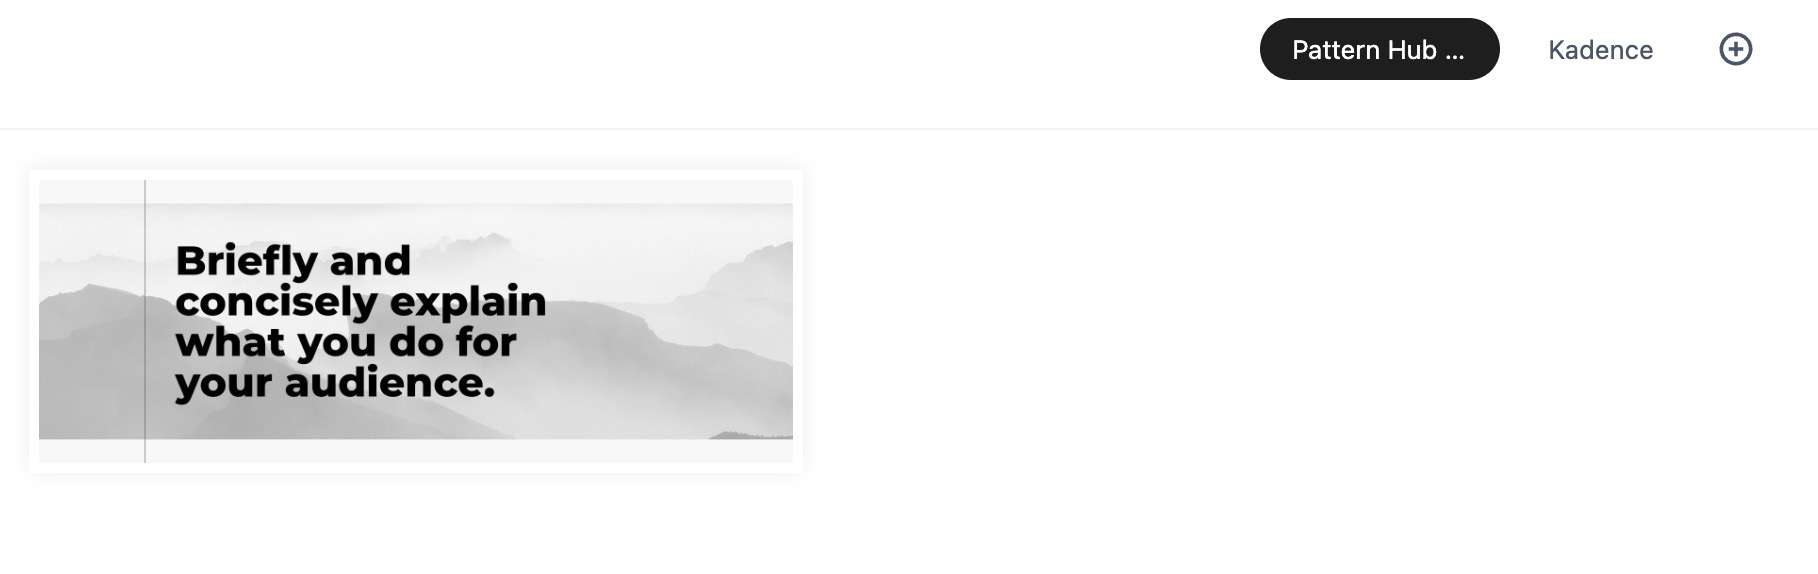
Once you’ve add your connection, you will have a new tab for that Pattern Hub. Now, you will be able to import the created Pattern Items directly to your page by clicking on them in the Design Library.
Removing a Pattern Hub
To remove a Pattern Hub from your library, click the plus (+) icon as if you were adding a new Pattern Hub. You will see all connected Pattern Hubs listed above the Add Connection form. Simply click the trash icon next to the hub you wish to delete.
Pattern Hub and Website Indexing
By default, Pattern Hub Items will have a front end URL that can be indexed. This is required functionality for some features, such as Screenshot Images of the Pattern Hub Items. If you would like to prevent Pattern Hub Items from being indexed, you can use an SEO plugin or a custom code snippet.
Most SEO plugins allow you to prevent specific post types from being indexed. If you’re using an SEO plugin such as Yoast SEO or Rank Math, review the plugin’s settings and set the Pattern Hub post type to not be indexed. This will prevent the Pattern Hub URLs from being indexed by search engines like Google, Bing, etc.
Another option is to use a custom code snippet. This can be done using a plugin like Code Snippets or WPCode. You can add the following code snippet to your website to prevent Pattern Hub URLs from being indexed.
/**
 * Make sure pattern hub can't be accessed directly from non-logged in users.
 */
function custom_patternhub_single_only_logged_in_editors() {
	if ( is_singular( 'kadence_cloud' ) && ! current_user_can( 'edit_posts' ) ) {
		wp_redirect( home_url( '/' ), 301 );
		die;
	}
}
add_action( 'wp', 'custom_patternhub_single_only_logged_in_editors' );
How to Remove Pattern Hub Items From Your Sitemap
If you’re using an SEO plugin such as Yoast SEO or Rank Math, check with your plugin documentation to find out how to remove custom post types from your sitemap. To remove Pattern Hub Items from your default WordPress sitemap.xml file, you can use the following PHP snippet:
add_filter( 'wp_sitemaps_post_types', function ( $post_types ) {
	unset( $post_types['kadence_cloud'] );
	return $post_types;
});
How to Disable the WordPress sitemap.xml
If your Pattern Hub is hosted on a dedicated site (i.e. no other content or functionality beyond Pattern Hub), you may want to consider disabling the WordPress sitemap functionality altogether. To do so, add the following PHP snippet:
add_filter( 'wp_sitemaps_enabled', '__return_false' );