
Kadence makes it easy to turn your WordPress website creations into importable child themes. Similar to our Starter Templates process, Kadence Child Themes can be imported via the AI-Starter Templates by Kadence plugin. Allowing you to import essentially entire websites. This includes customizer settings, free plugins, pages, taxonomies, etc.
The Kadence Child Theme Builder plugin is a premium plugin that is only available in our Ultimate or Ultimate Lifetime plans. Click here to view our pricing.
Requirements to export a Child Theme:
- The website that is being exported must use the Kadence Theme.
- If you want to export a regular Child Theme that doesn’t import through the Starter Templates plugin, leave the Demo Config and Pattern Hub Config information empty when generating a Child Theme. This will generate a regular Kadence Child Theme.
Requirements to import a Child Theme with Starter Templates:
- The Kadence Parent Theme must be installed on the website.
- The AI-Starter Templates by Kadence plugin must be installed and activated on the website.
- Must fill out the Demo Config plugin settings for the Child Theme Builder Plugin.
Requirements for Premium Plugins:
- If a Child Theme uses Premium Kadence Products, the user who imports the Child Theme should have the premium plugins pre-installed, pre-activated, and pre-licensed on the website before importing the Child Theme. This will ensure the pro contents are properly imported.
- The same goes for 3rd Party Premium Plugins. The user who imports the Child Theme should complete the process of installing, activating, and licensing their 3rd party premium plugins before importing the Child Theme.
Installing Kadence Child Theme Builder
Installing the Kadence Child Theme Builder plugin is easy. Just follow the steps below to get started.
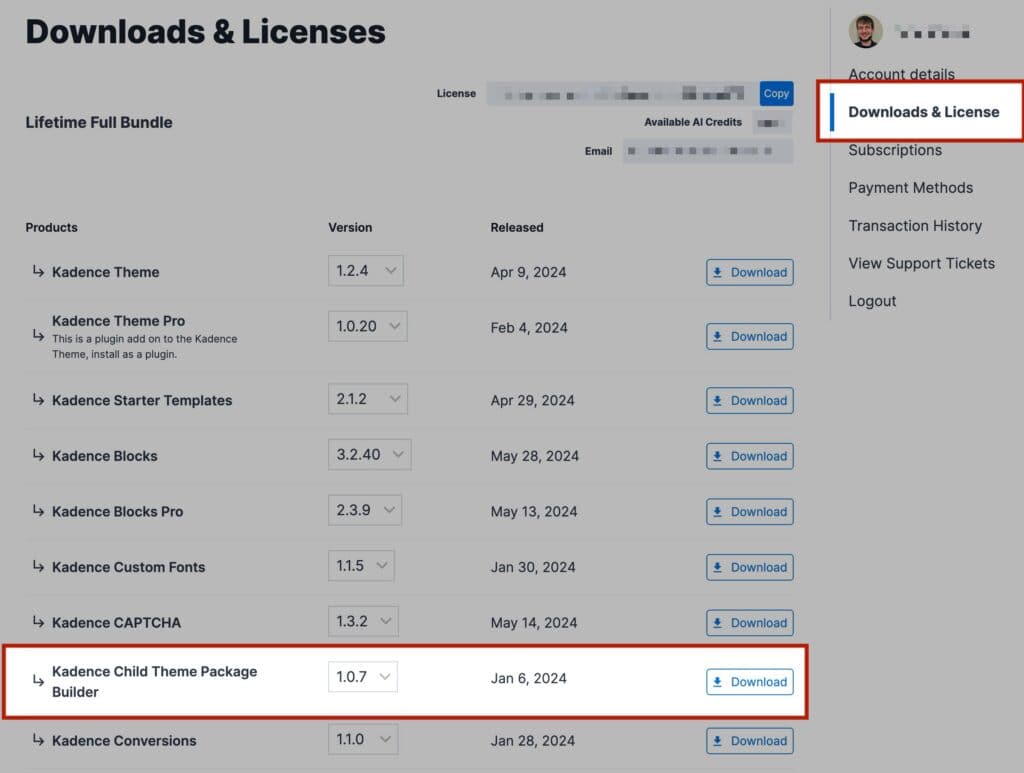
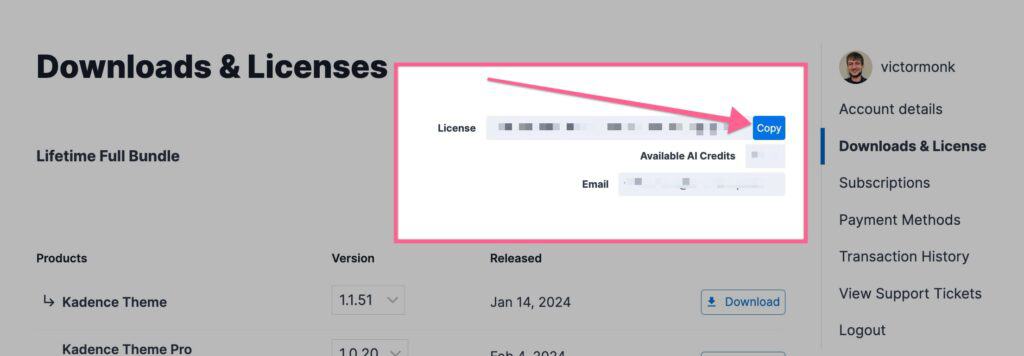
Once you have access to the Kadence Child Theme Builder plugin, you can download it from your Kadence Downloads & License page.
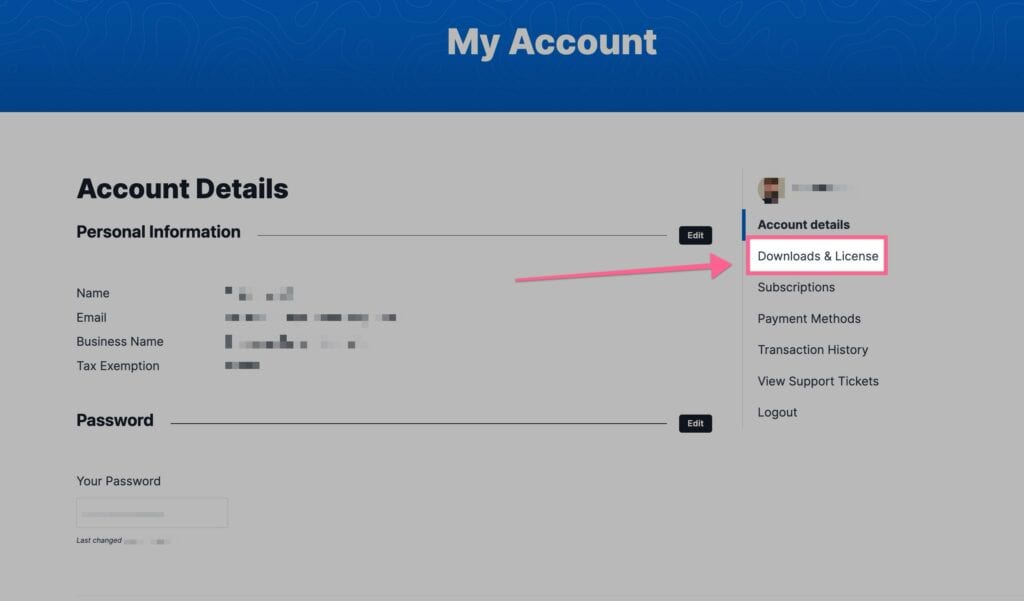
You will see Kadence Child Theme Package Builder listed in your Products list. You can click on the Download button to download the Kadence Child Theme Builder Zip. Be sure to leave the file compressed and don’t unzip it.
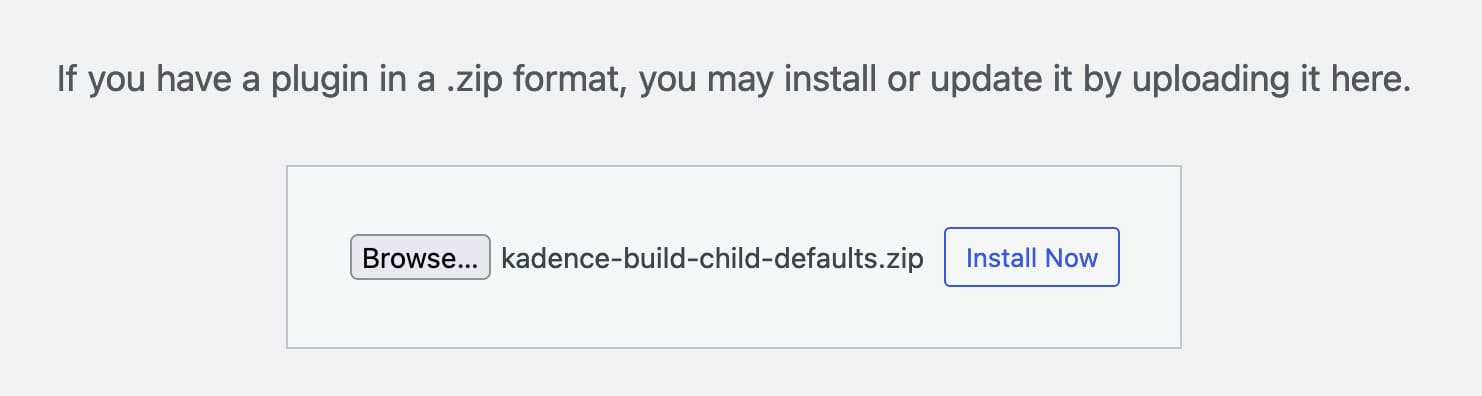
Next, navigate to your WordPress Dashboard and go to Plugins -> Add New Plugin. At the top of the Add New Plugin page, click on the Upload Plugin button.

Click on the Choose File button, select the Kadence Child Theme Builder Zip file and click the Install Now button.
Once the plugin is installed, click the blue Activate Plugin button to activate your plugin. Now your Kadence Child Theme Builder plugin is activated on your website. You must now license your plugin.
Licensing Kadence Child Theme Builder
Once you activate the Kadence Child Theme Builder plugin, you will get a prompt in your WordPress Dashboard that says The following plugins have not been activated: Kadence Child Theme Builder. Click here to activate. You can click on the link in the prompt to get to your Kadence License Activation page.

Once you click on the link, you will be brought to your Kadence License Activation page. If you do not get the prompt in your Dashboard, you can simply navigate to your WordPress Dashboard -> Settings -> Kadence License Activation page to get here manually.
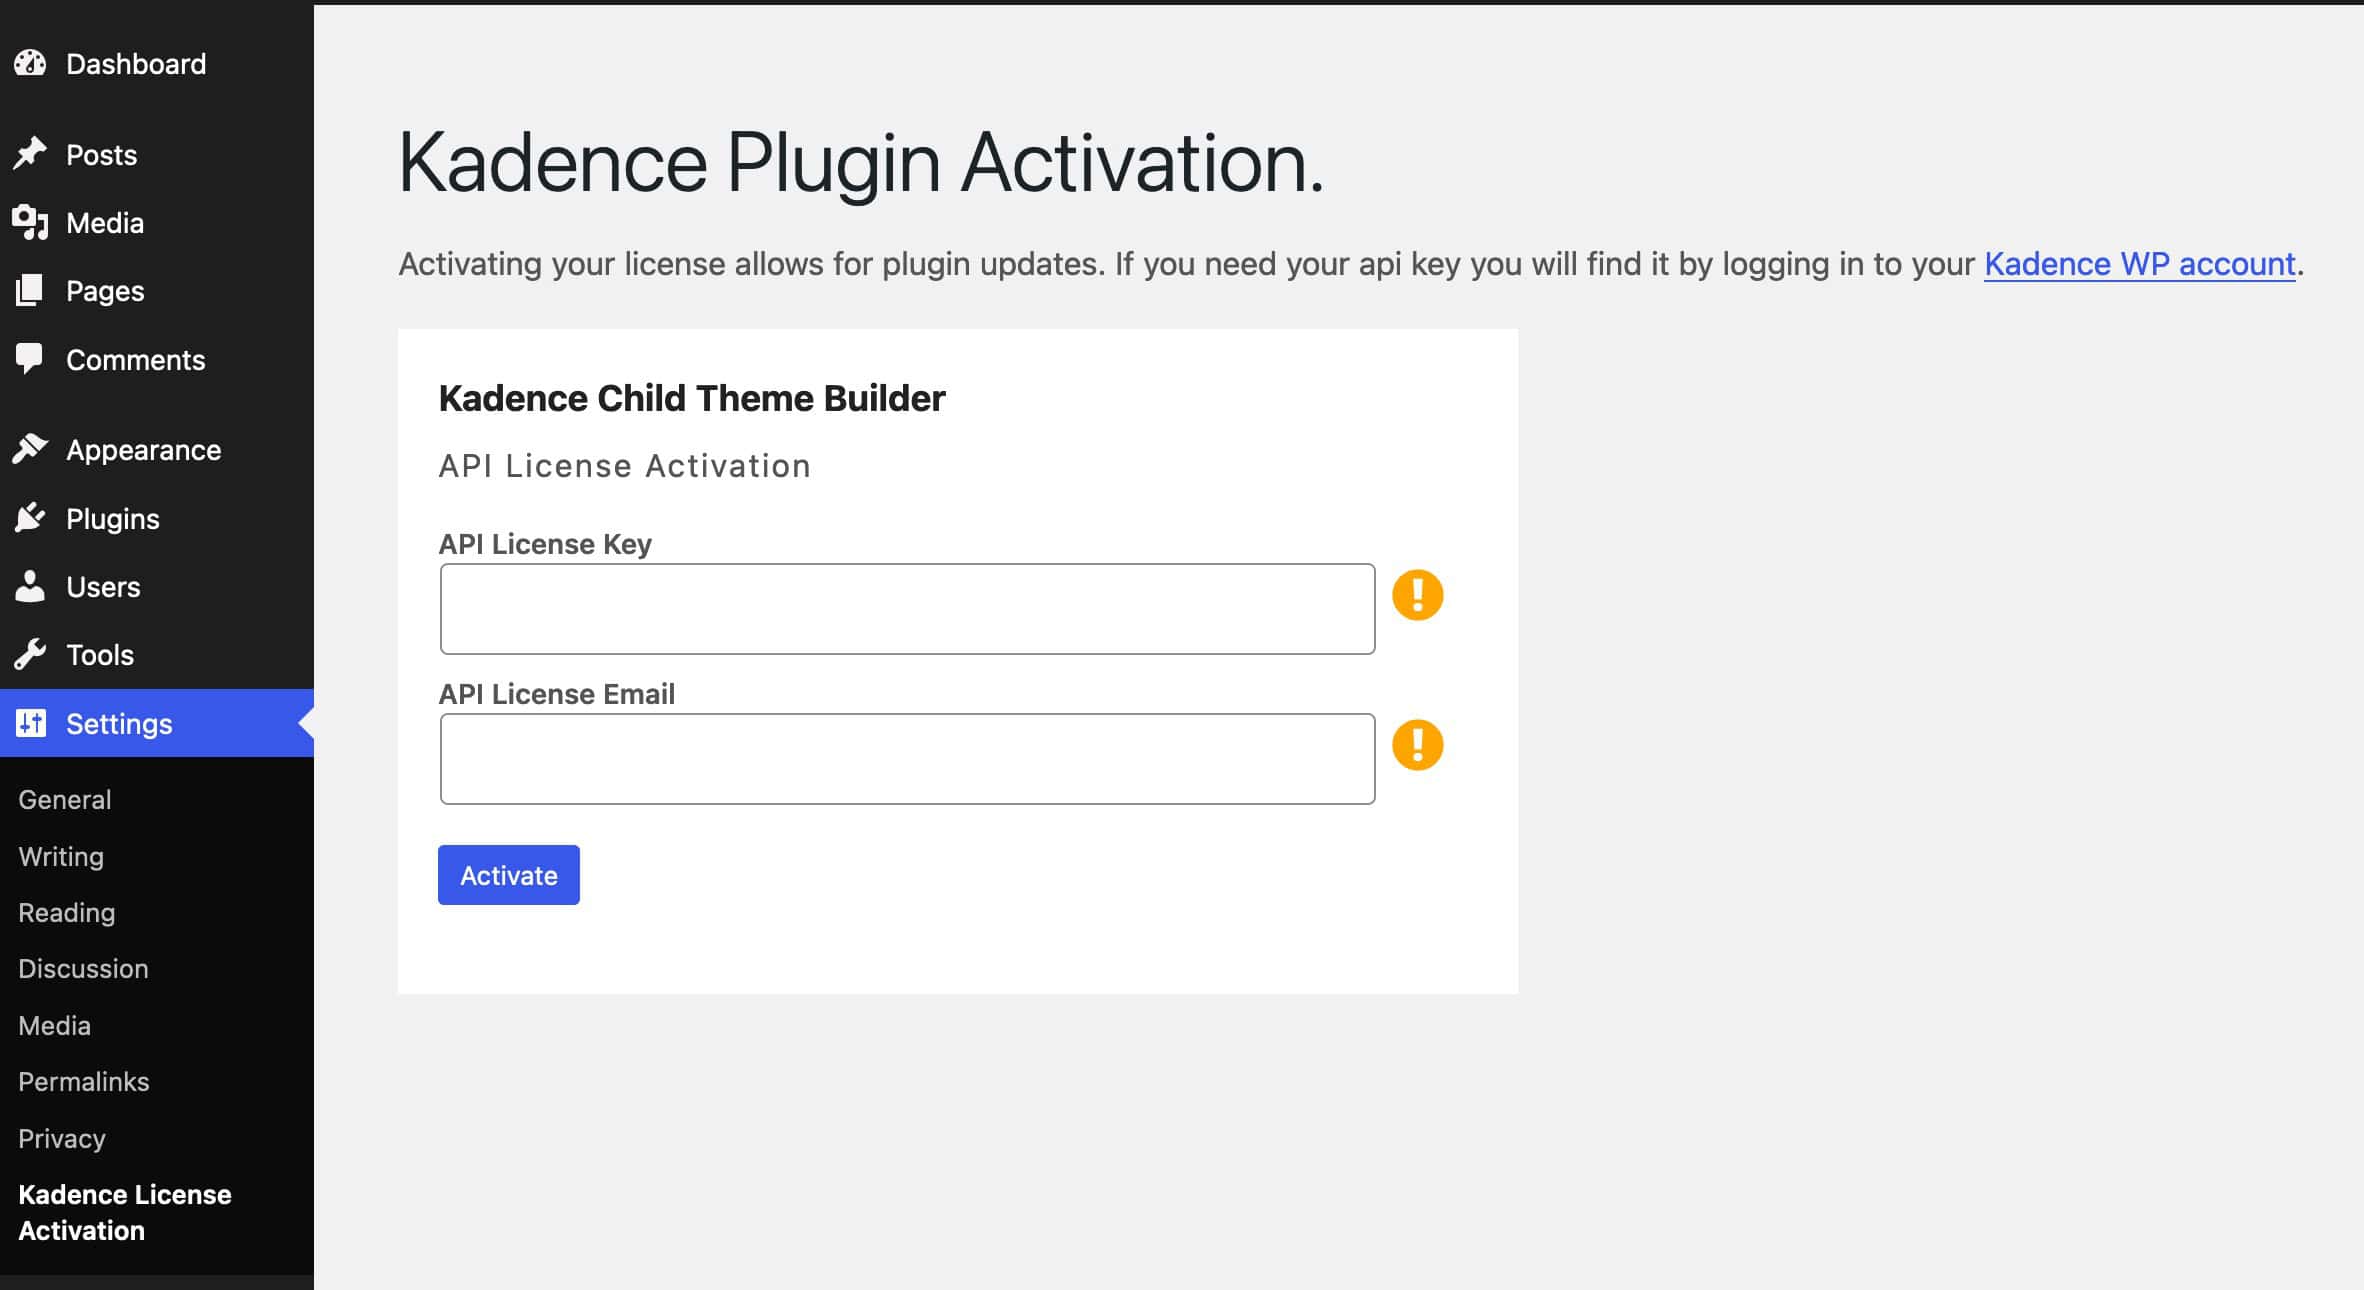
Once you are on the Kadence Child Theme Builder Page, you can input your License API Key, API License Email, and License your Kadence Child Theme Builder plugin. Your License API Key and Email can be found on your Kadence Downloads & License page. You can click on the Copy button next to your License Key to copy it directly to your clipboard.
Once you have your API Key, you can input it in your Kadence Child Theme Builder API License Key field. Then you can put your Account Email in the API License Email field and press the Save Changes button.
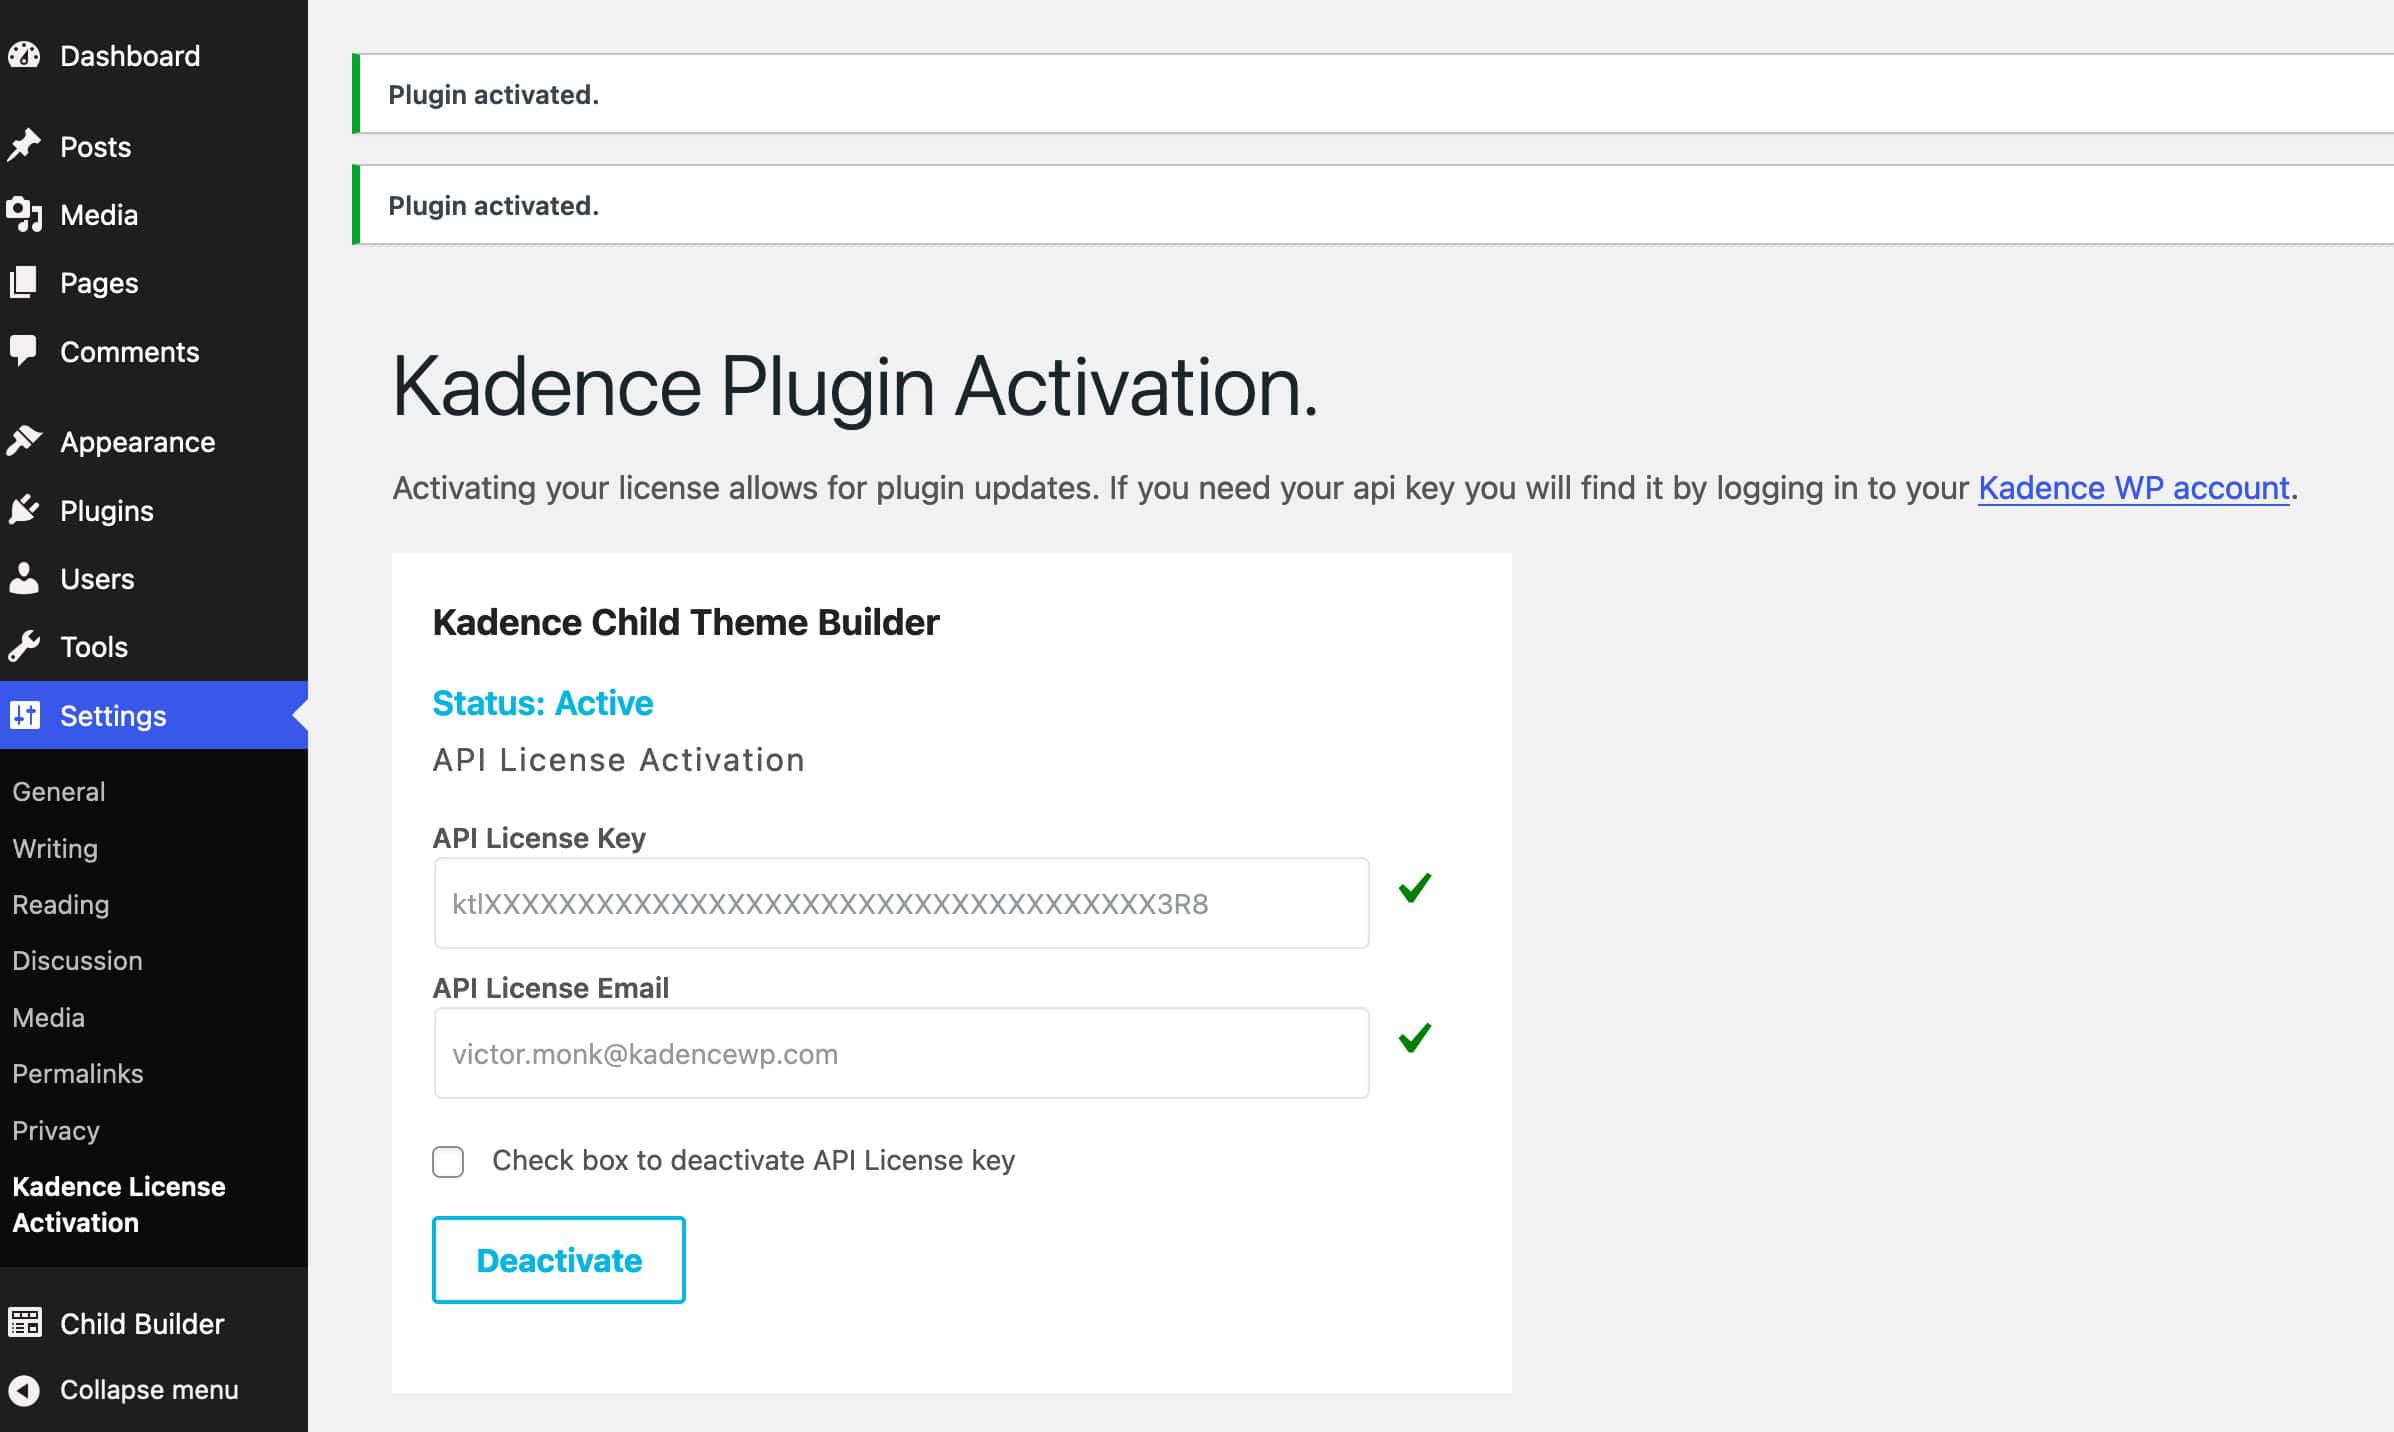
That’s it, your Kadence Child Theme Builder plugin is ready to be used.
Child theme images
We follow how WordPress importer works. When importing content, the site only imports the full-size version of each image. This approach prevents the media library from being flooded with multiple size variations for every image, which would significantly increase import time.
After import, when image URLs are updated in the content to match the local site, only the main URL of the image is replaced. The -300x300 (or similar) part in the filename that indicates a specific image size remains unchanged.
For this reason, it’s recommended to use optimized images on your templates and select full sizes to prevent missing images after importing your child theme on other websites
Exporting a Child Theme
Exporting a theme is easy. First, you should ensure the website that will export the Child Theme is complete and ready to be packaged. Then, you can navigate to your Dashboard -> Child Builder page. Here, you can access the Child Theme Config, Demo Import Config, Pattern Hub Config, and Generate Child Theme settings.
- To export a regular Child Theme, you must fill out the Child Theme Config settings, and then you can generate the Child Theme.
- To export a Starter Template Child Theme, you must also fill out at least the Demo Import Config settings.
- If you wish to also export a Pattern Hub Library (previously known as Kadence Cloud) you can do so using the Pattern Hub Config settings.
Child Theme Config Settings
Navigate to the Child Builder from your admin dashboard, and Kadence will present you with the Child Theme Config tab. This is the main configuration for how your Child Theme will display.
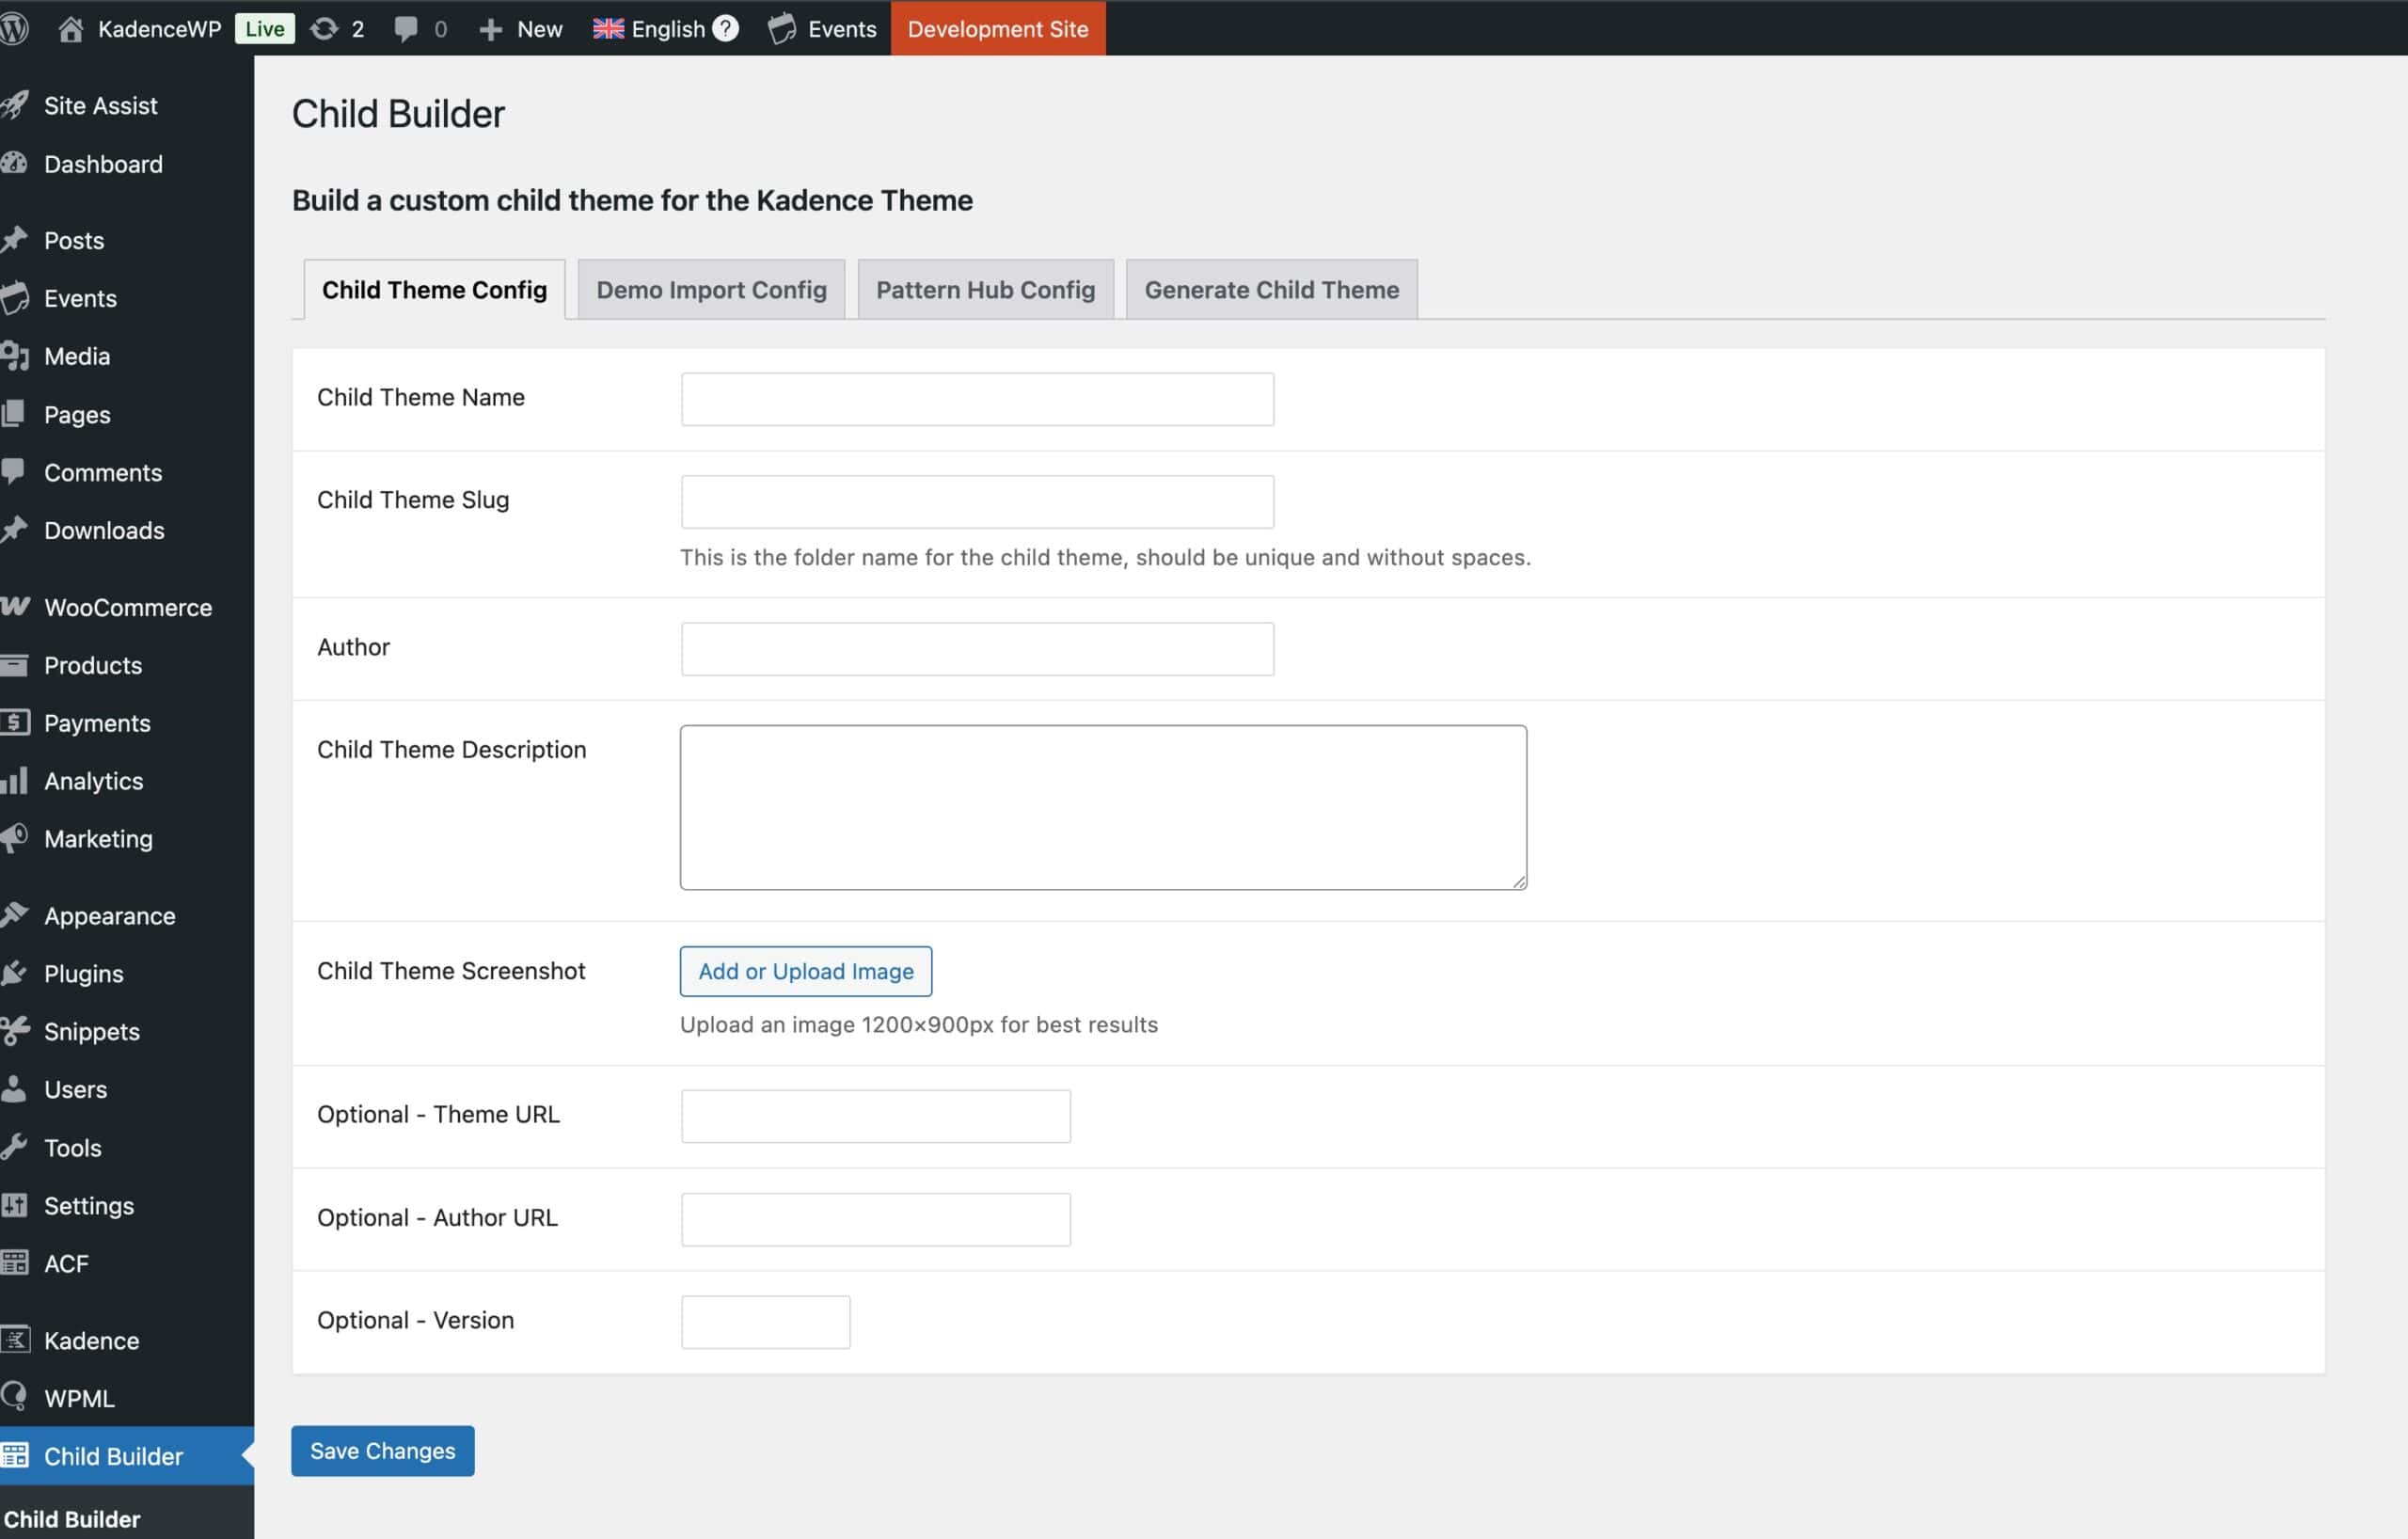
Child Theme Name: Enter the name of your child theme. If left empty, the default name will be “Pro Design.”
Child Theme Slug: This is the folder name for the child theme. If left empty, the default slug will be “child-theme-name.” Slugs should be unique and should not contain spaces.
Author: Enter the name of the author of the child theme. If left empty, the name will be “Pro Author.”
Child Theme Description: Fill in a description of the child theme. If left empty, the default description is “Child Theme Description.”
Child Theme Screenshot: Upload an image to serve as the theme’s screenshot. This field is REQUIRED, and there is no default WordPress will not install the theme generated via the Child Theme Builder plugin if you do not upload a photo for this field.
Optional – Theme URL: The default theme URL is n/a.
Optional – Author URL: The default author URL is n/a.
Optional – Version: The default version is 1.0.
After filling out the Child Theme Config options, you can save your changes by pressing the Save Changes button at the bottom of the page. If you export a Child Theme and only fill out the Child Theme Config information, then your export will be of a regular Kadence Child Theme. To make your Child Theme have the ability to import like a Starter Template, you must also fill out the Demo Import Config settings.
Demo Import Config
The Demo Import Configuration provides settings for importing your Child Theme through our AI Starter Templates by Kadence plugin. If you leave these settings blank, you won’t have the option to import the Child Theme through our Starter Templates plugin.
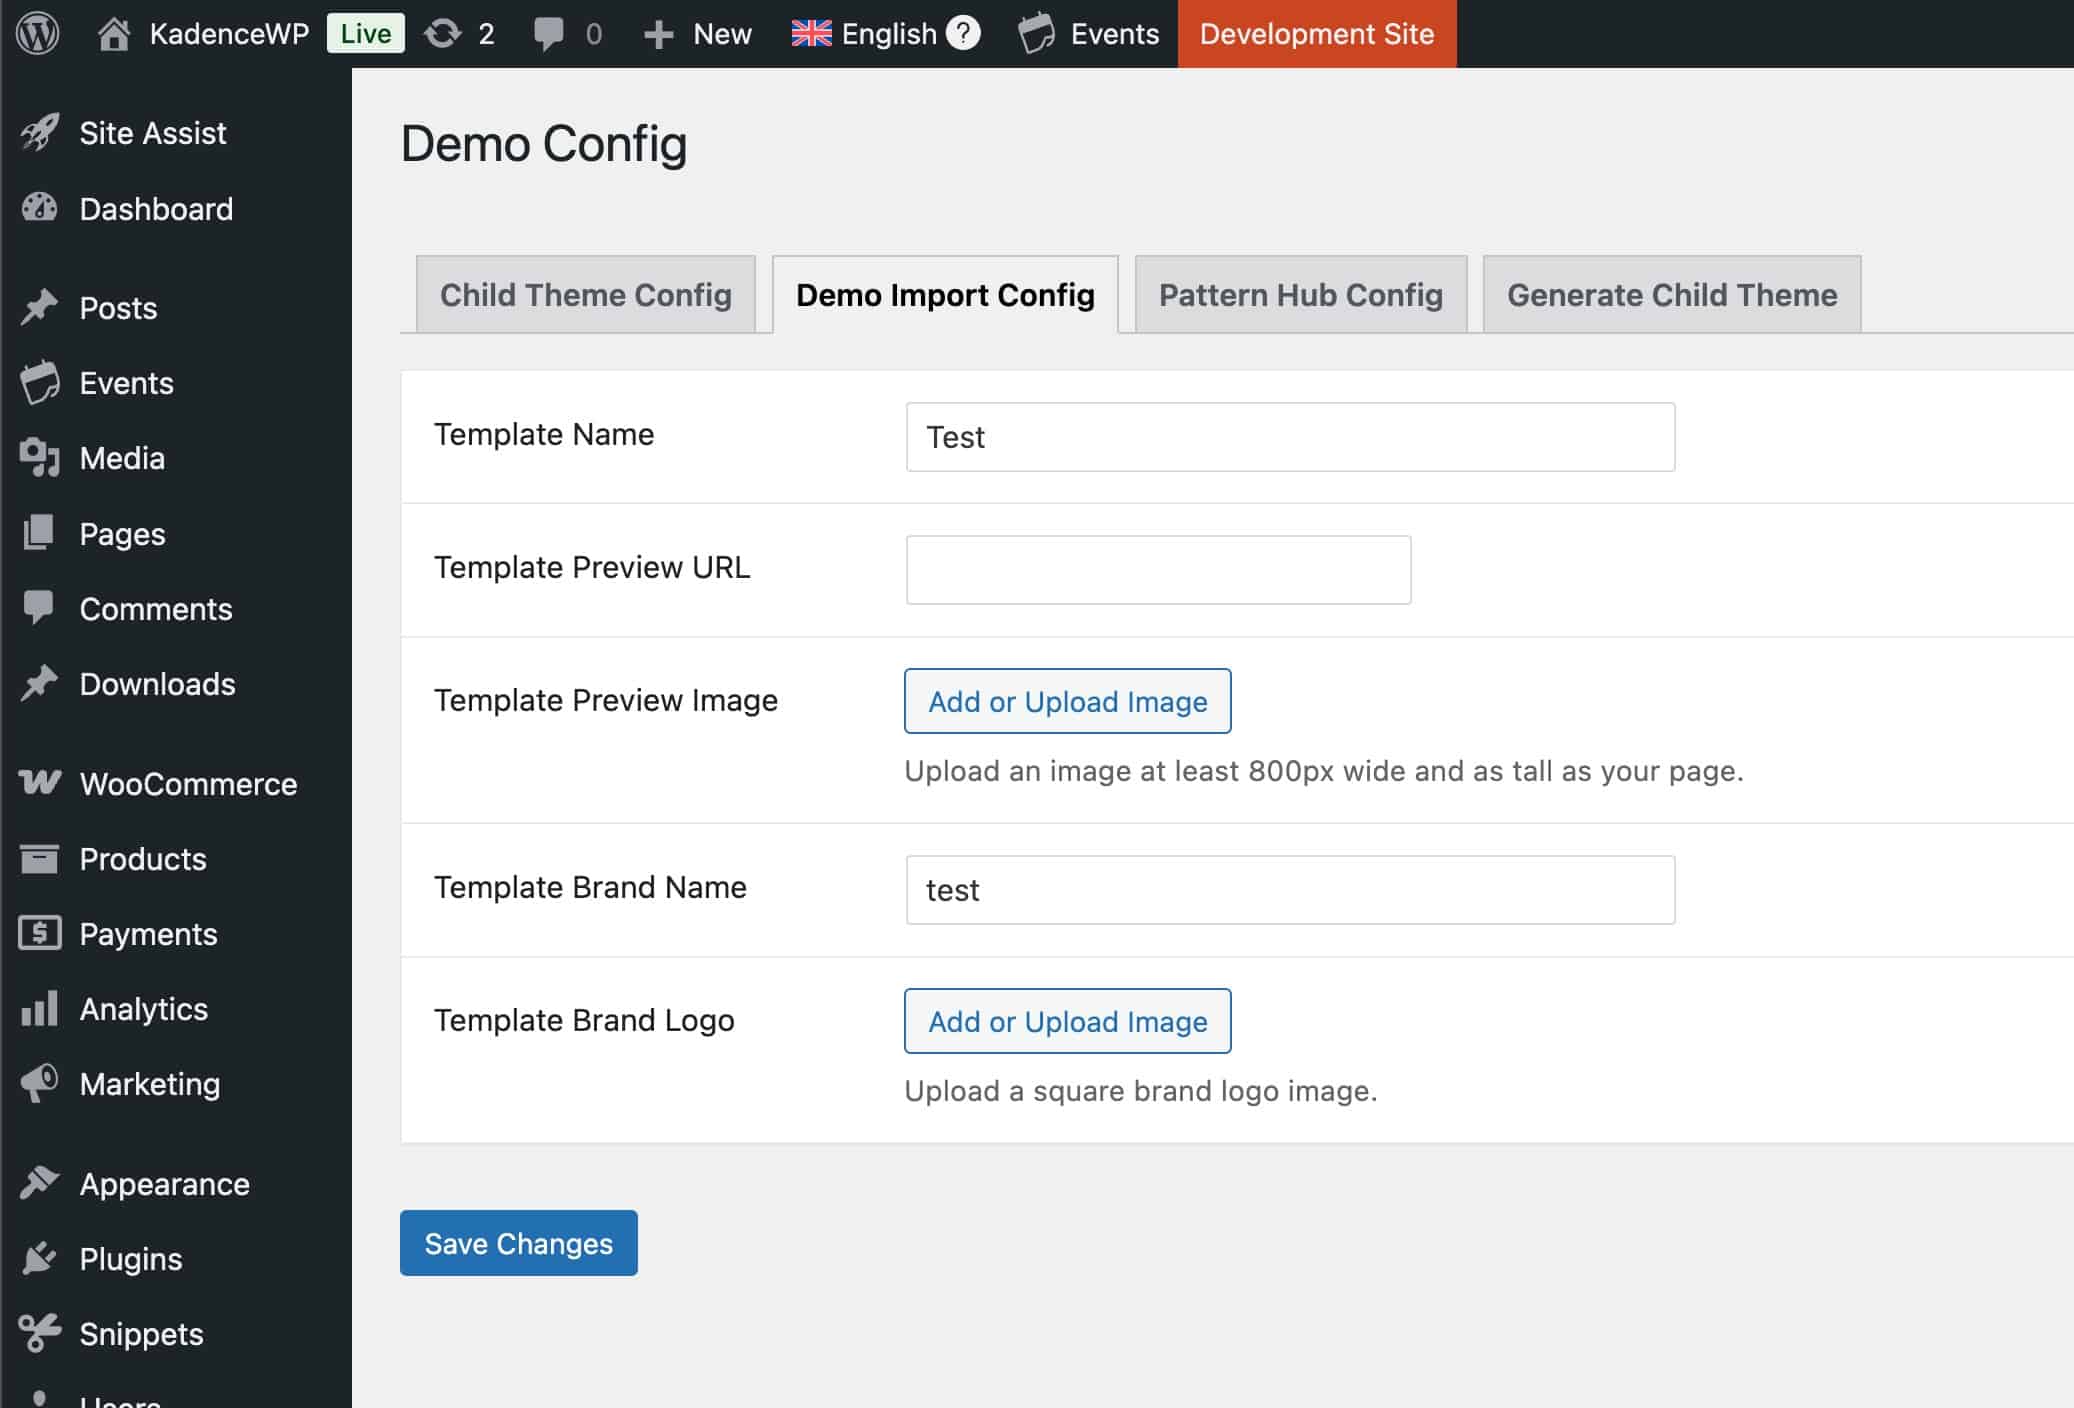
Template Name: This field is required. Give your starter template a name. There is no default value. Without this input, the Starter Template plugin will not find your starter template.
Template Preview URL: Lists the URL for a preview of the template.
Template Preview Image: This is the other required field in this tab. Without a Template Preview Image (or a Template Name), the Kadence Starter Template plugin will not locate your child theme to import your demo.
Template Brand Name: Enter the name of your brand.
Template Brand Logo: You can also upload a logo for your brand.
Pattern Hub Library Config
The Pattern Hub Library Config settings allow you to link a Pattern Hub. This will automatically import the Pattern Hub when importing the Child Theme as a Starter Template. You can learn about Kadence Pattern Hub Connections by Clicking Here.
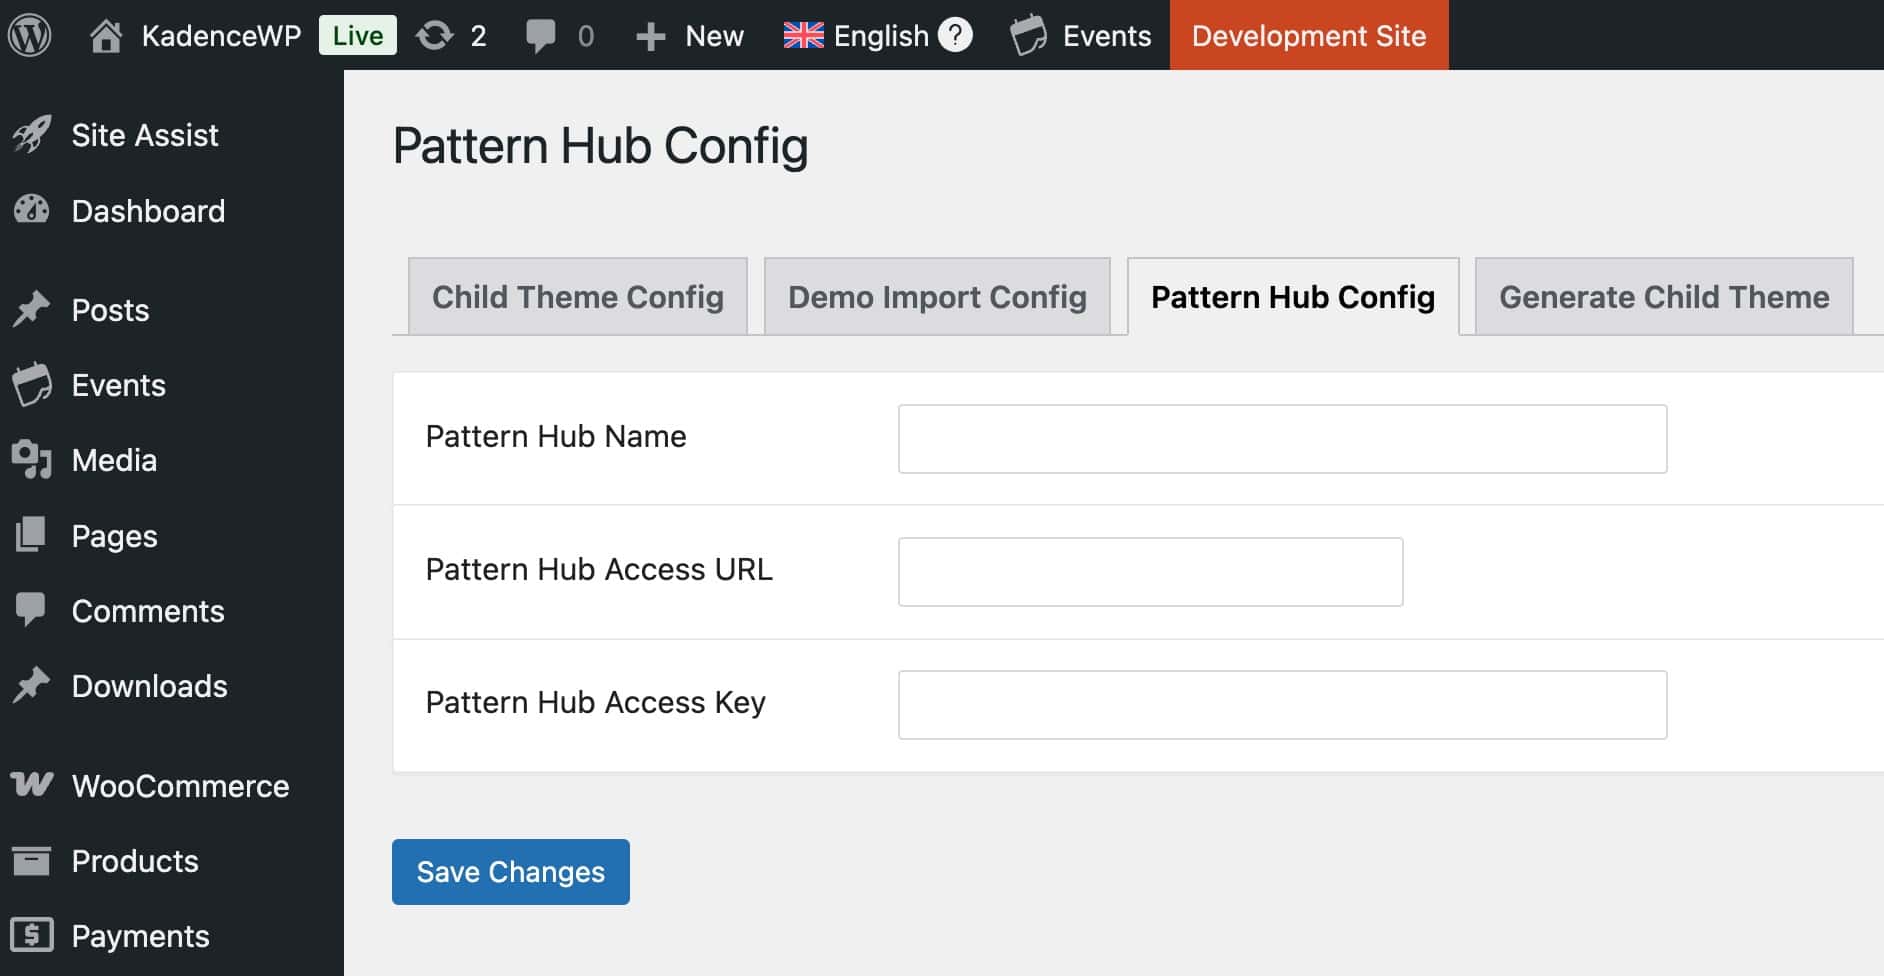
Pattern Hub Name: Enter the name of the Pattern Hub.
Pattern Hub Access URL: Enter the Access URL for your Pattern Hub connection.
Pattern Hub Access Key: Enter the Access Key for your Pattern Hub connection.
If valid, the Pattern Hub Library will be imported whenever the Child Theme is imported as a Starter Template.
Generate Child Theme
Once you have filled out the appropriate Settings, you can go to the Generate Child Theme settings to generate the Child Theme.
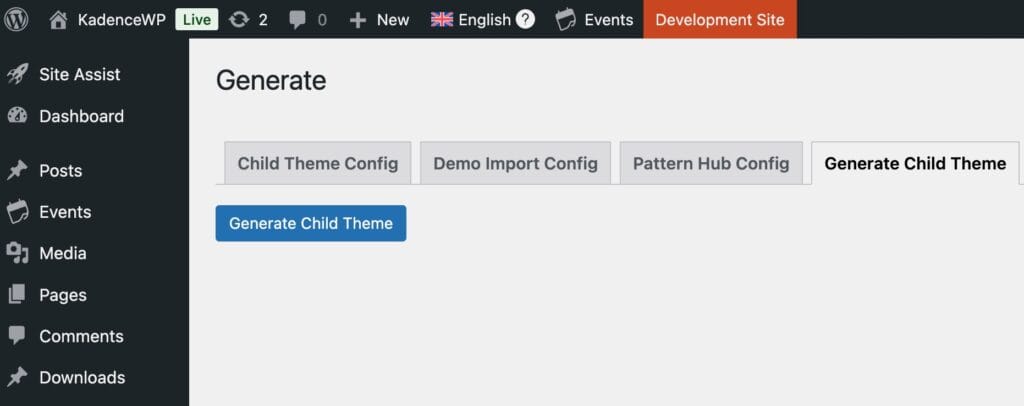
You can click on the Generate Child Theme button. This will trigger a download for your new Child Theme.
Importing a Kadence Child Theme
Importing a Kadence Child Theme is easy. First, you must ensure the website that is importing the Child Theme has the Kadence Theme installed. If you are importing Demo Content, the website must also have the Kadence Starter Templates plugin installed and activated.
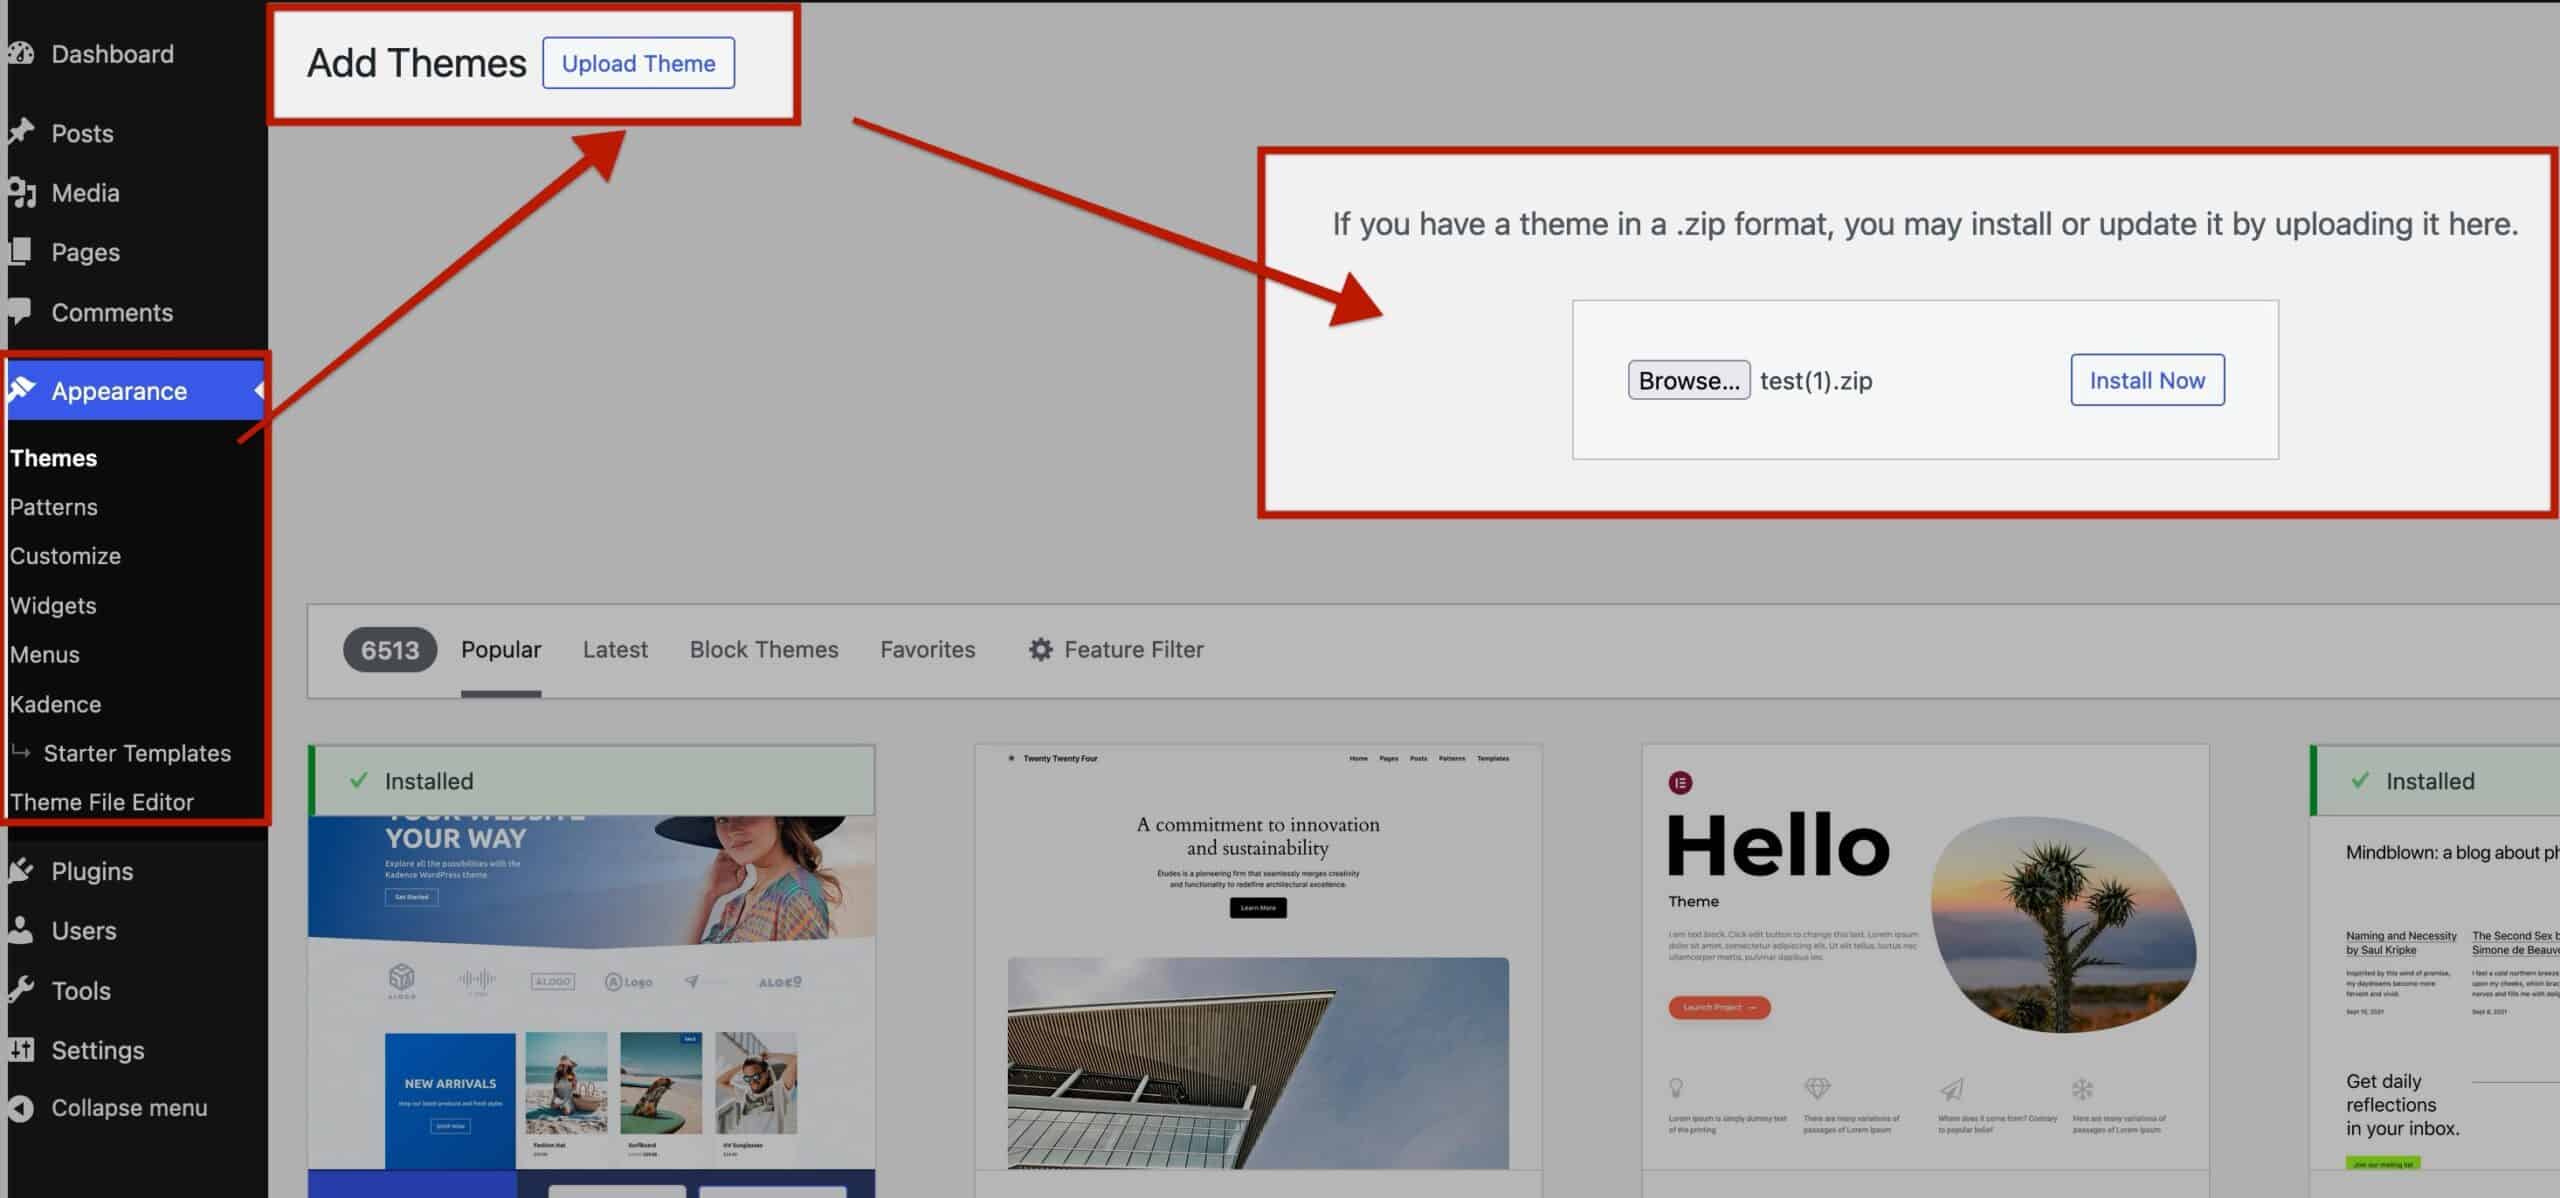
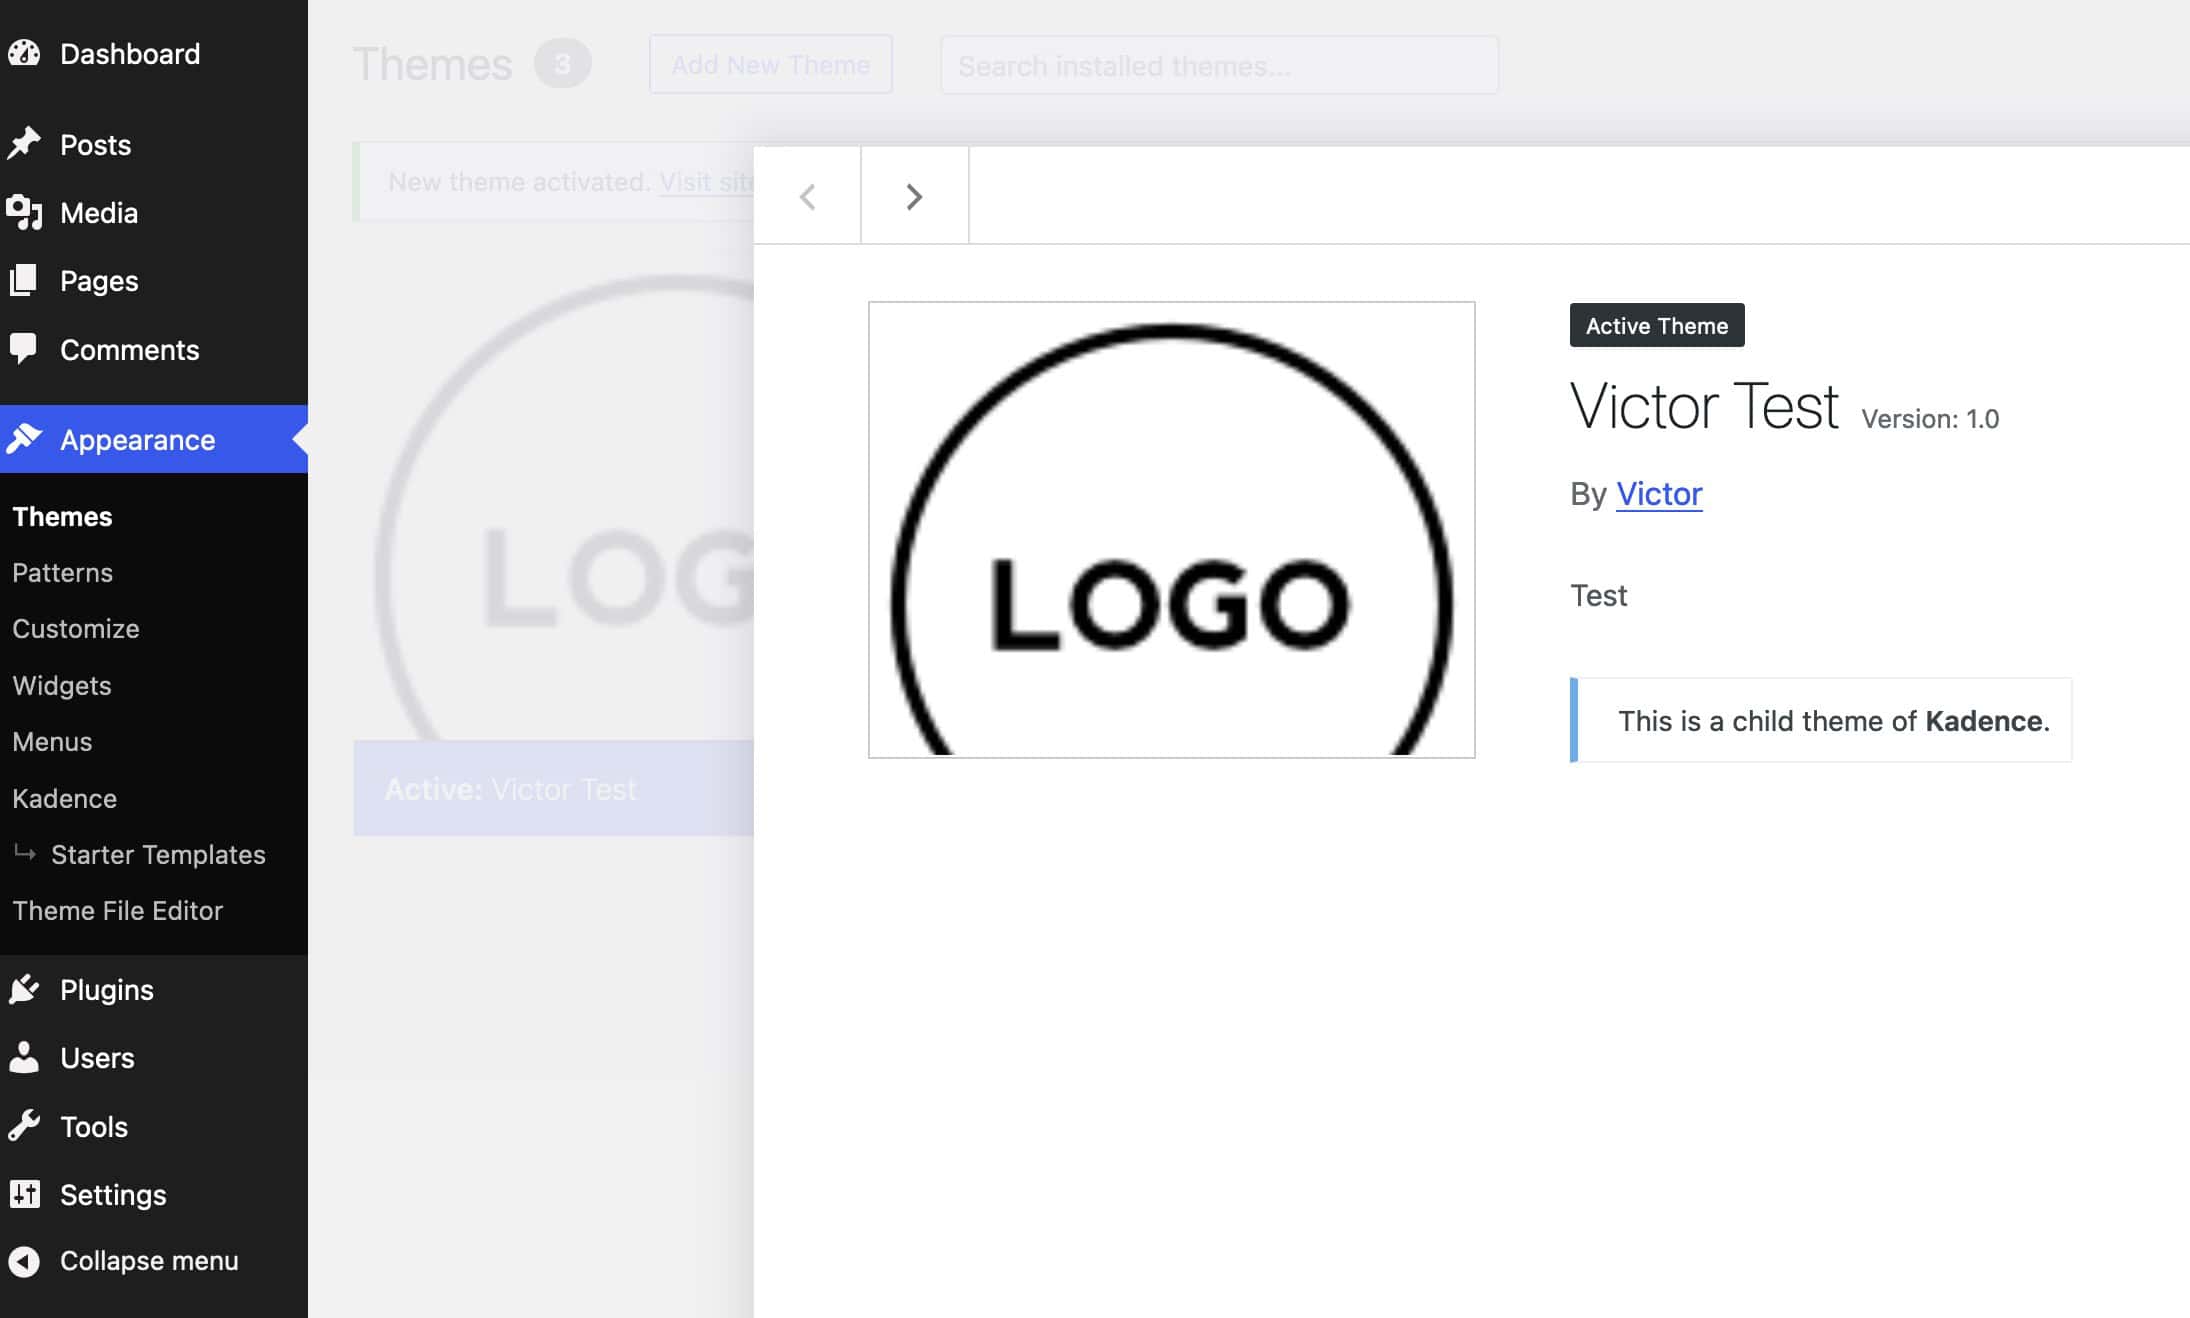
You can upload the Kadence Child Theme in the Dashboard -> Appearance -> Themes. Click the Add New button near the top of the page, then click the Upload Theme button. Choose the Child Theme Zip file that was exported and upload it to the website.
Then, Activate the Child Theme and you will now have an active Kadence Child Theme on the website.
Importing Demo Content (Starter Template)
If you filled out the Demo Import Config and wish to import your Child Theme content fully, there are a few additional steps you must take. You should first ensure the website that is importing the content has the AI-Starter Templates by Kadence plugin activated on it for the remaining steps.
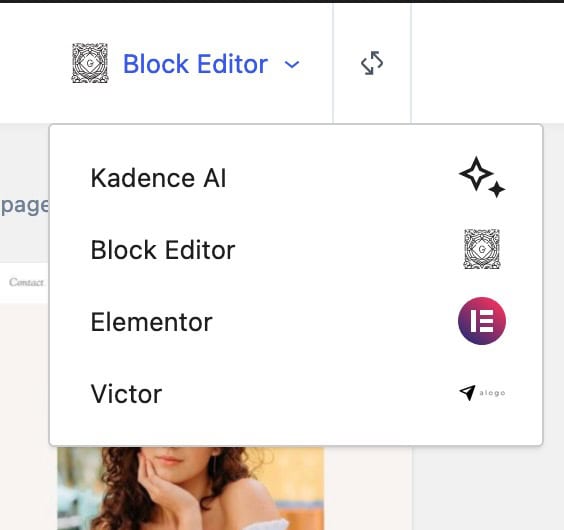
Once the Child Theme is Activated, go to the Dashboard -> Kadence -> Starter Templates page. Click on the dropdown menu on the top right of the page. The dropdown may contain either Elementor, Block Editor, or Kadence AI by default.
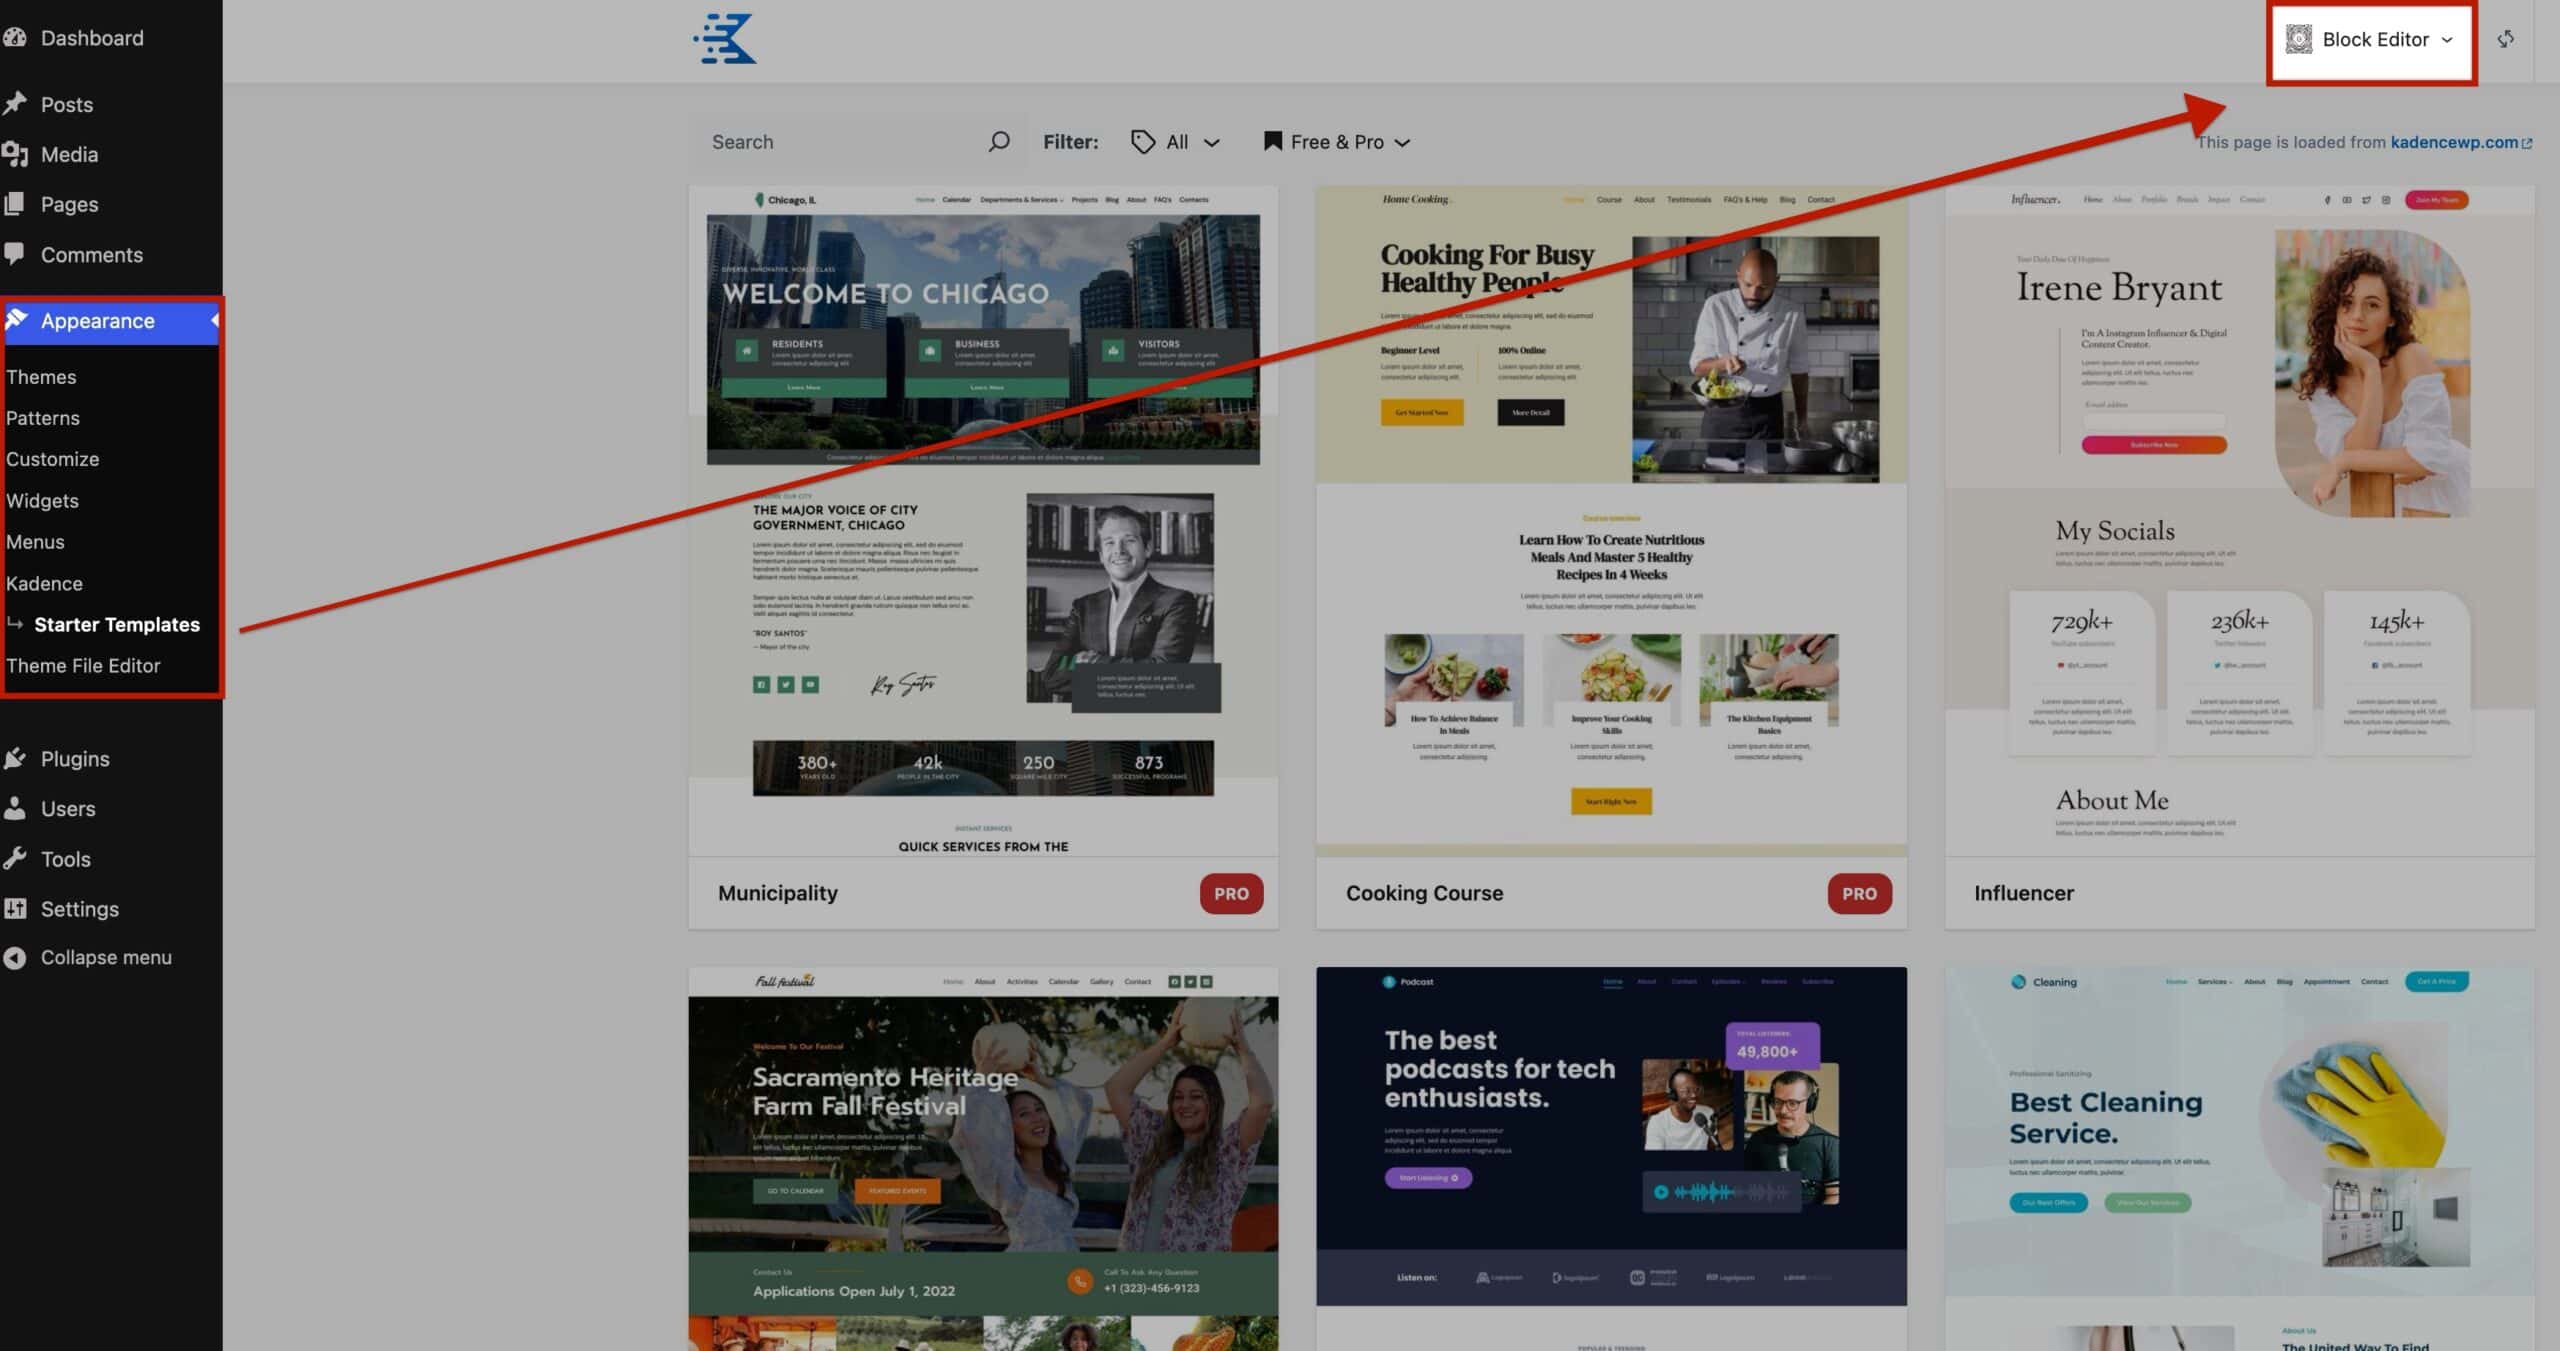
From the dropdown, select the Brand of the Child Theme that was set up in the Demo Config settings.
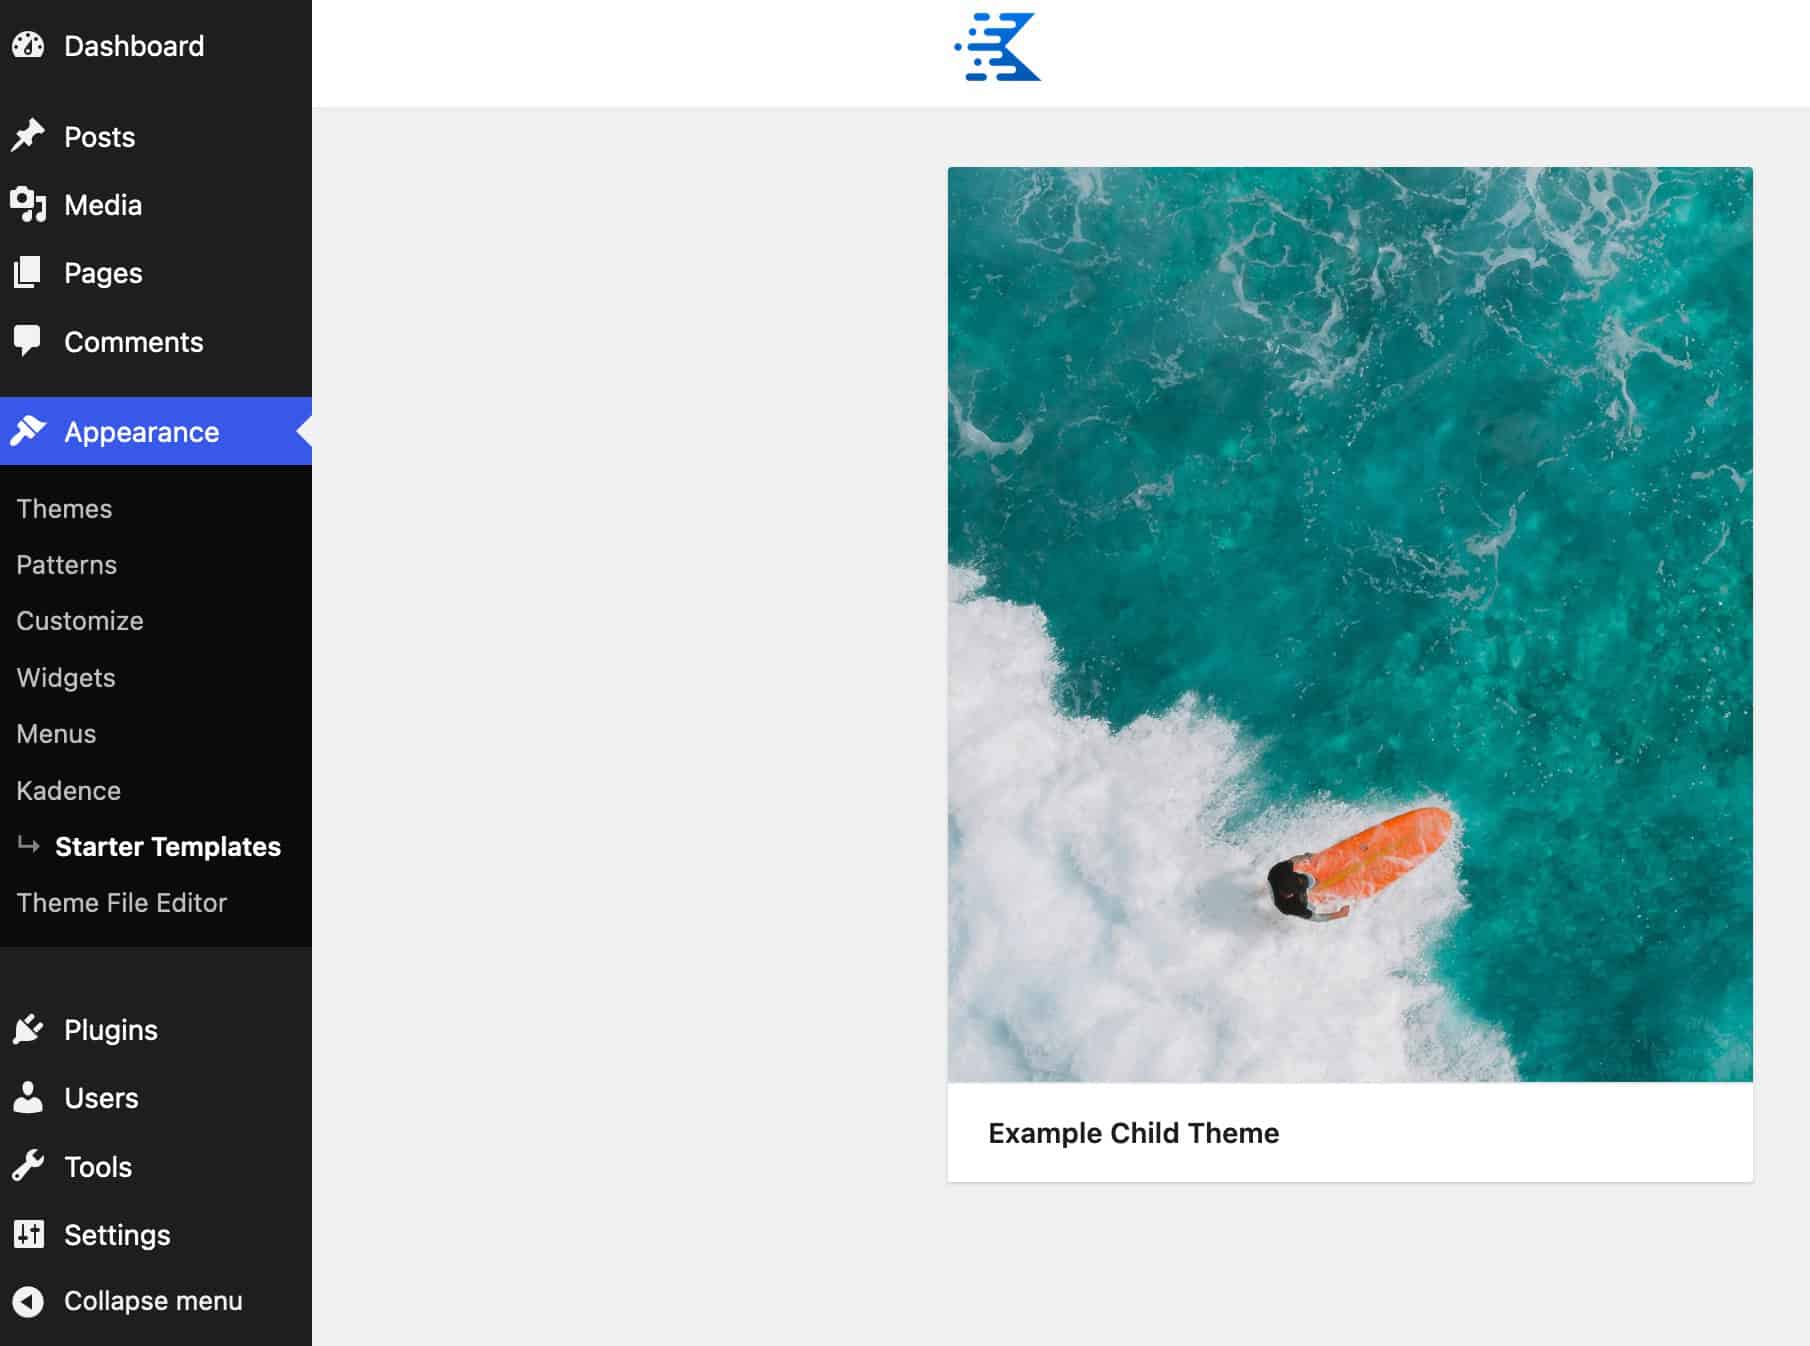
Once selected, the Child Theme Starter Template will be available to import.
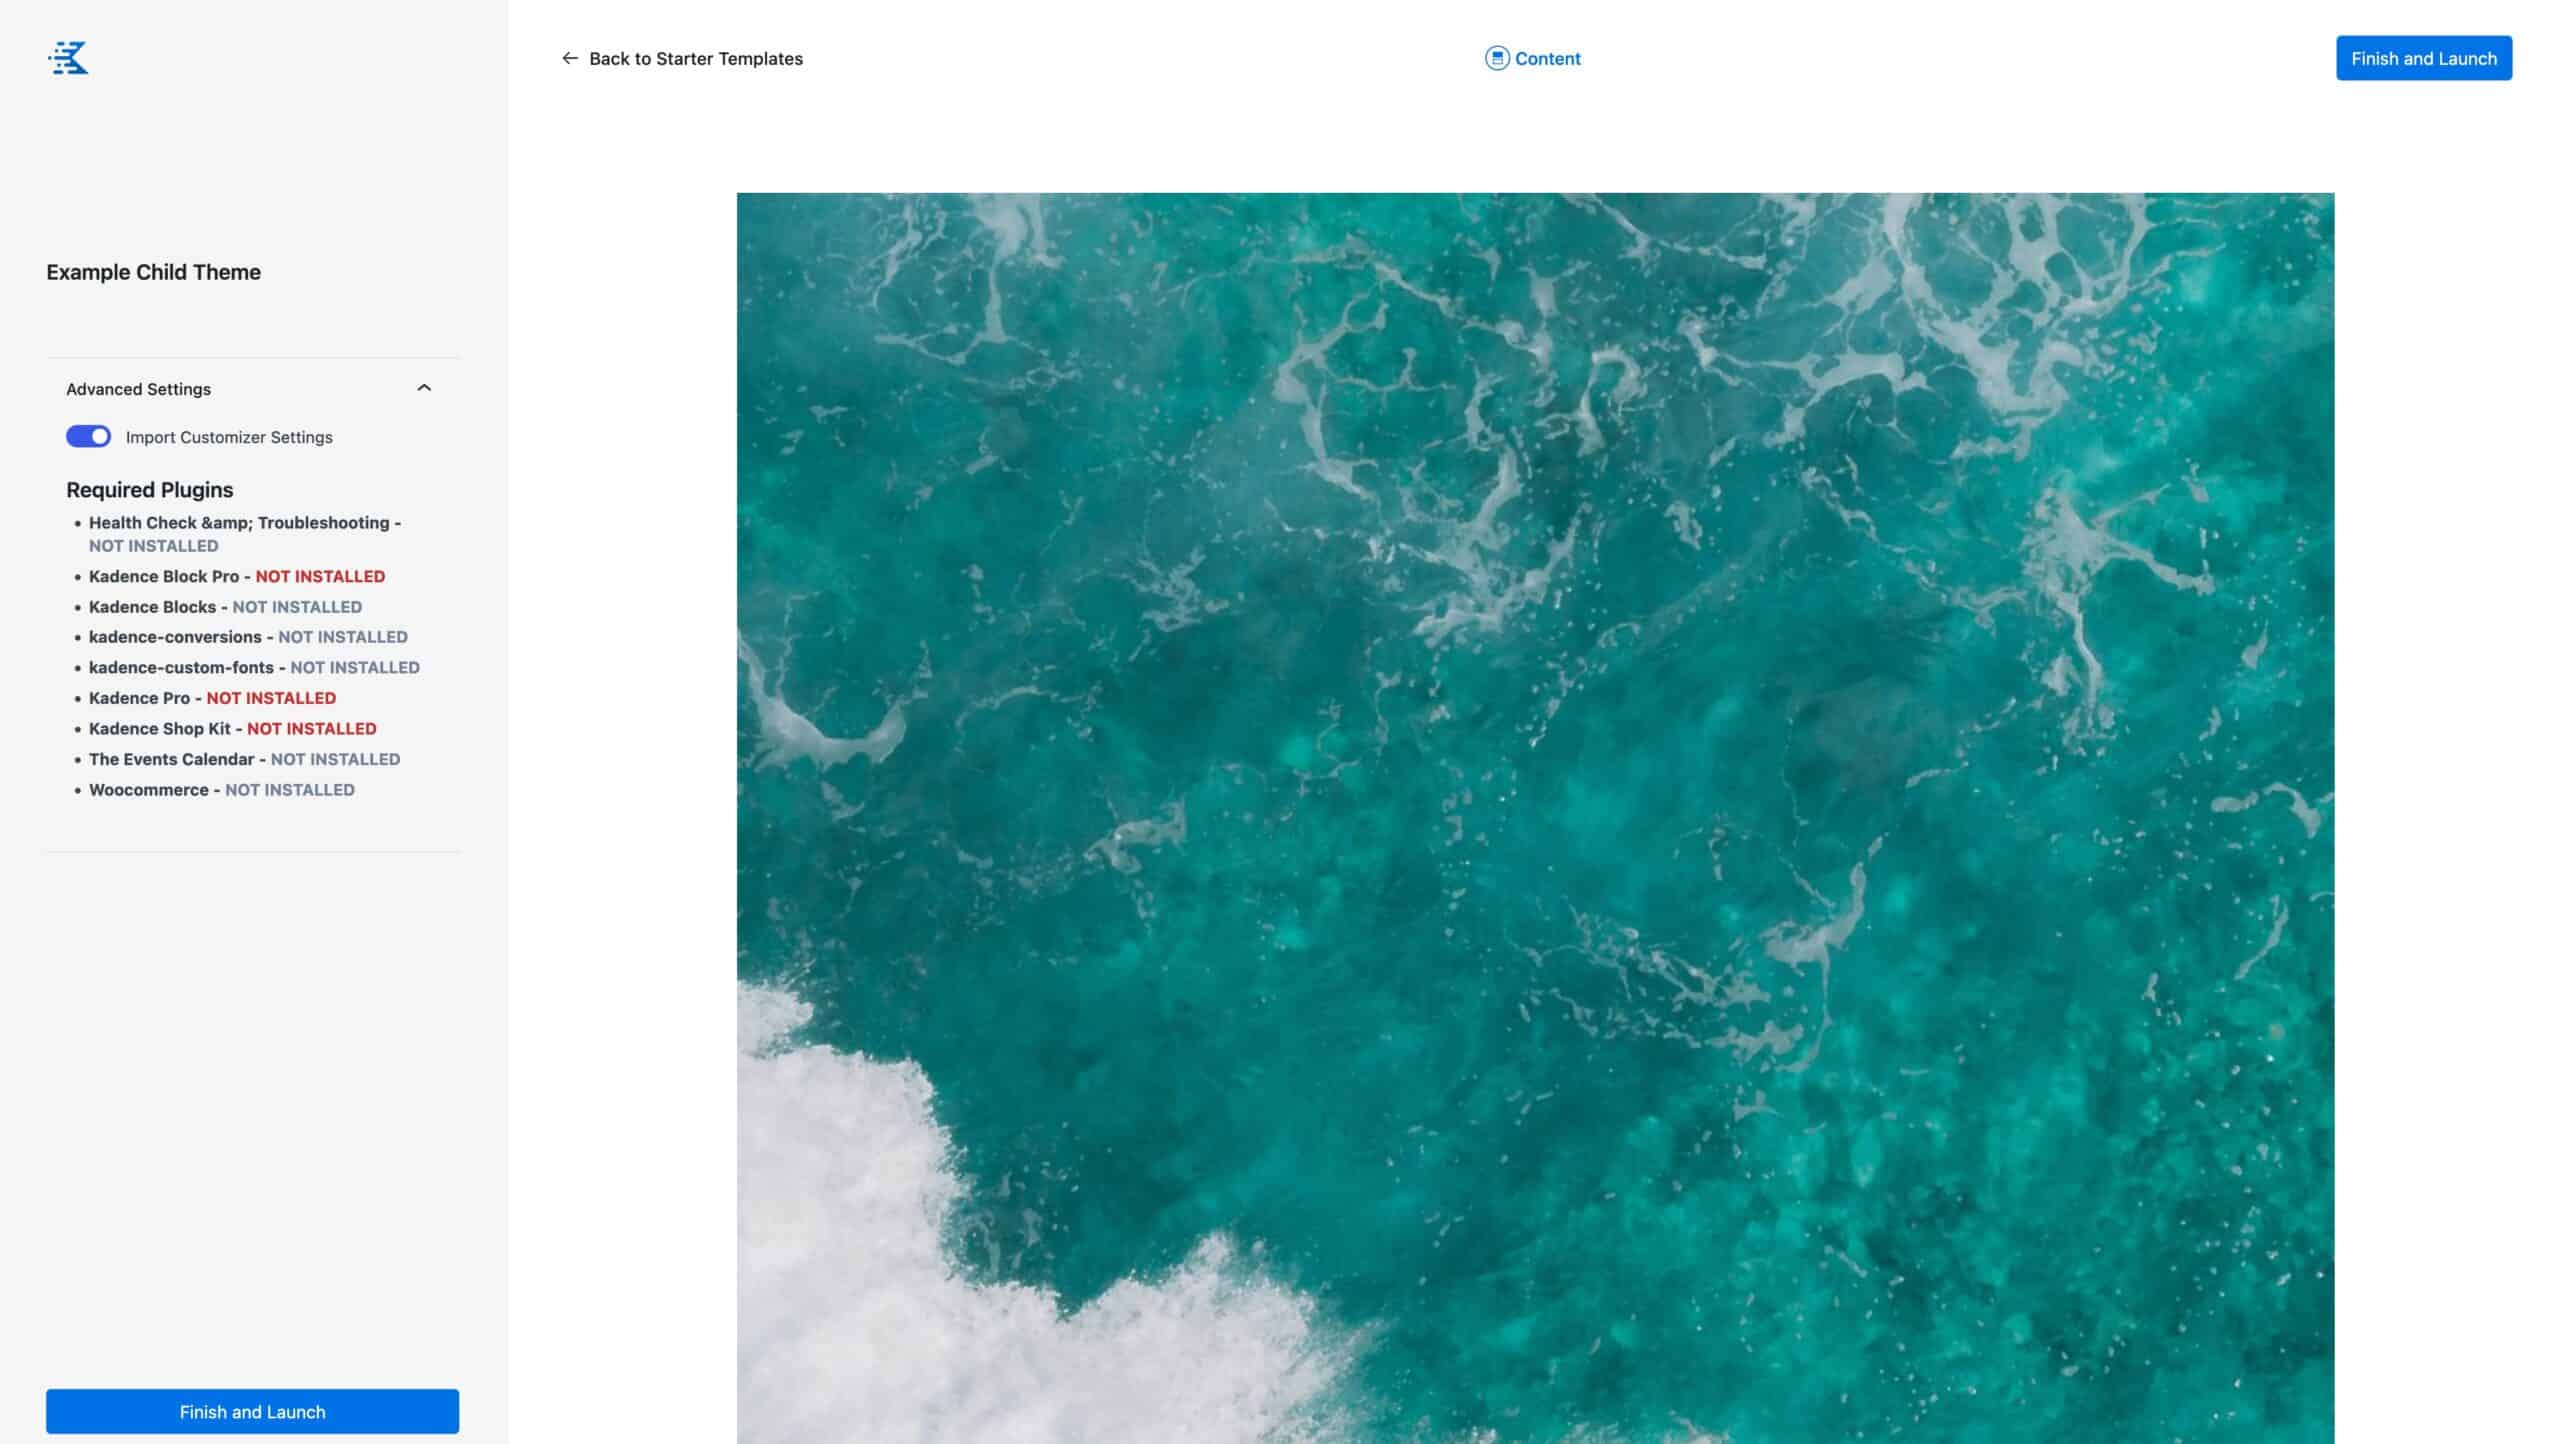
Click on the Child Theme Demo to import the content. This will give you the option to toggle the import customizer settings to on or off. This includes all customizer settings, including the header and footer settings. Additionally, there will be a list of the required plugins. Plugins marked with red text saying NOT INSTALLED indicate that a Premium Plugin is required. These Premium Plugins should be installed, activated, and licensed before importing the Child Theme Starter Template.
Once ready, you can click on Finish and Launch. This will prompt you to verify that you want to import the Child Theme Starter Template. Once the import is completed, you can view your website and see your new content.
