
Creating a seamless reading experience for your WordPress blog is one of the most effective ways to boost engagement and keep visitors exploring your content. Instead of forcing readers to click through pagination links, you can implement an infinite scroll blog roll, where posts automatically load and display their full content as the user scrolls down the page. This creates a continuous, magazine-like flow of articles that feels modern, intuitive, and effortless.
But infinite scroll isn’t just about sleek design; it’s also about usability. By dynamically appending posts as the reader scrolls, you can present more content without overwhelming them or breaking their focus. This approach maintains consistent styling, improves readability, and even opens the door to enhanced features such as scroll-triggered URL updates. For content-heavy blogs, online magazines, and creative portfolios, infinite scroll is a powerful tool to keep readers engaged with minimal friction.
In this tutorial, we’ll walk through how to set up an infinite scroll blog roll in WordPress using Kadence Pro (for infinite scroll and Kadence Elements) and Kadence Blocks Pro (for Dynamic Content). Together, these tools give you the flexibility to design a dynamic, visually engaging blog experience where readers can consume full posts without ever leaving the archive page.
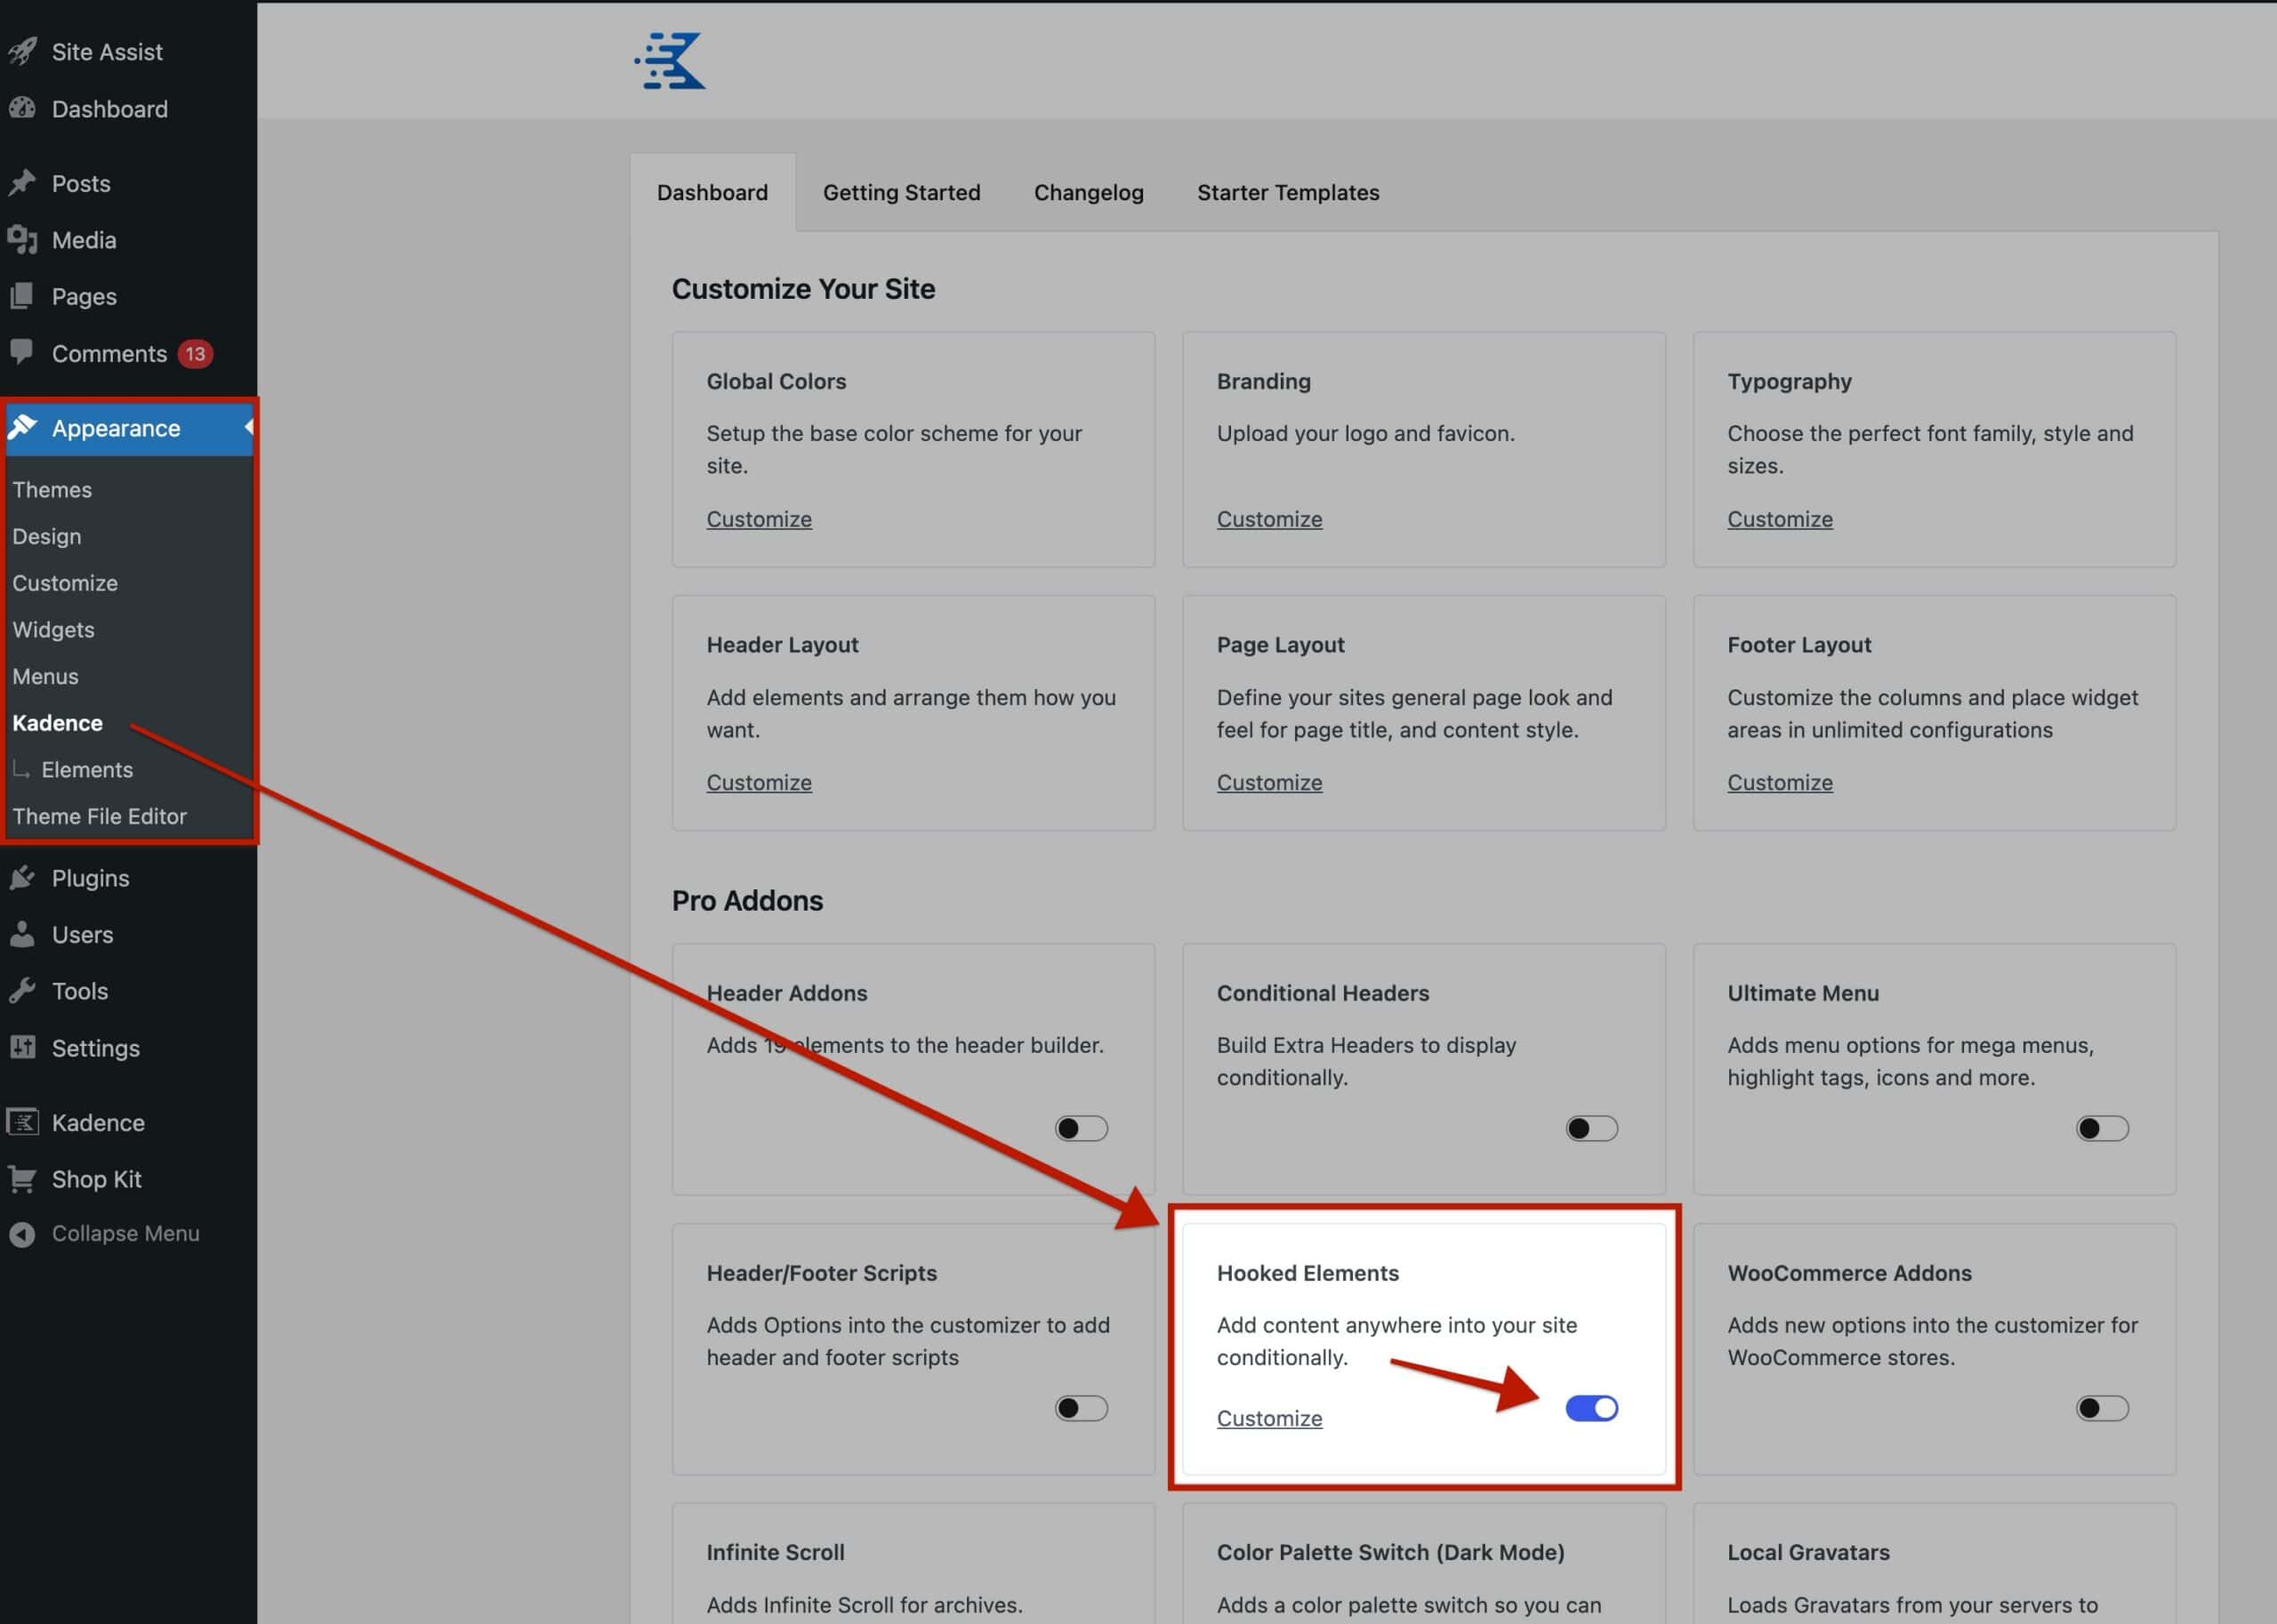
Step 1: Enable Kadence Elements
Start by enabling Kadence Elements in your WordPress dashboard. This feature allows you to build reusable templates that can override parts of your site, like the archive loop items that display your blog posts.
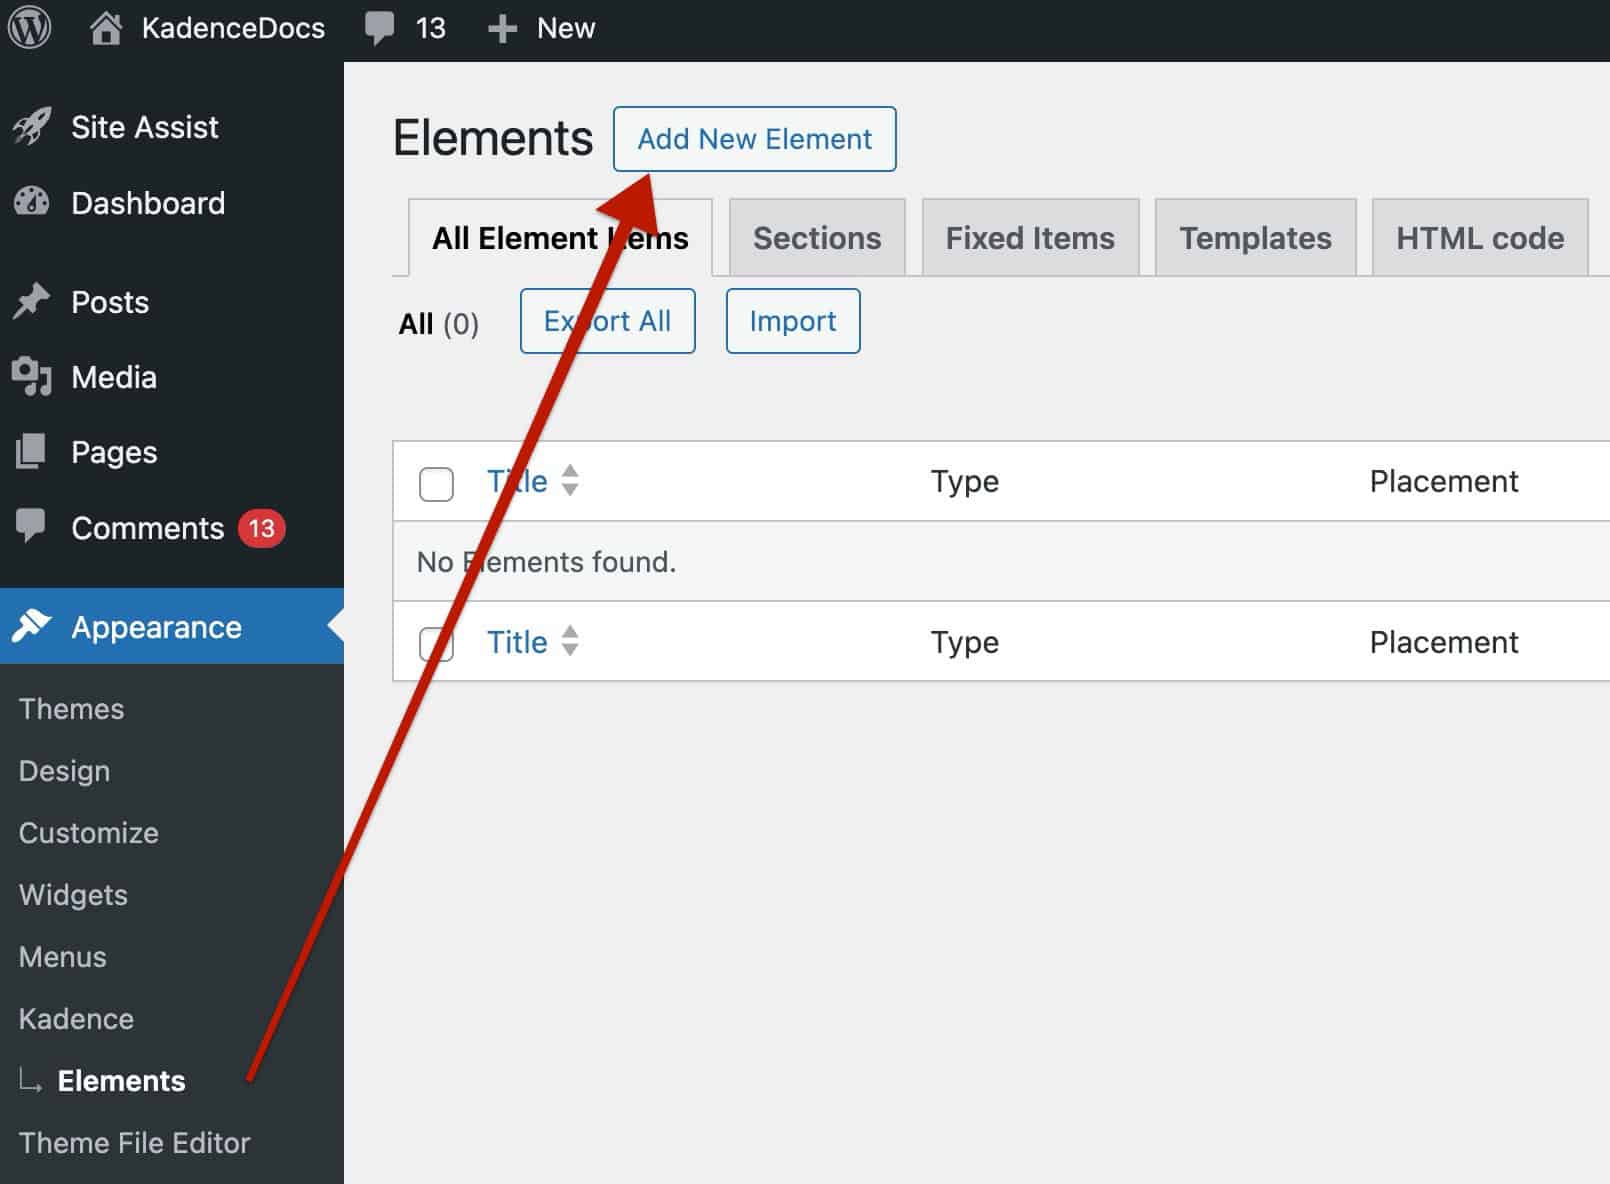
Step 2: Create and Design an Element Template
Next, create a new template element to replace the default archive loop item content. This template determines how each post appears in your infinite scroll layout.
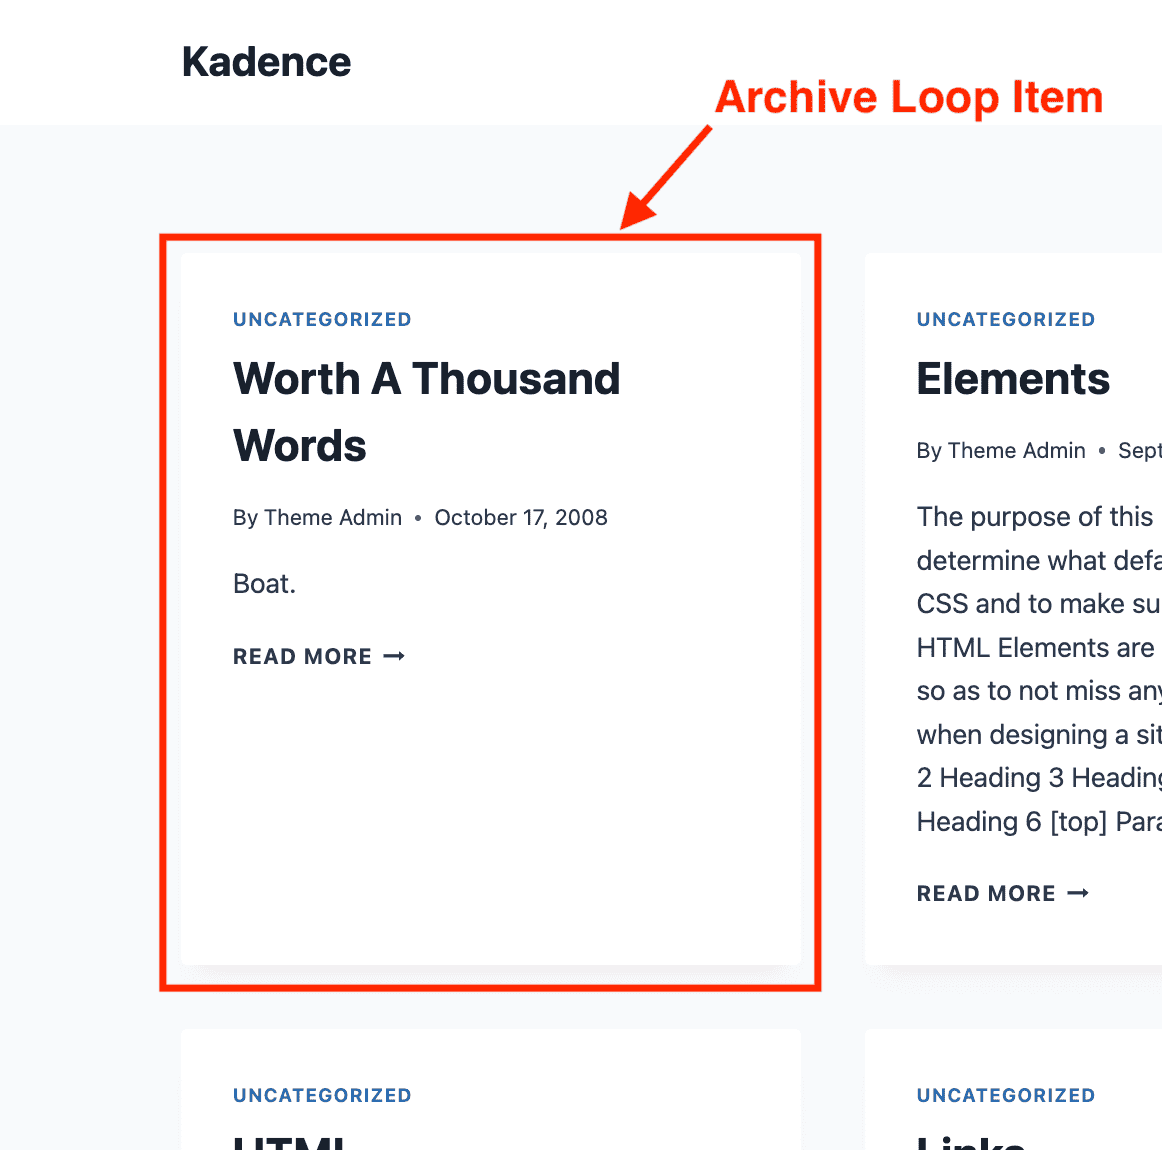
When building custom archive loop items using Kadence template elements, you leverage specific Kadence Blocks to dynamically pull information. This ensures your templates always display the correct title, author, date, and featured image, regardless of the content being viewed. Below are some blocks that are typically used to achieve these things.
- Advanced Text Block & Dynamic HTML Block: These blocks are essential for inserting text-based dynamic information. You can use them to automatically grab values such as the Post Title, the Author Display Name: the Post Date (published or modified), and other standard post metadata. This is the core method for displaying text that changes depending on the page it’s on.
- Advanced Image Block: This block is used to set a dynamic image, most commonly the Featured Image associated with the current post or page. By setting the image source to be dynamic content, the template element will automatically display the correct featured image for every piece of content.
- Advanced Buttons Block: The Advanced Buttons Block can be used to add interactive buttons. While not always directly pulling dynamic content into the button text, it is crucial for creating dynamic links, such as a “Read More” button that automatically links to the full post URL.

After you have finished designing your layout within the Template Element using the dynamic blocks mentioned above, you need to configure the element’s settings to tell Kadence where to display it.
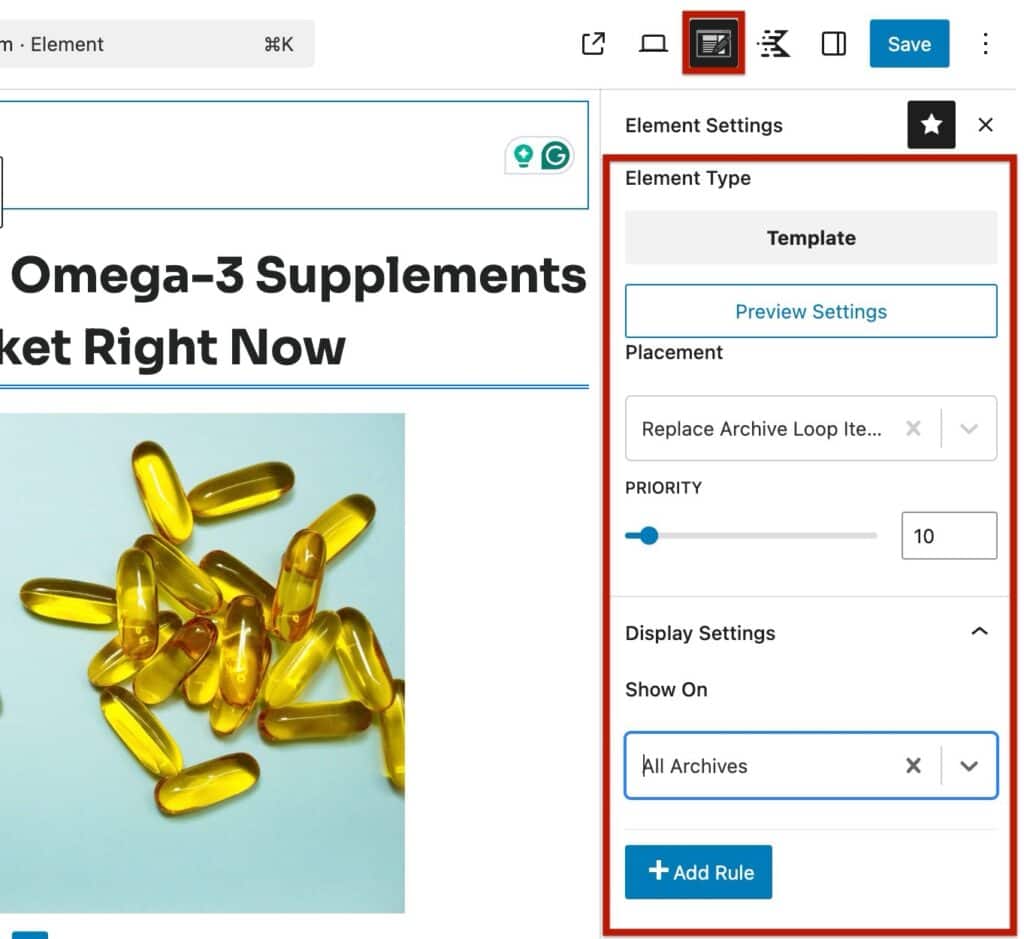
- Set the Placement: In the Element Settings sidebar, the Placement option must be set to Replace Archive Loop Item. This tells the theme to use your custom design for each individual post listed in the archive loop, replacing the default layout.
- Configure Display Settings: Expand the Display Settings panel. This is where you determine which archives the new custom template will be applied to.
- You can set the template to apply to All Archives globally.
- Alternatively, you can choose to apply it to a specific archive, such as Category Archives. This gives you precise control over which listing pages use your custom design.
Important: If you want to enhance your blog roll with scroll-based URL updates (see Bonus Step below), make sure you output the post title as an <h2> element that includes a link to the post. The JavaScript enhancement depends on these <h2> tags to update the browser address bar correctly. You’ll also need to add a dynamic link to the <h2> tag for the post URL to appear in the user’s browser.
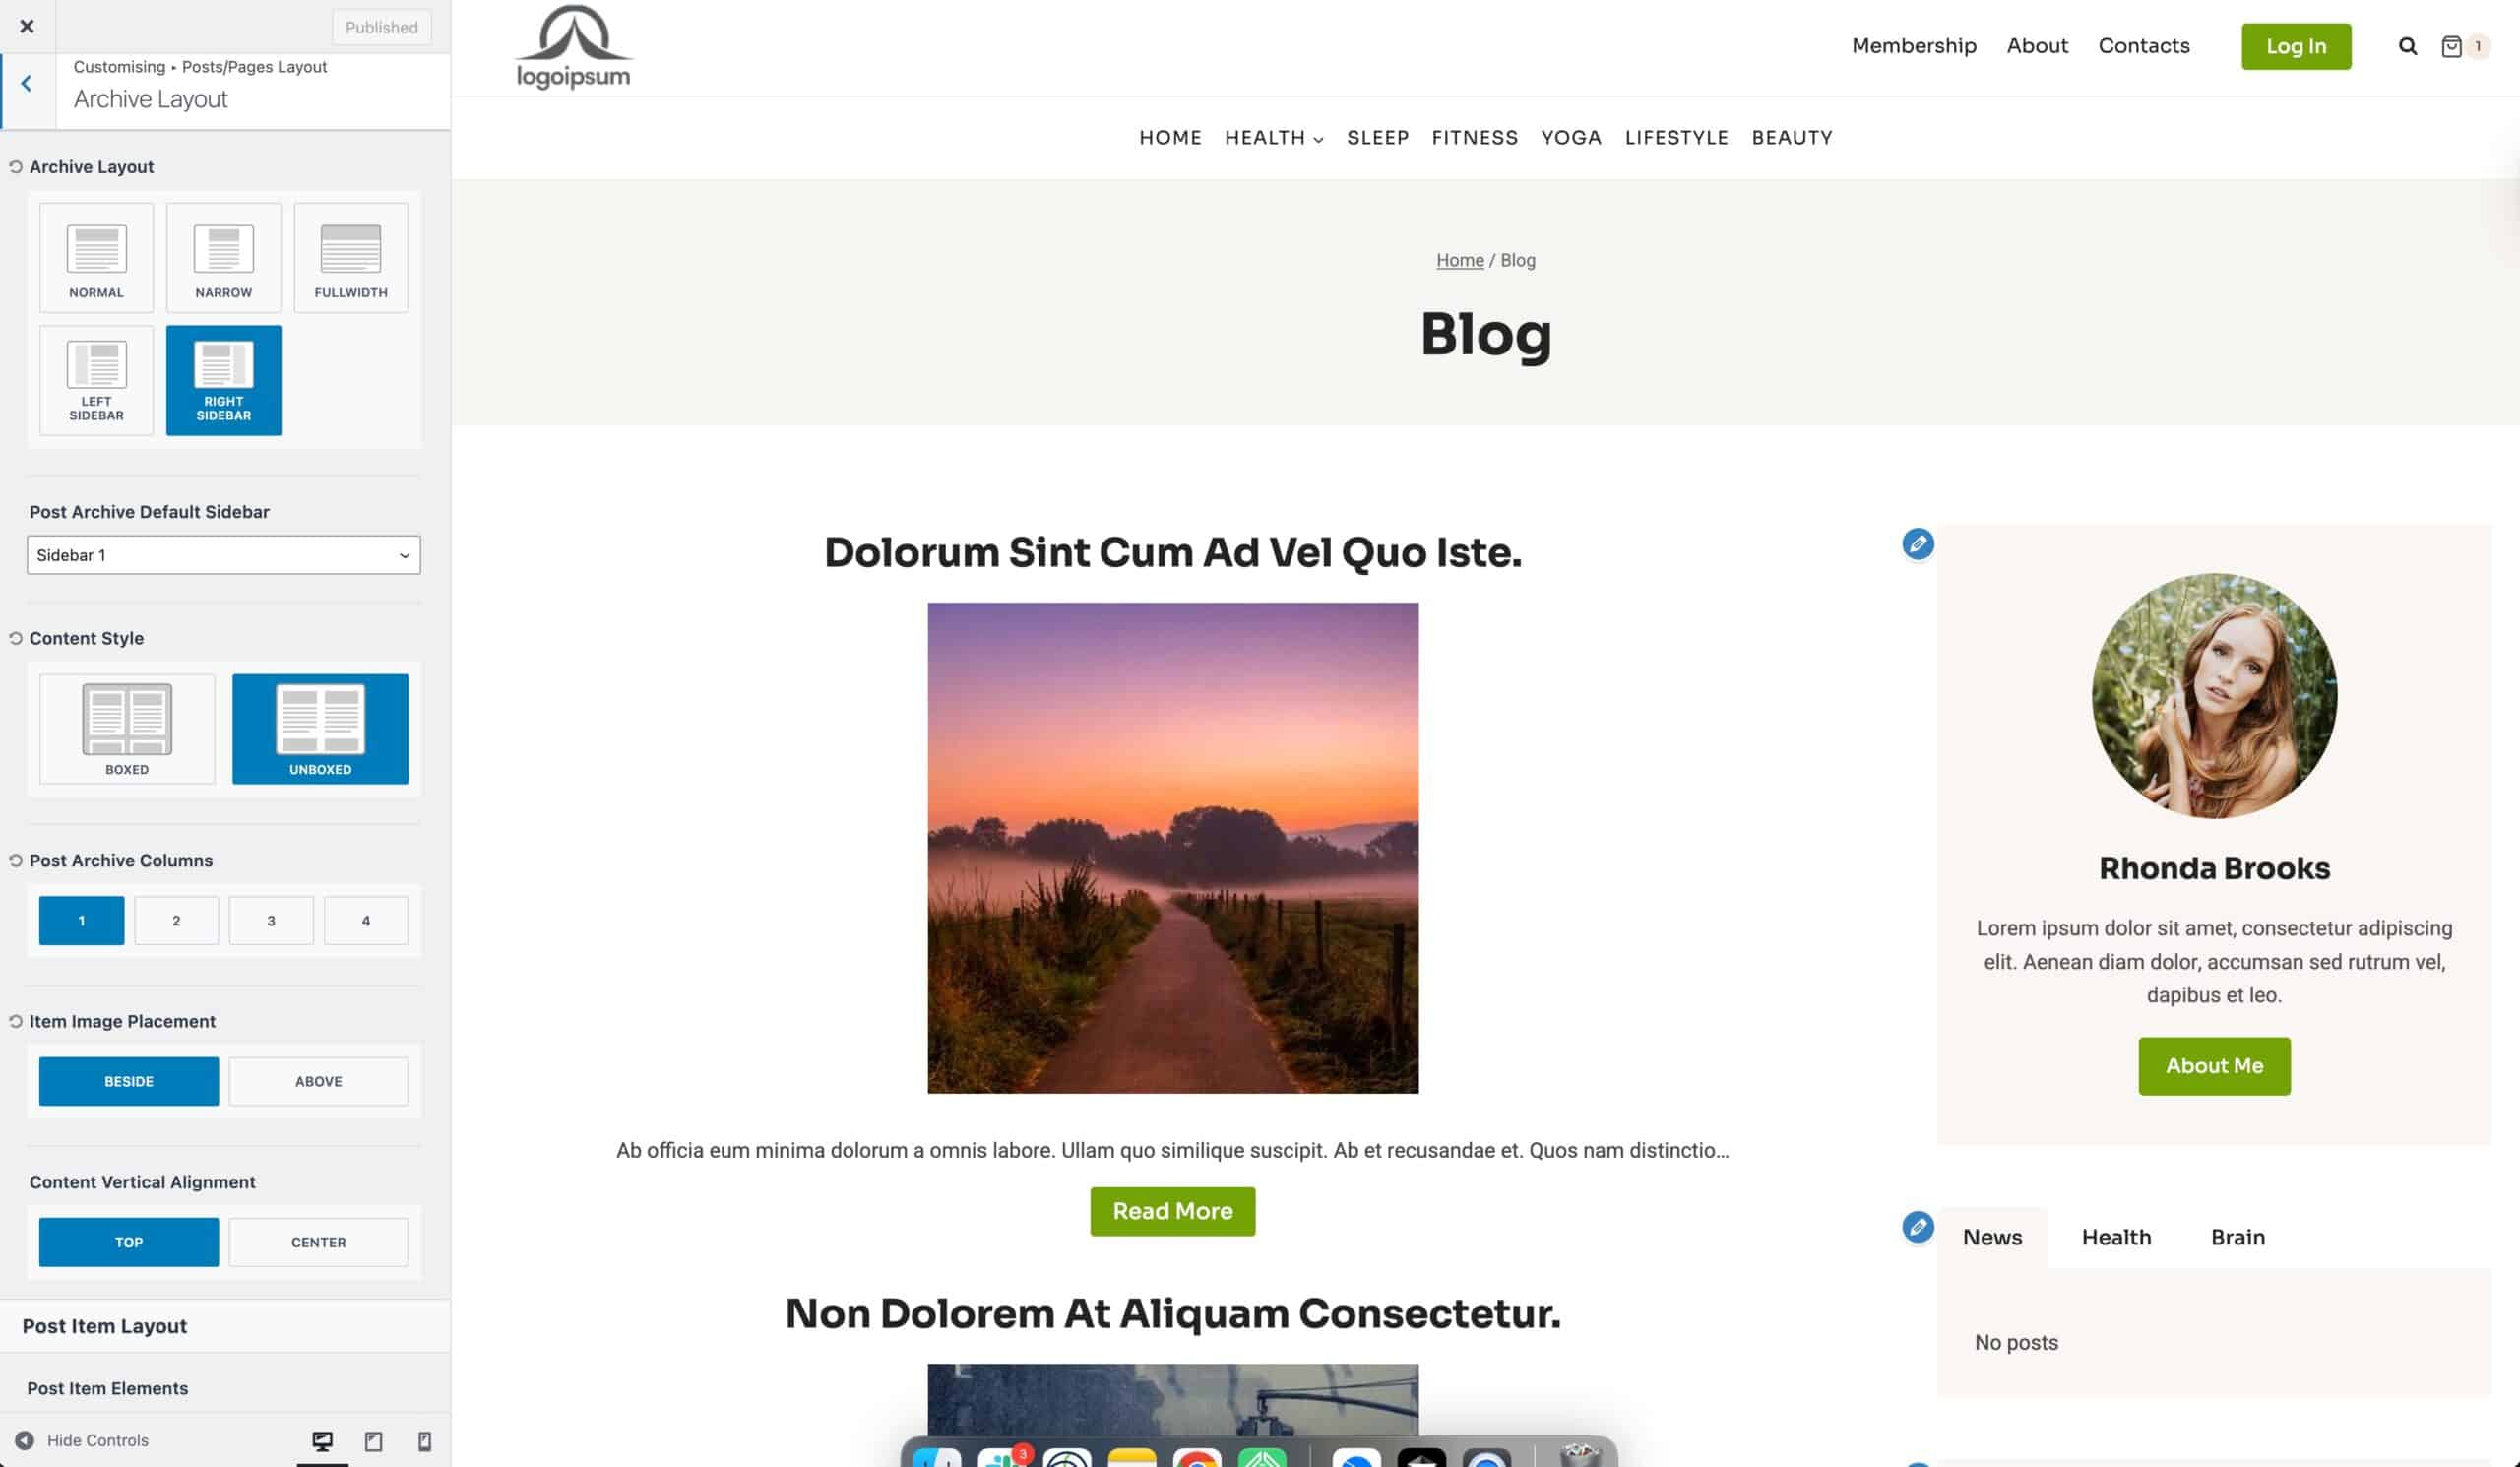
Step 3: Configure the Archive Layout
Head to the Archive Layout settings in the WordPress Customizer. Choose a single-column layout, which works best in this scenario because it allows posts to stack naturally in a continuous vertical feed.
Step 4: Enable Infinite Scroll
Finally, enable the Infinite Scroll option in the Appearance -> Kadence settings. Once activated, your blog roll will automatically load additional posts as visitors reach the bottom of the page, delivering a smooth, uninterrupted reading experience that feels both polished and user-friendly.
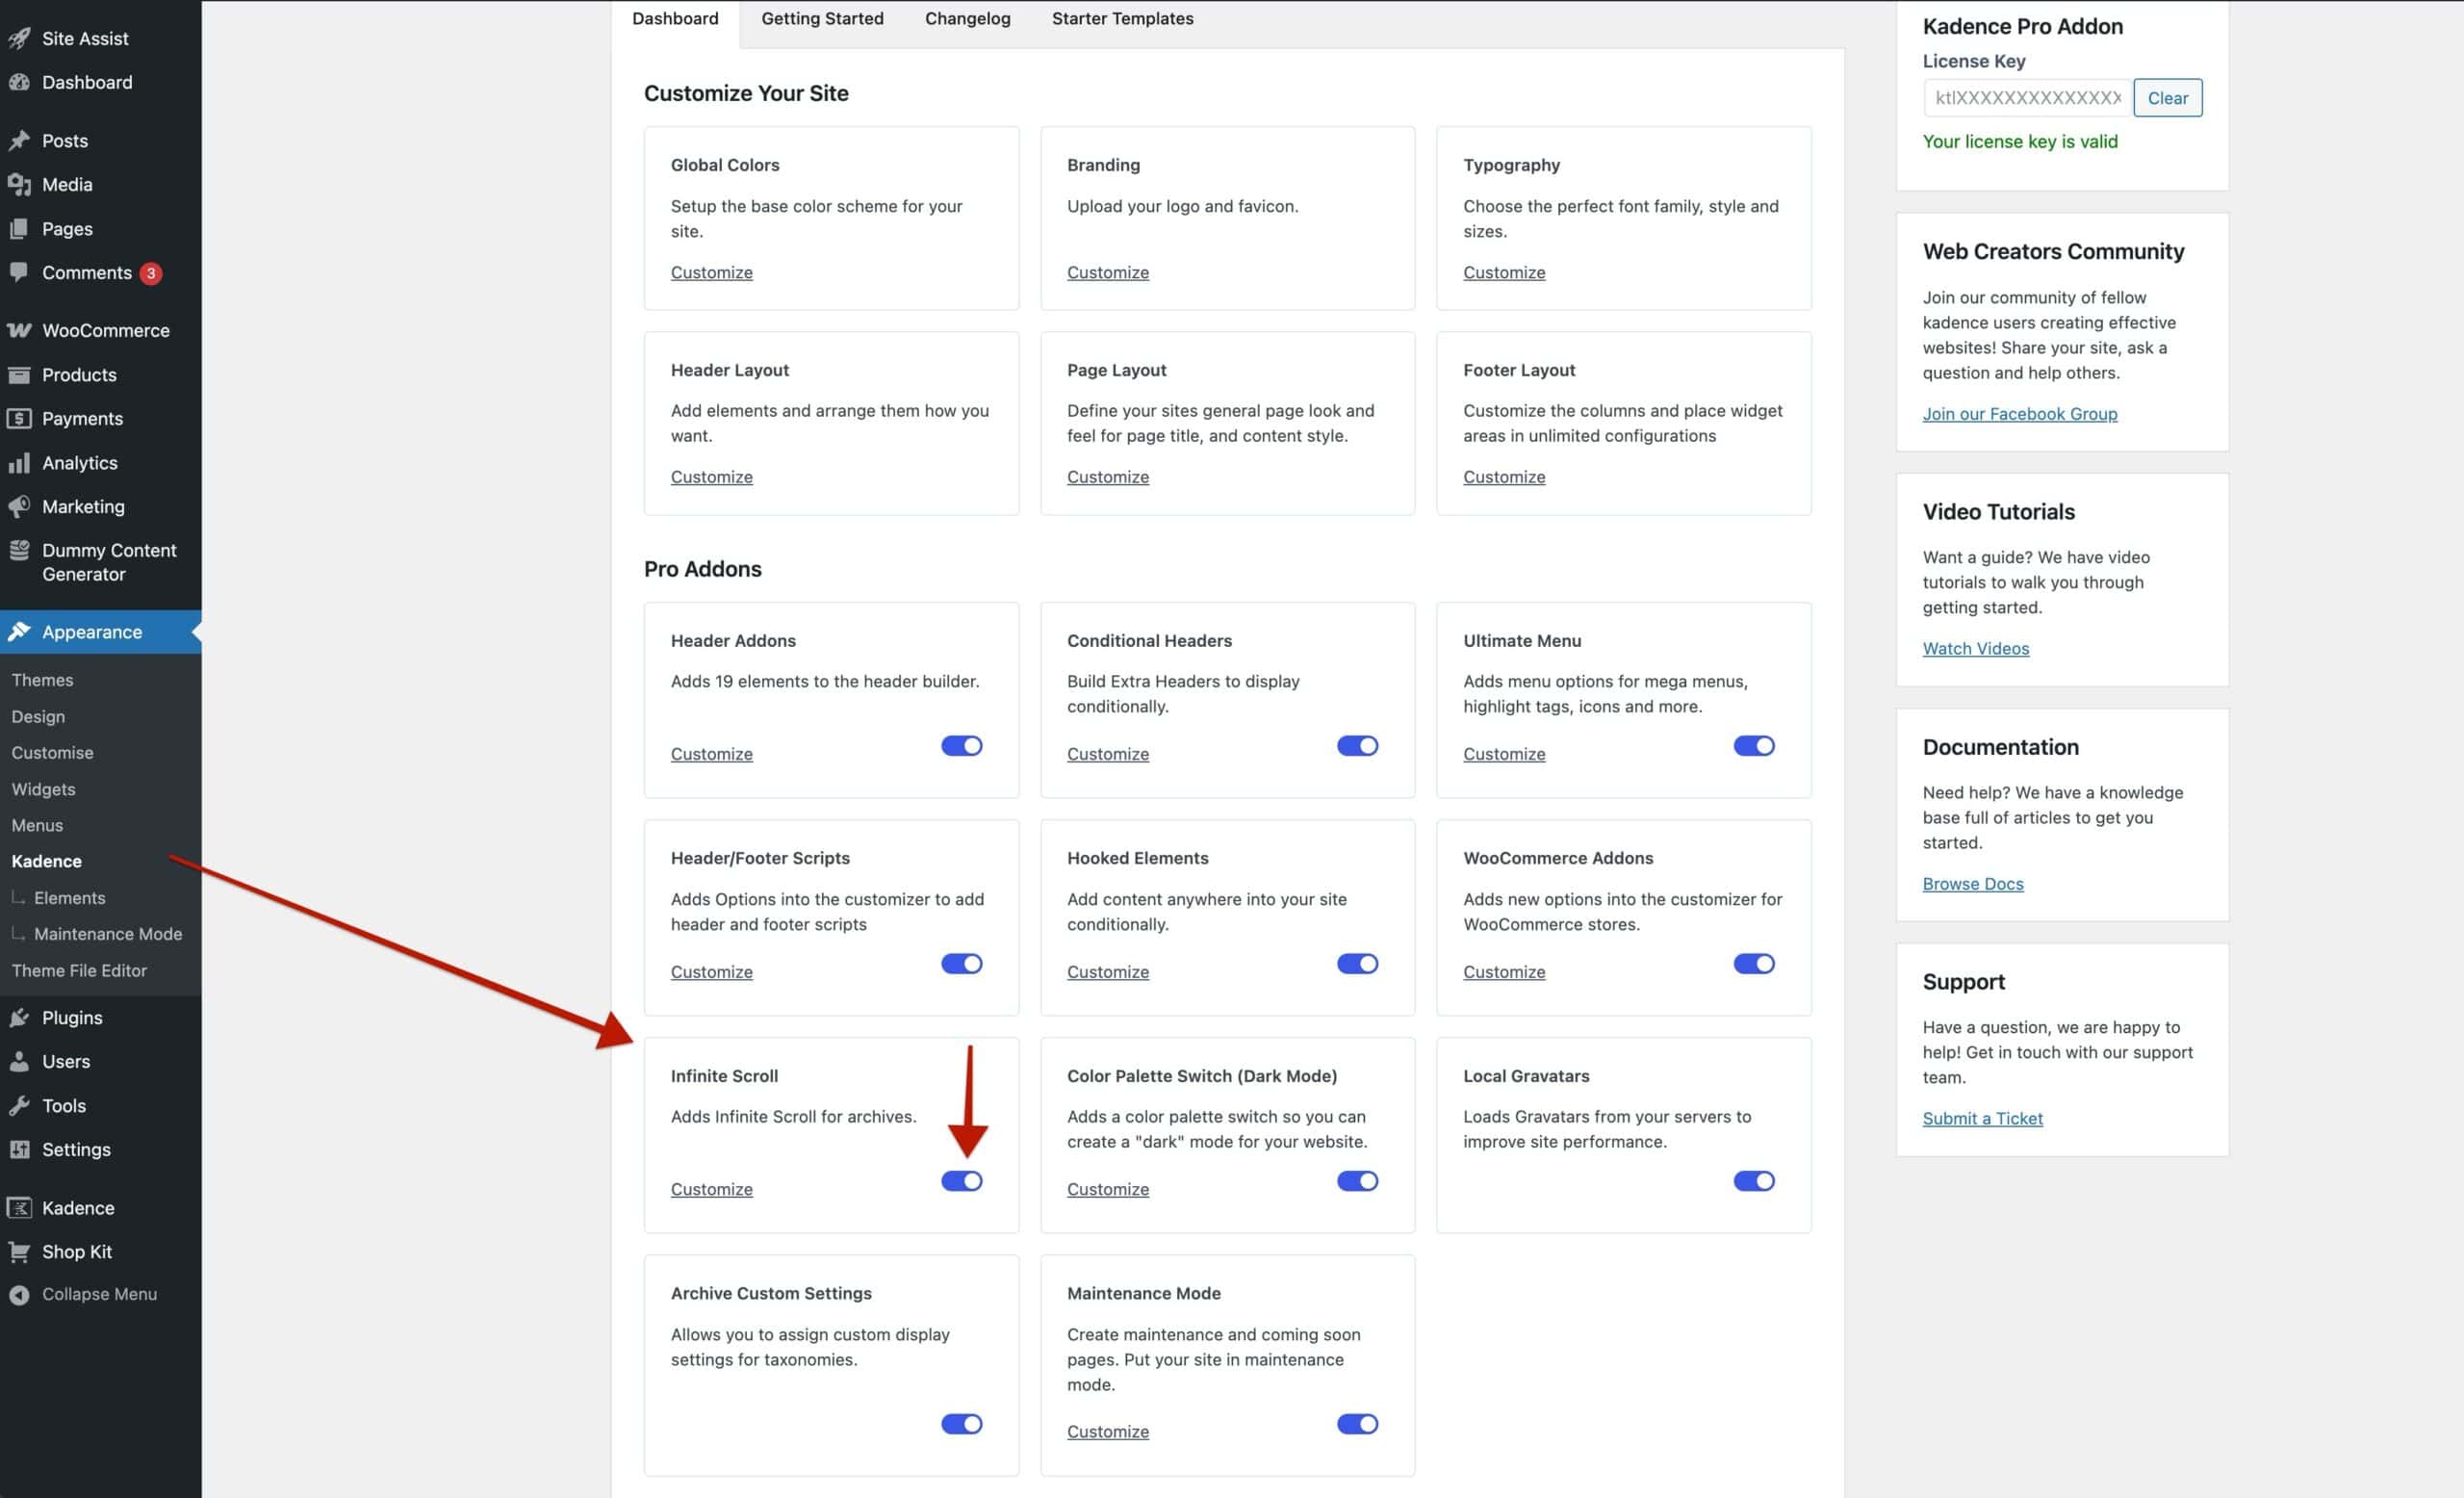
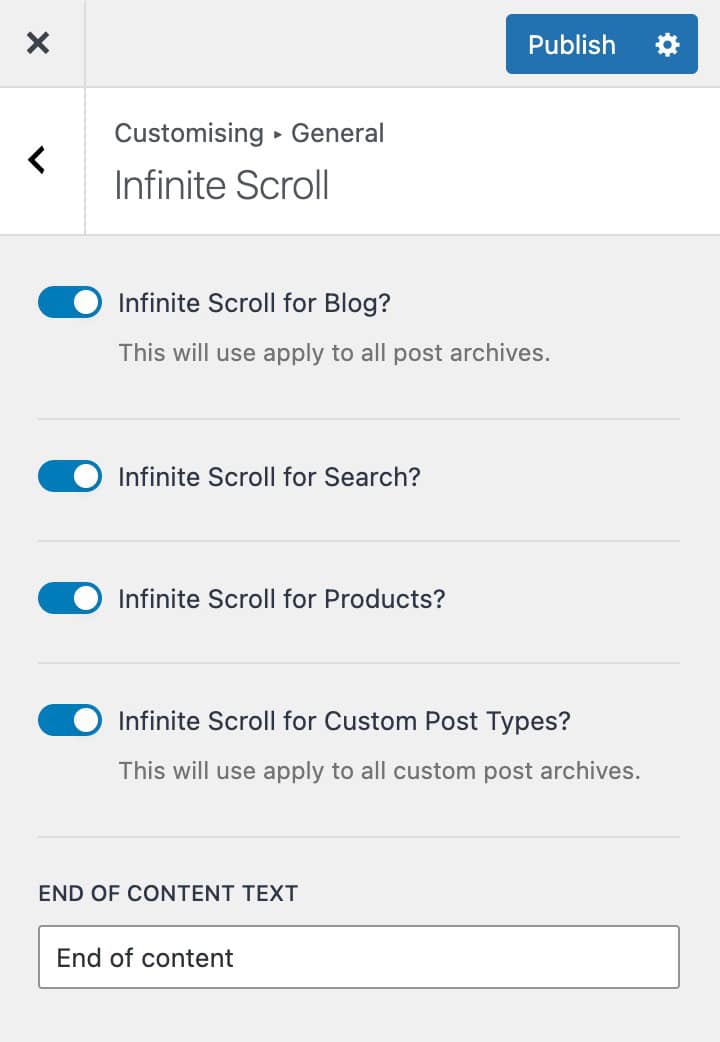
Use the Customizer -> General -> Infinite Scroll settings to control exactly where Infinite Scroll will work.
Bonus Step: Add Scroll-Triggered URL Updates
To take the user experience one step further, you can add a small JavaScript enhancement that updates the browser’s URL and page title as readers scroll through posts. This makes it easier for visitors to share or bookmark a specific article they’ve reached within the infinite scroll feed.
Here’s the snippet you can add to your site (for example, using the Code Snippets plugin):
<?php
add_action( 'wp_footer', function() {
    ?>
    <script>
    (function() {
        const observer = new IntersectionObserver(entries => {
            entries.forEach(entry => {
                if (entry.isIntersecting) {
                    const link = entry.target;
                    const href = link.getAttribute('href');
                    const title = link.textContent.trim();

                    if (href && history.pushState) {
                        history.pushState(null, title, href);
                        document.title = title; // Optional: update browser title
                    }
                }
            });
        }, { threshold: 0.5 });

        function observeHeadings(context = document) {
            const links = context.querySelectorAll('h2 a[href]'); // Optional: change heading selector for more specific use cases
            links.forEach(link => observer.observe(link));
        }

        // Initial run
        observeHeadings();

        // Re-scan after Kadence reloads content (e.g., infinite scroll)
        document.addEventListener('kadenceJSInitReload', function() {
            observeHeadings();
        });
    })();
    </script>
    <?php
});
This script looks for <h2> elements that contain links (such as your post titles). When one scrolls into view, it updates the browser’s address bar with that post’s URL and optionally updates the page title. Because it also listens for the kadenceJSInitReload event, it continues working as new posts are loaded via infinite scroll.
By combining Kadence Pro’s infinite scroll functionality with Kadence Blocks Pro, you can move beyond the standard blog roll experience and create a continuous reading flow where each post is fully displayed as visitors scroll. With just a few steps, you’ve transformed your archive page into an engaging, modern feed.
And with the optional JavaScript enhancement, you’ve taken it even further by allowing URLs and titles to update as readers progress through your content. This not only improves navigation and shareability but also delivers a browsing experience that feels intuitive and connected.
Infinite scroll doesn’t have to mean “just more of the same.” With Kadence, you can make it smarter, more dynamic, and tailored to the way your audience wants to consume content.
