
The Kadence Plus Plan is designed for site creators who want to build and manage a business or client website with more powerful tools. This plan includes premium products, such as the Creative Kit for premium starter templates and patterns, Kadence Custom Fonts, and Kadence CAPTCHA.
In addition to these plugins, the Plus Plan adds two core products that significantly expand a site creator’s design and functionality options:
- Kadence Blocks Pro: Unlocks premium blocks, features, and the full design library.
- Kadence Theme Pro: Adds advanced features to the Kadence Theme, such as hooked elements, a mega menu, and more header options.
The Plus Plan is one of the premium plans offered by Kadence. Learn more ⧉.
Before You Begin
The Plus Plan builds directly on the free Kadence products. Before installing the premium features, you should have the free Kadence Theme, the free Kadence Blocks plugin, and the free Kadence Starter Templates plugin already installed and activated.
A helpful guide is available for users who have not yet installed the free products: Getting Started with Free Kadence Products.
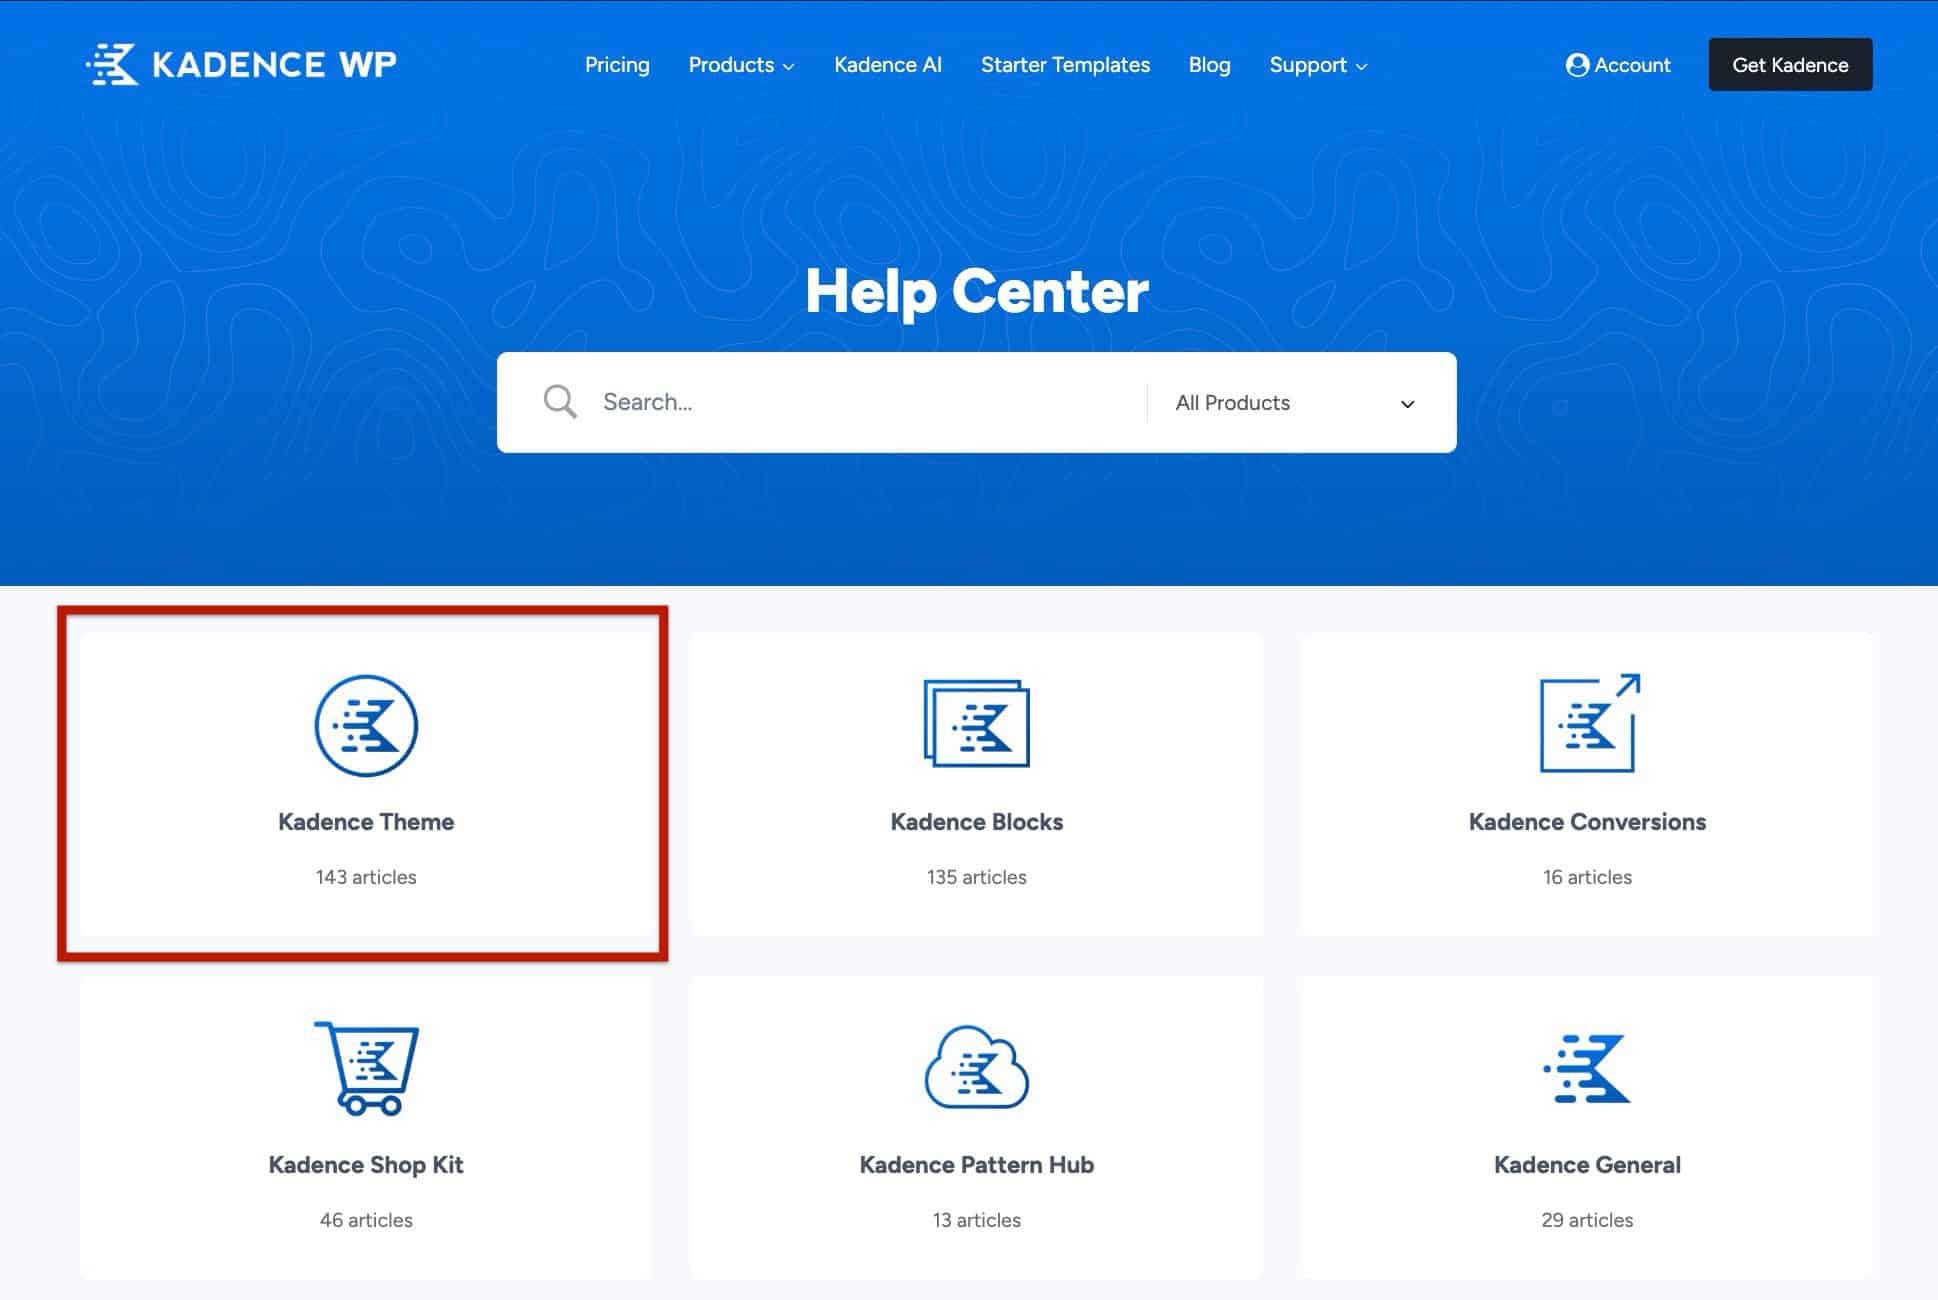
Understanding How to Use the Resource Hub
This guide is designed to help you get started with Kadence products. It highlights some of the key tools and premium features available across the Kadence ecosystem, though it doesn’t cover every feature or each feature in full detail for each product. Every Kadence product includes its own powerful options and workflows.
To continue learning beyond this guide, the Kadence Resource Hub is your best next stop. It’s organized into dedicated Knowledge Bases for each product, making it easy to:
- Browse by category to explore topics specific to a feature or product.
- Use the search bar to quickly find setup guides, troubleshooting tips, and tutorials.
- Stay up to date with new documentation and feature releases as they’re added.
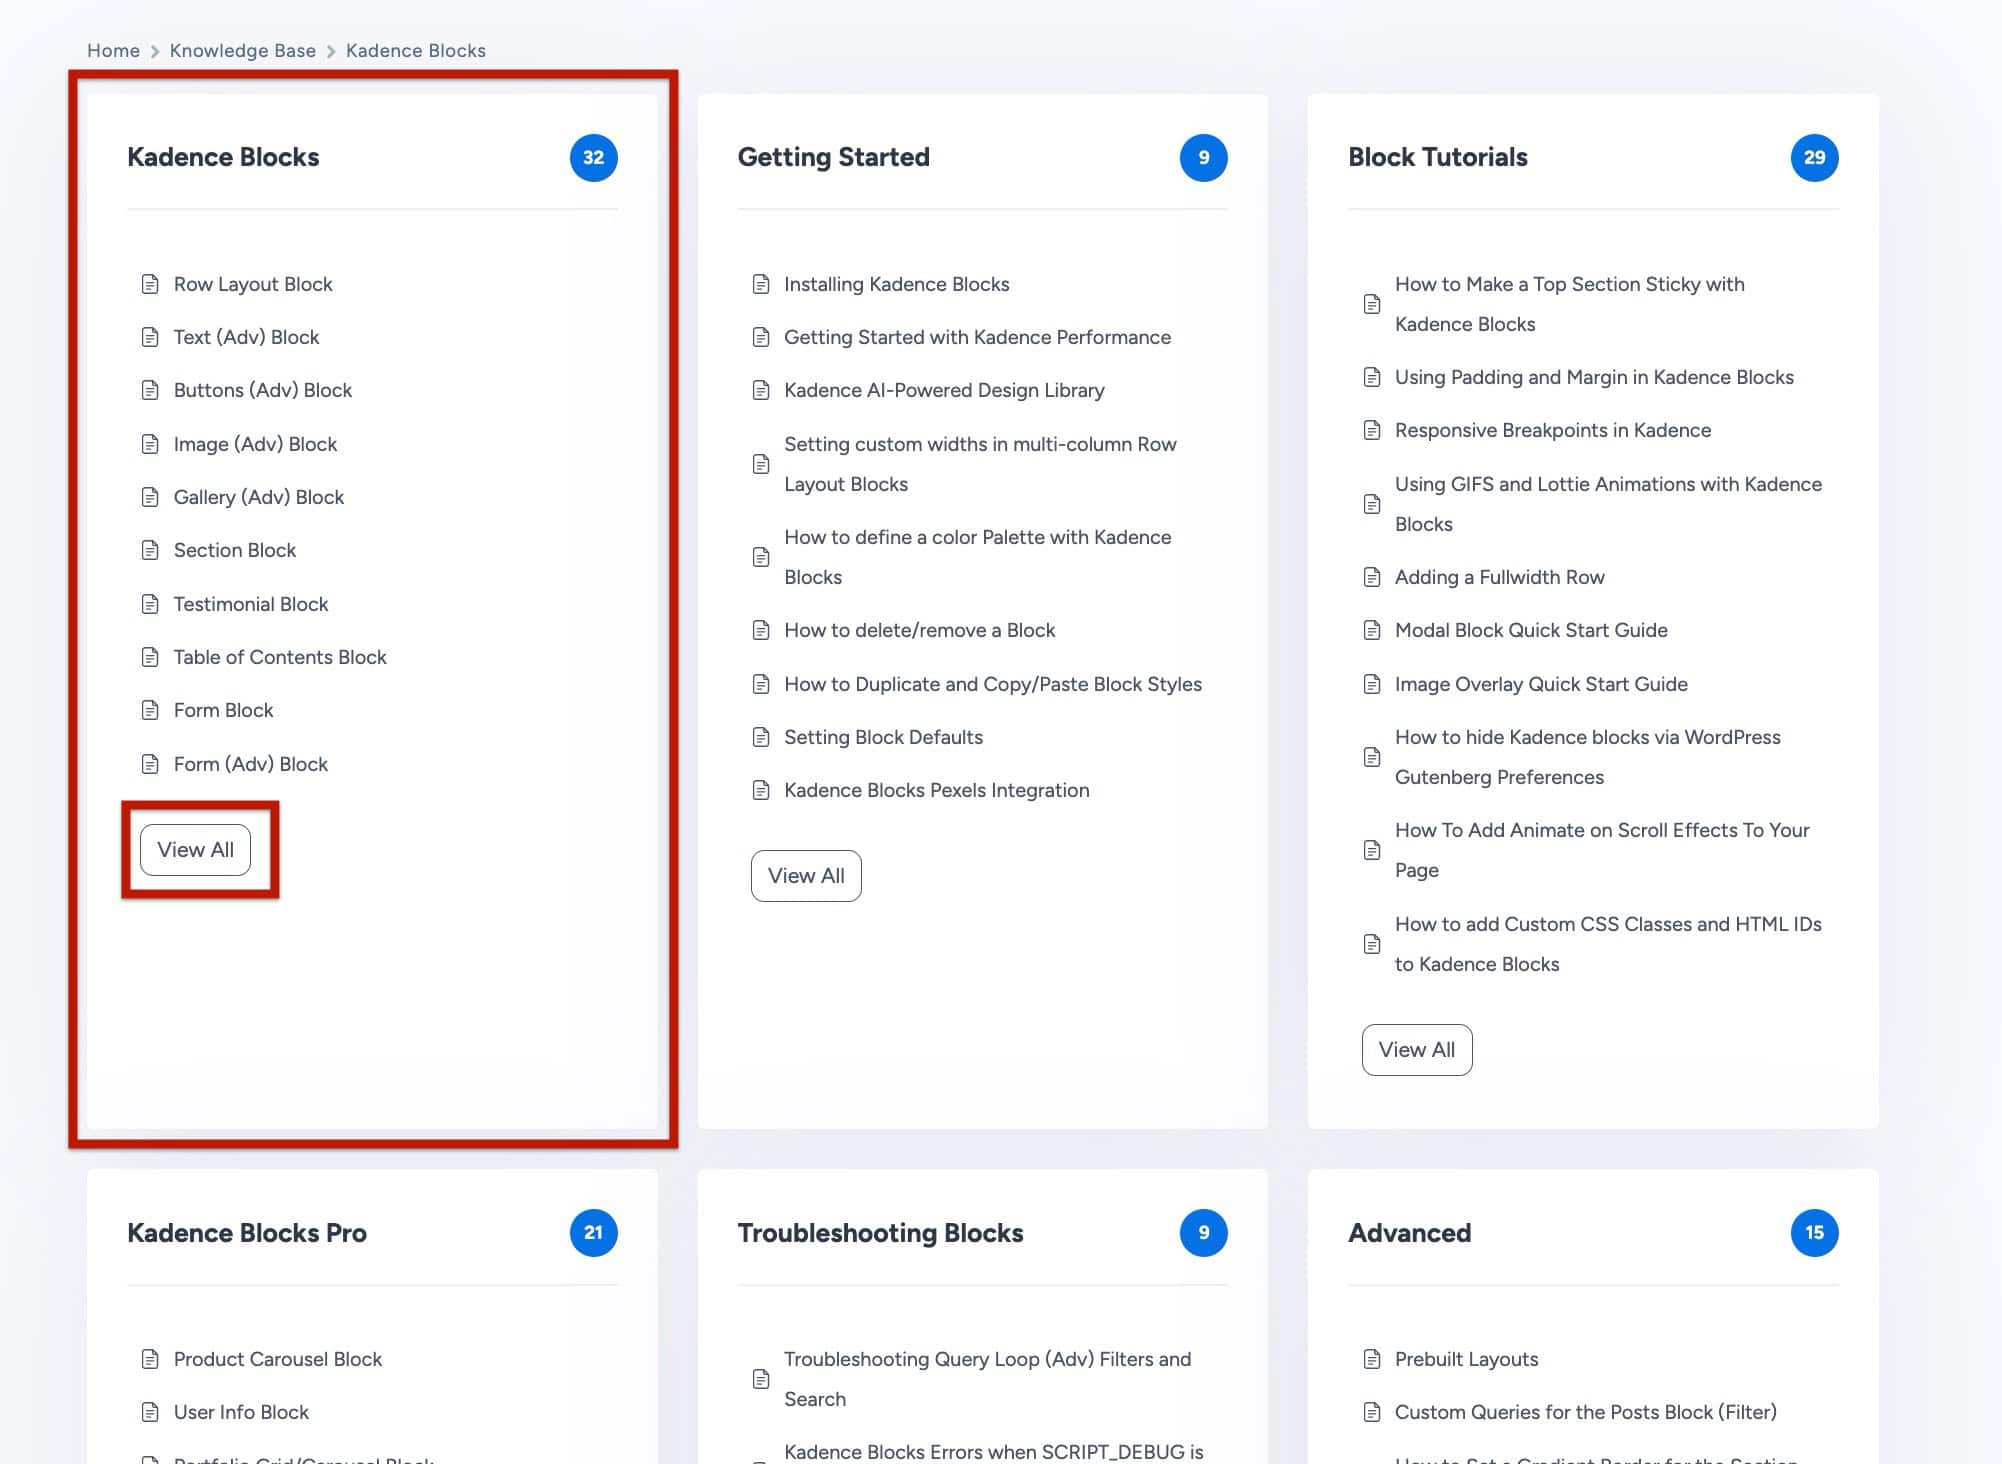
From the main Resource Hub page, you can navigate to the appropriate Knowledge Base. For example, Kadence Blocks Pro and Kadence Blocks Free are both covered in the Kadence Blocks Knowledge Base. Similarly, Kadence Theme Kit Pro resources can be found in the Kadence Theme Knowledge Base.
Other premium plugins have their own dedicated Knowledge Base with detailed categories and articles inside.
Click into the relevant Knowledge Base to explore its categories and find the information you need. You can also use the search bar at the top of the Resource Hub to quickly locate specific documents.
Learning how to navigate the Resource Hub will help you find answers faster. Whether you’re setting up your first site, refining performance, or exploring advanced customization options.
Core Kadence Plugins
The Core Kadence Plugins include the Kadence Blocks Pro Plugin to extend the free Kadence Blocks Plugin and the Kadence Theme Kit Pro Plugin to extend the free Kadence Theme. The combination of these two plugins on your website will also unlock Premium Design Library Items along with Premium Starter Templates.
Installing Kadence Blocks Pro
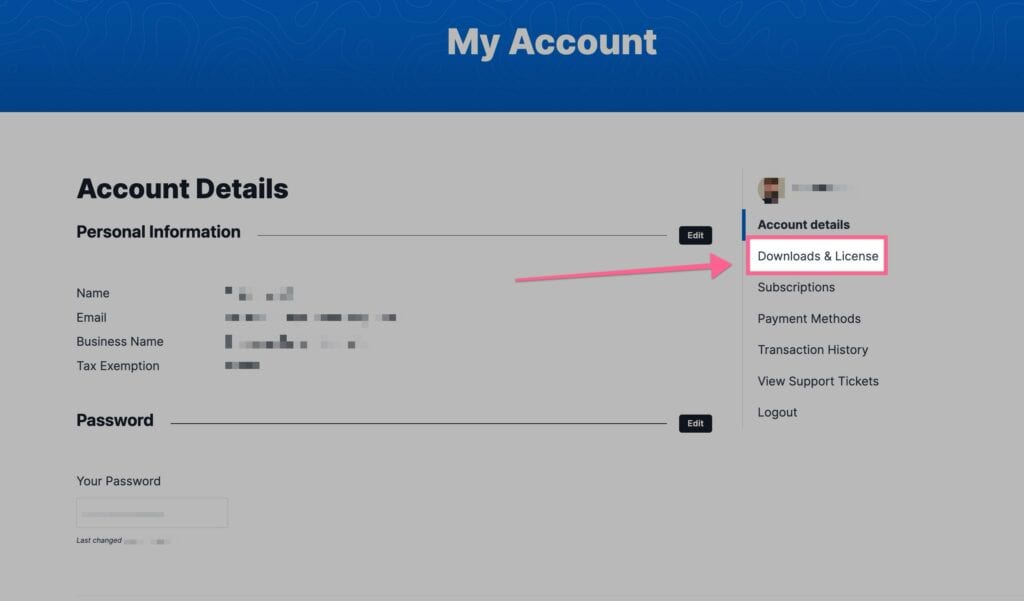
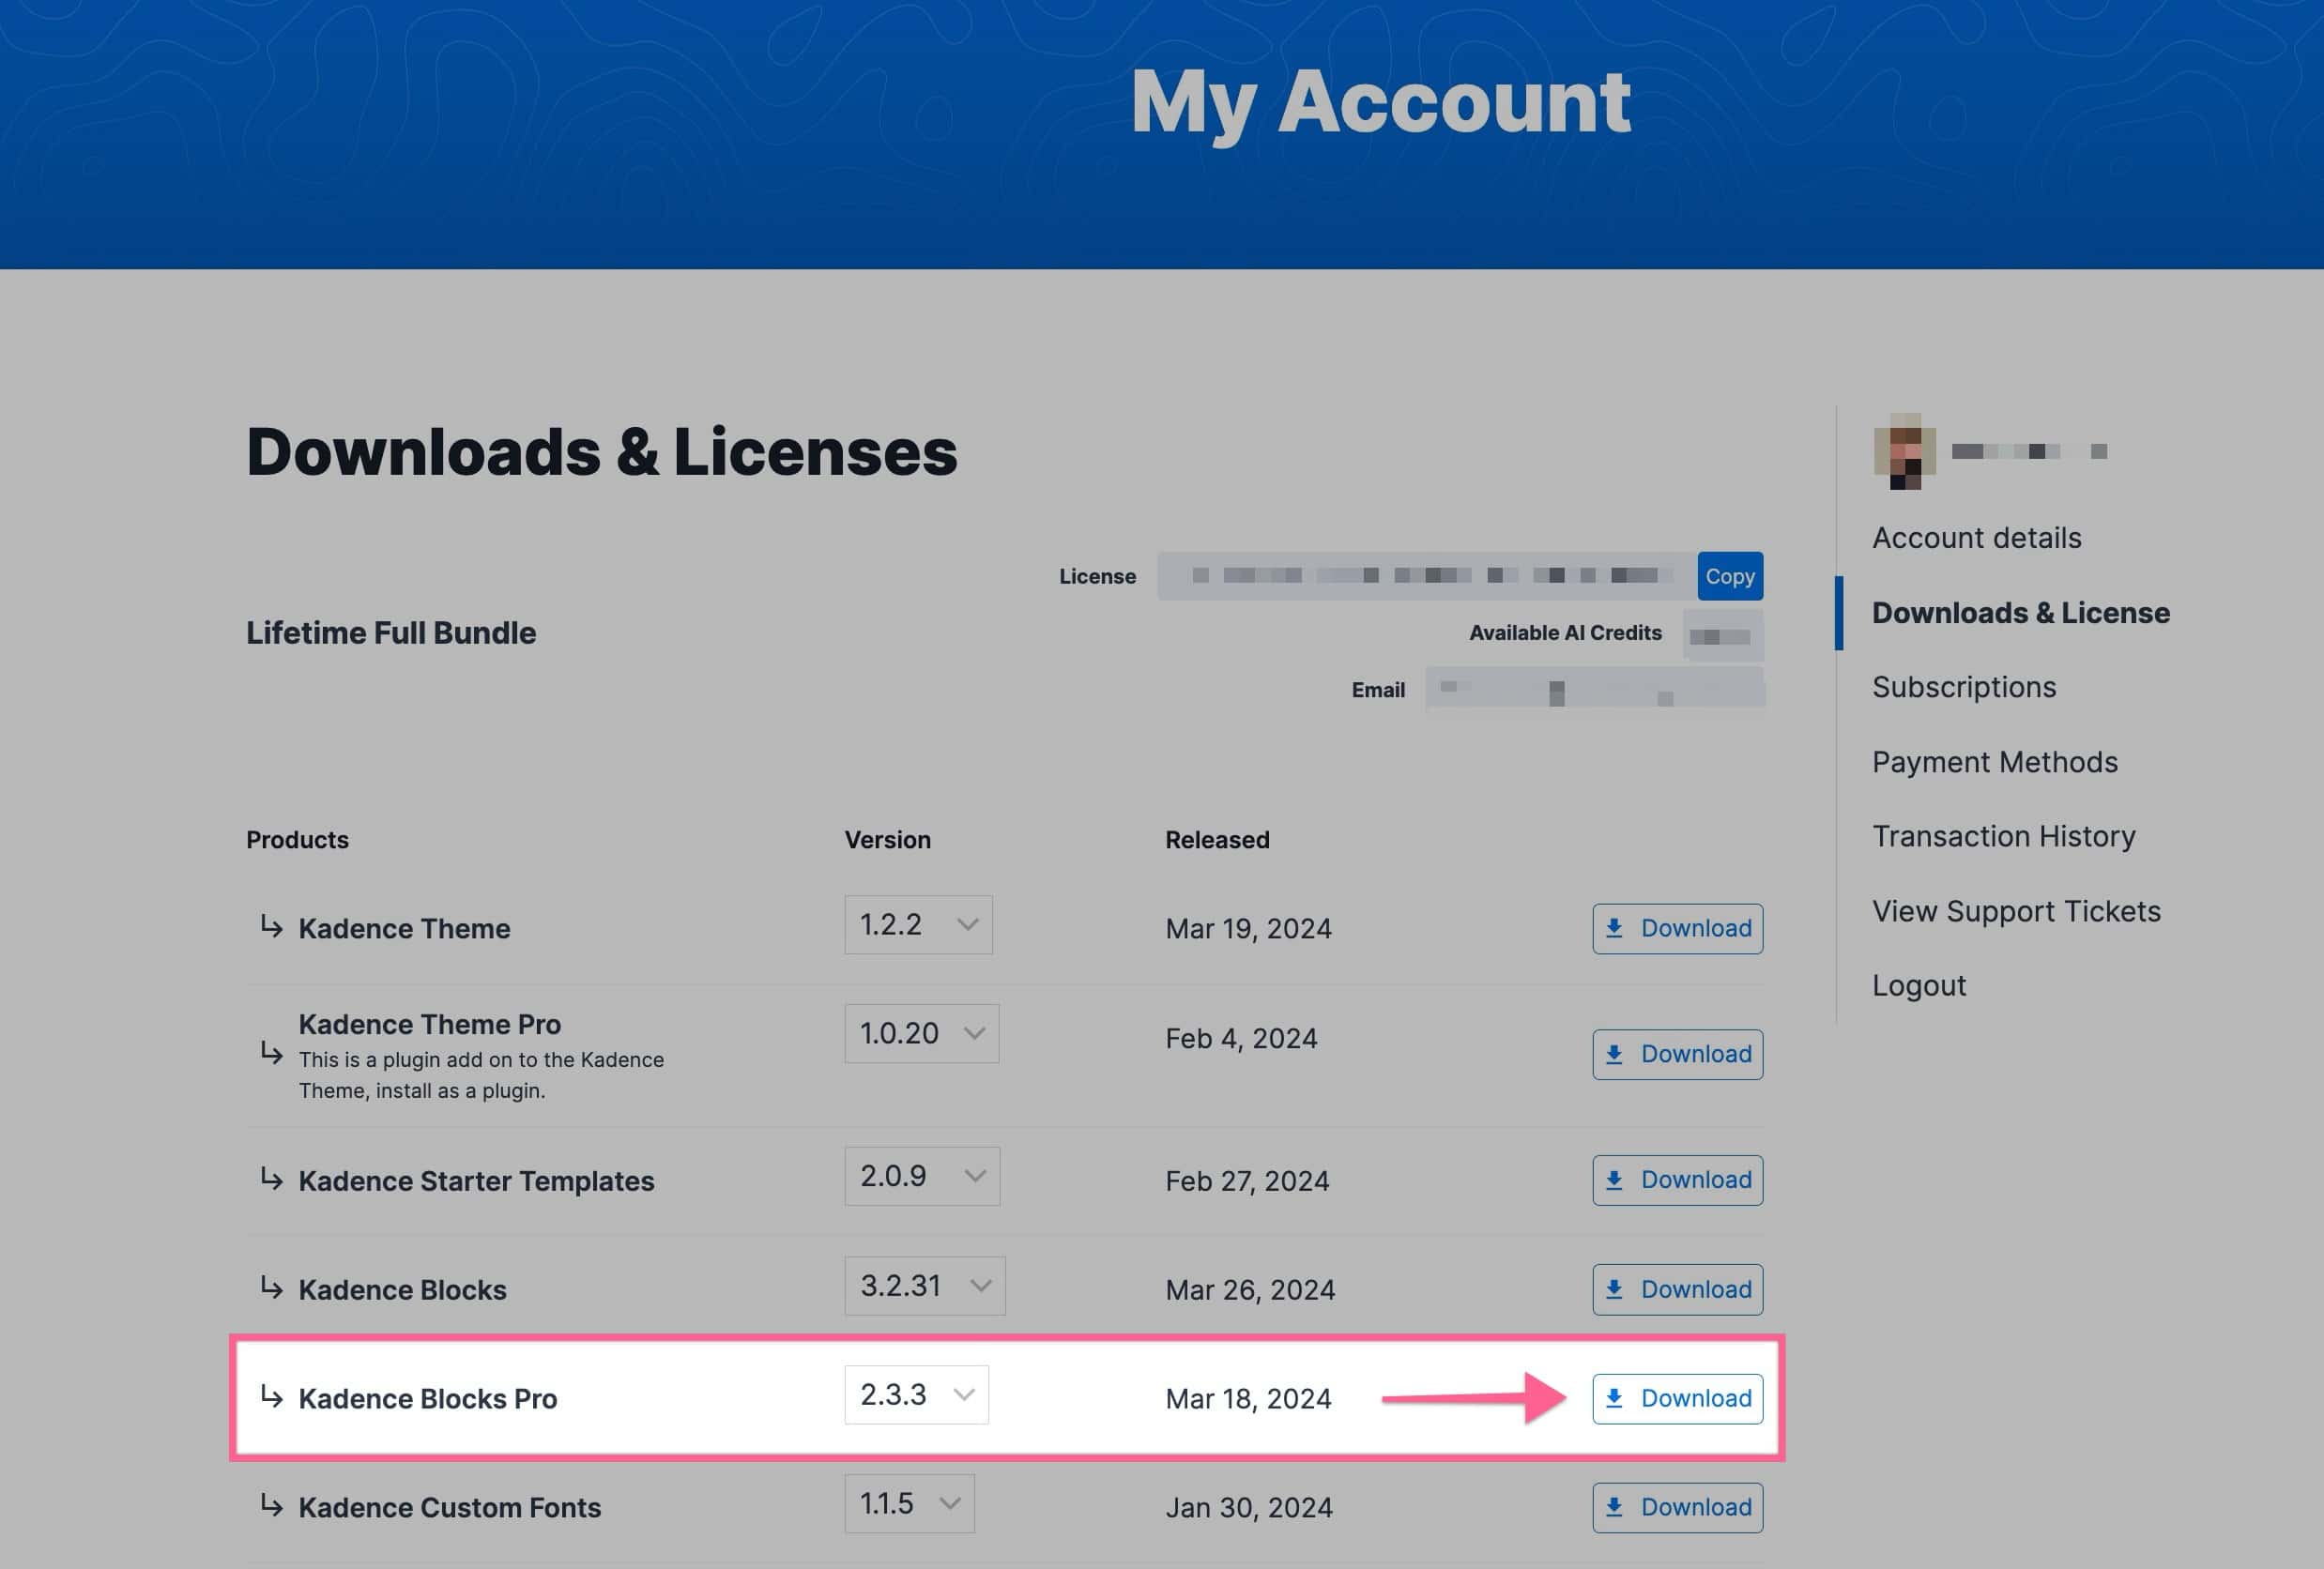
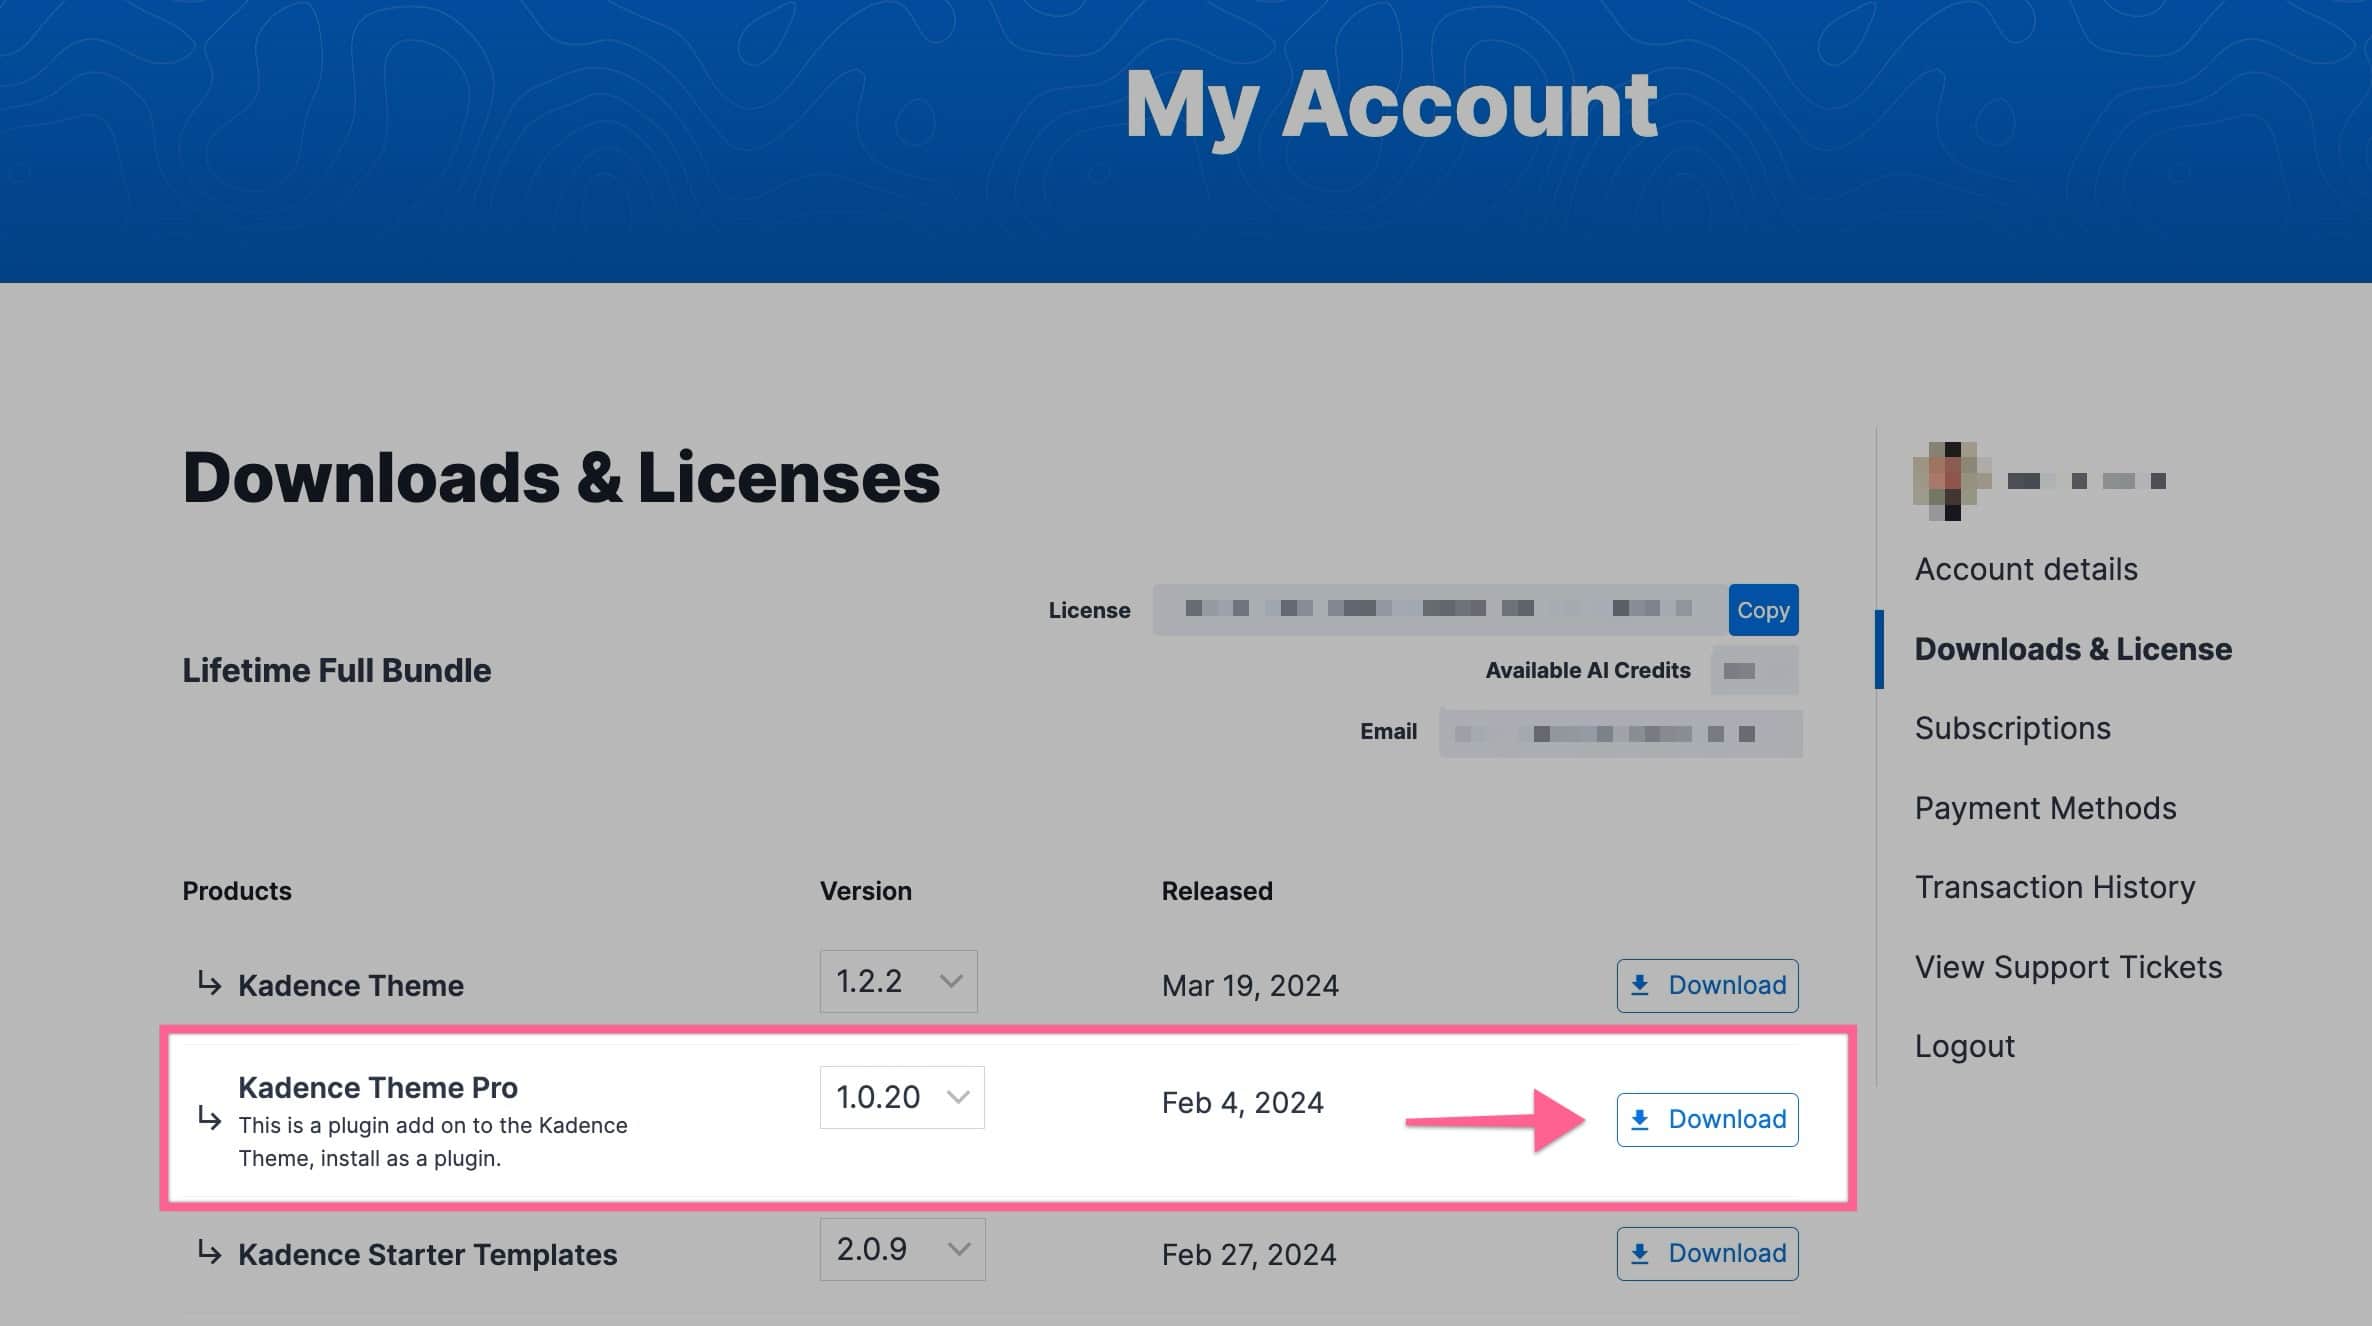
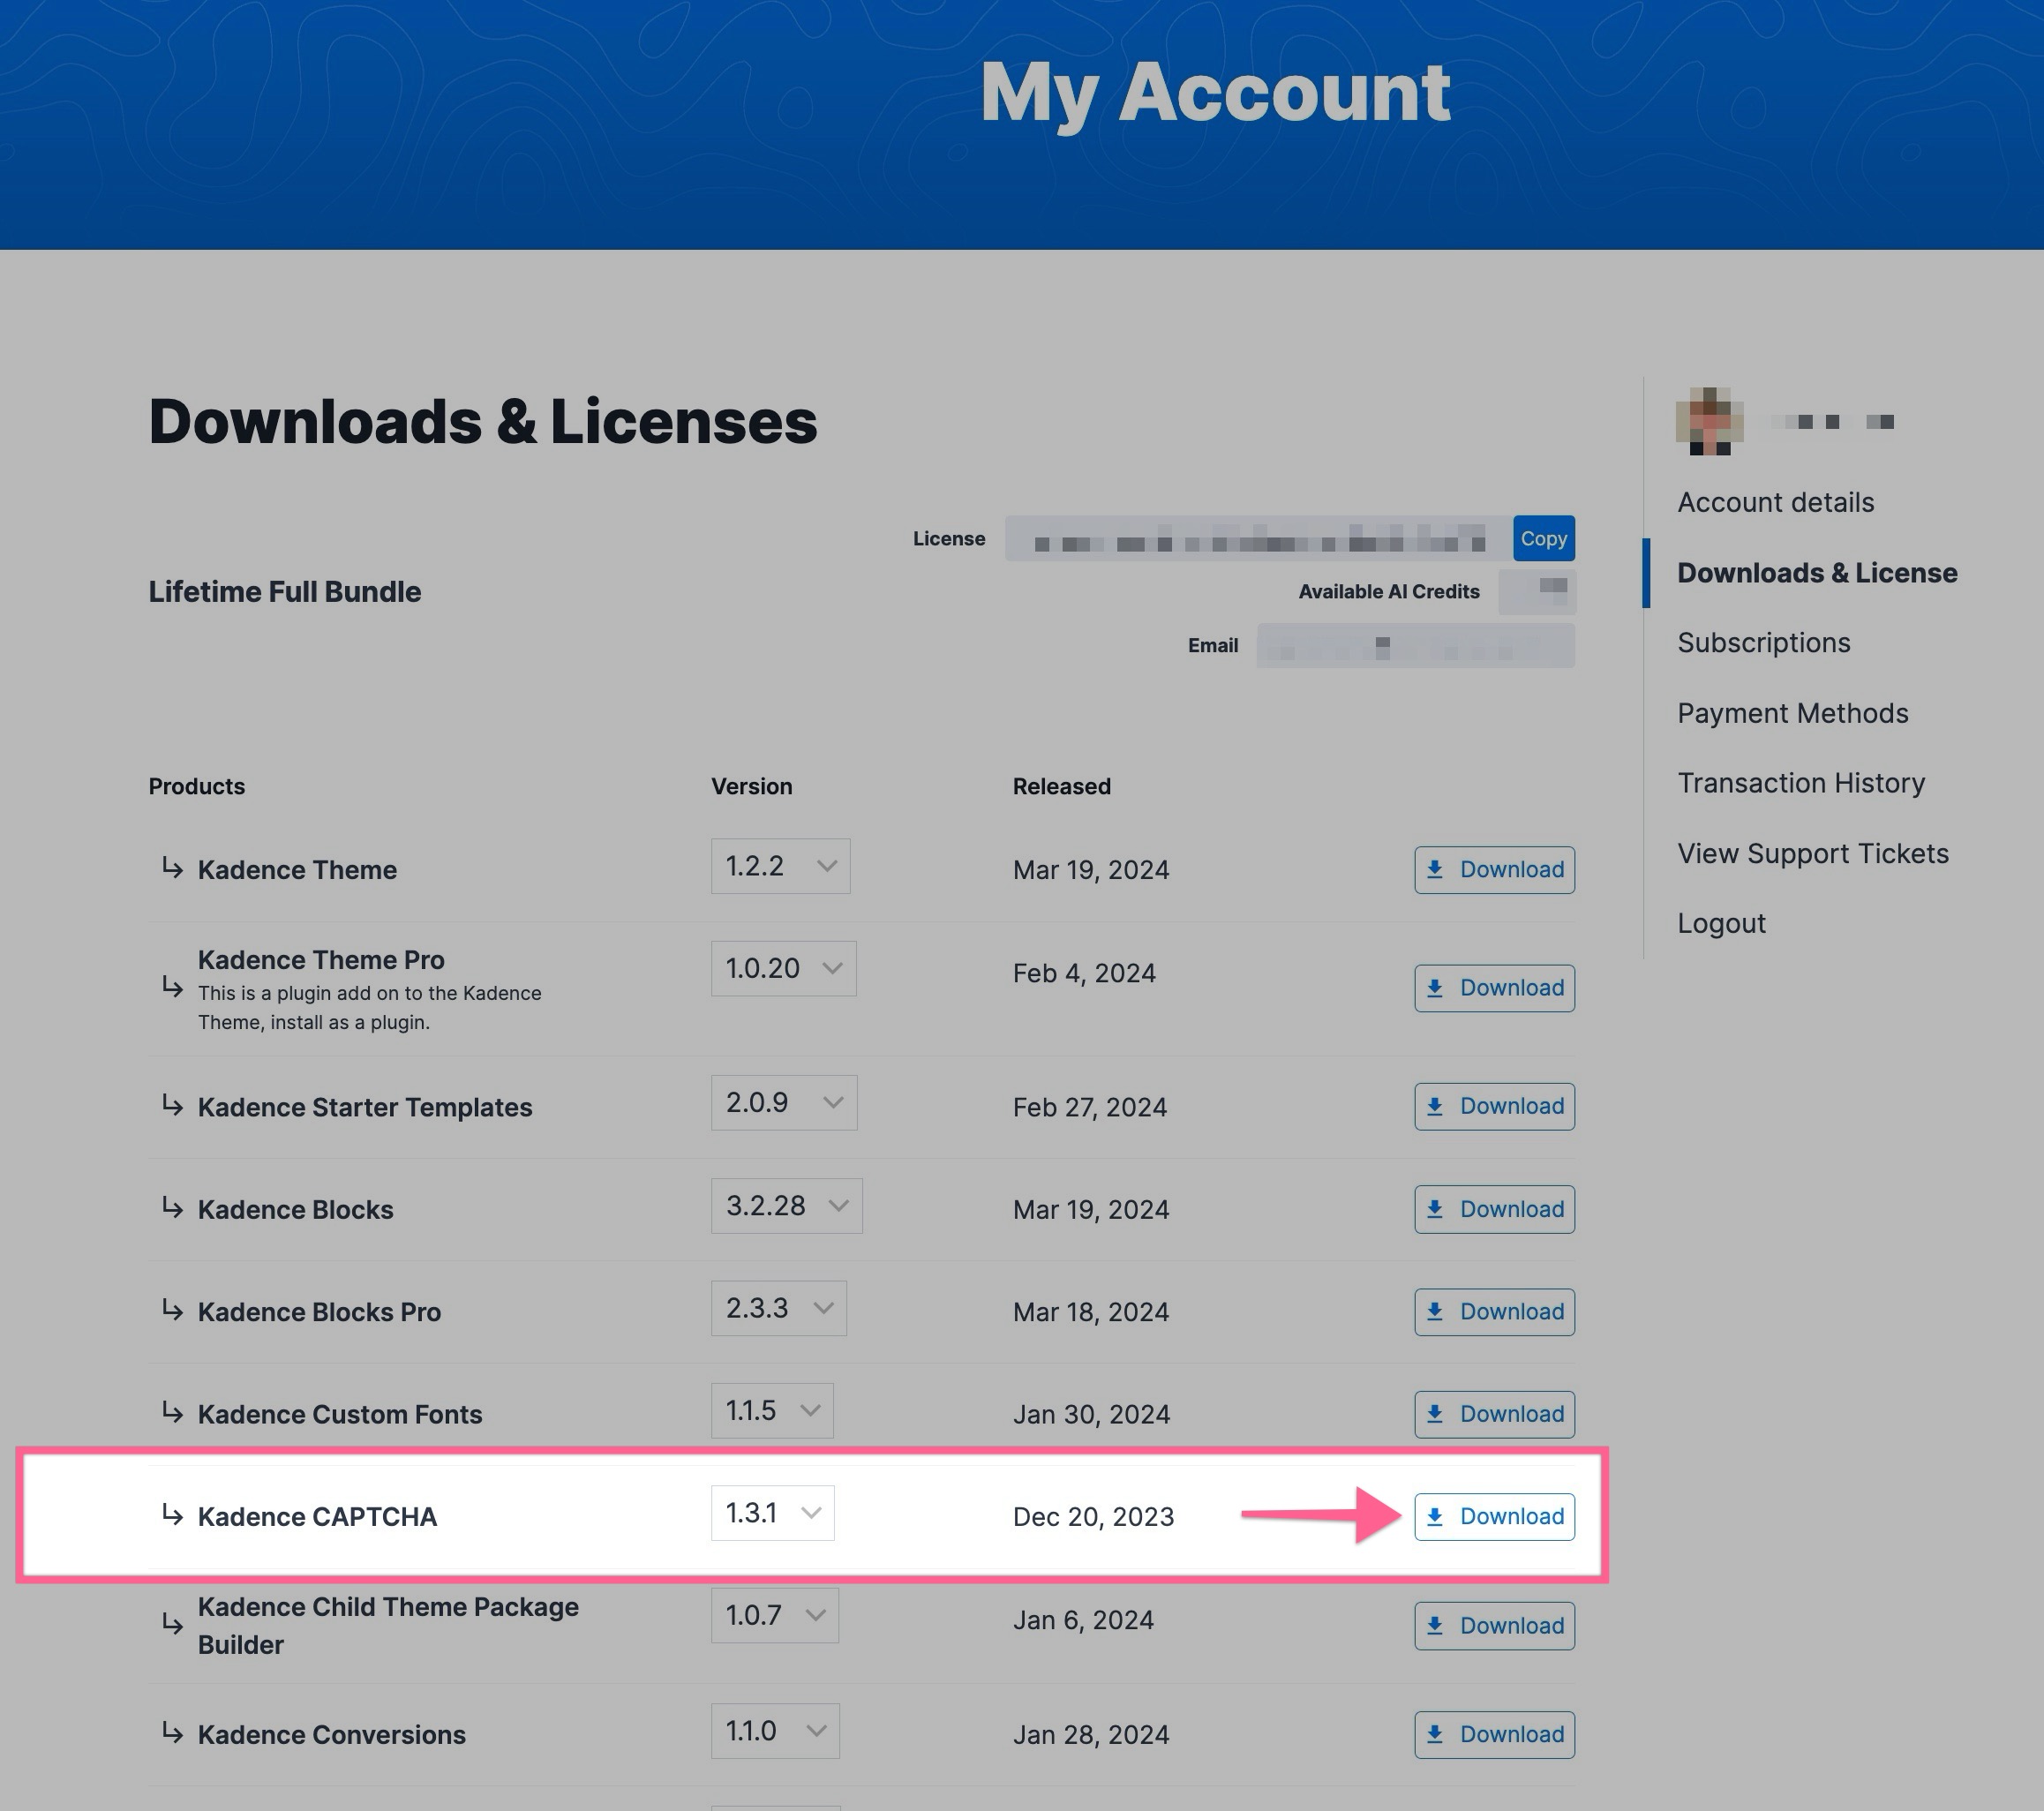
- Log in to the Kadence account and go to the Downloads section.
- Download the Kadence Blocks Pro zip file to a computer.
- In the WordPress Dashboard, navigate to Plugins → Add New Plugin.
- Click the Upload Plugin button and choose the zip file.

- After the installation is complete, click Activate Plugin.

You now have full access to Kadence Blocks Pro features.
Blocks Pro Features
The Kadence Blocks Pro plugin expands the Kadence Blocks toolkit with advanced features and powerful blocks for creating complex and dynamic content. Some popular Blocks Pro features are listed below. However, there are many more features, and this is a brief overview.
- Dynamic Content ⧉: With Kadence Blocks Pro, Dynamic Content lets you insert content that’s not statically typed but pulled dynamically from your site’s database or custom fields.
- You can pull values like post title, URL, excerpt, featured image, metadata, or custom fields.
- It’s available in many Kadence Blocks (Advanced Text, Advanced Image, Video Popup, Section, Icon, etc.), so your design can adapt based on context.
- Modal Block ⧉: The Modal block lets you create overlay windows (popups) without leaving the current page.
- Populate a Modal container that can be opened on click.
- You can also control the trigger, overlay style, close button, and visual styling.
- Post Grid/Carousel Block ⧉: This block is for listing posts, pages, or custom content in grid, masonry, or carousel layouts.
- You choose which post types to display and can filter the post query by taxonomies.
- Multiple layout options, including a carousel with auto-play options.
- Query Loop (Adv) Block ⧉: The Query Loop (Adv) block gives you full control over how content is queried and displayed.
- Use dynamic Advanced Query Loops and Query Cards to display post loop content.
- You can include filter controls (dropdowns, checkboxes, text search, and more) that let users refine the displayed results based on taxonomy, metadata, date, and more.
To view all of the Premium Blocks in detail, view the Kadence Blocks Pro documentation list.
Kadence Blocks Pro adds premium blocks to WordPress and adds extensive features to the Free Kadence Blocks plugin. To see all the possibilities with Kadence Blocks Free + Pro, check out the Kadence Blocks Knowledge Base.
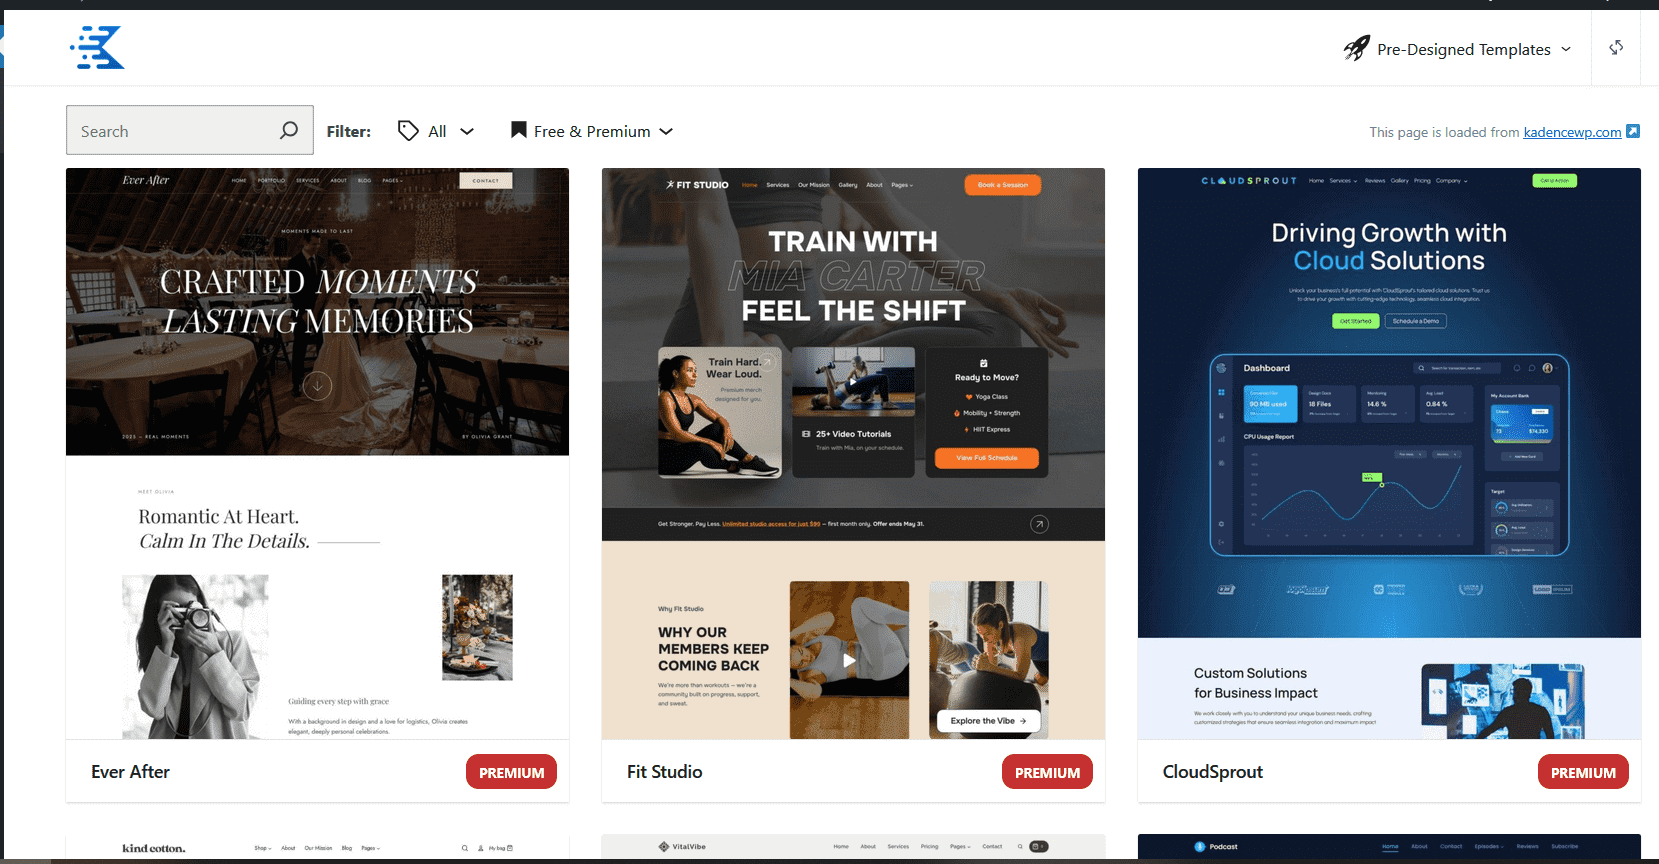
Using the Premium Design Library
The Kadence Blocks Pro plugin also provides a premium library of pre-designed patterns and pages that can be used within any page or post.
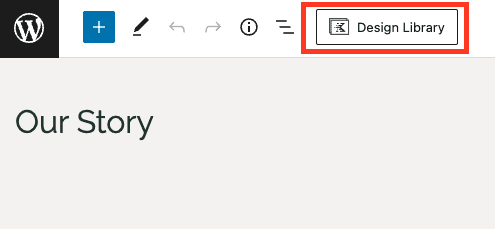
- When editing a page or post, click the Design Library icon in the top-right corner of the editor.
- The Kadence Design Library offers Pre-Designed Patterns along with AI Patterns. At the top left of the Design Library modal, you can find options to switch between By Design or With AI.

- AI Design Library Items require that you first activate Kadence AI ⧉ and provide the website with context. Learn more about using the AI Design Library ⧉.
- Pre-designed Library Items are ready to use out of the box. Learn more about using the Pre-designed Design Library ⧉.
- Browse the selection of free and premium patterns. The premium patterns are marked as “Premium”.
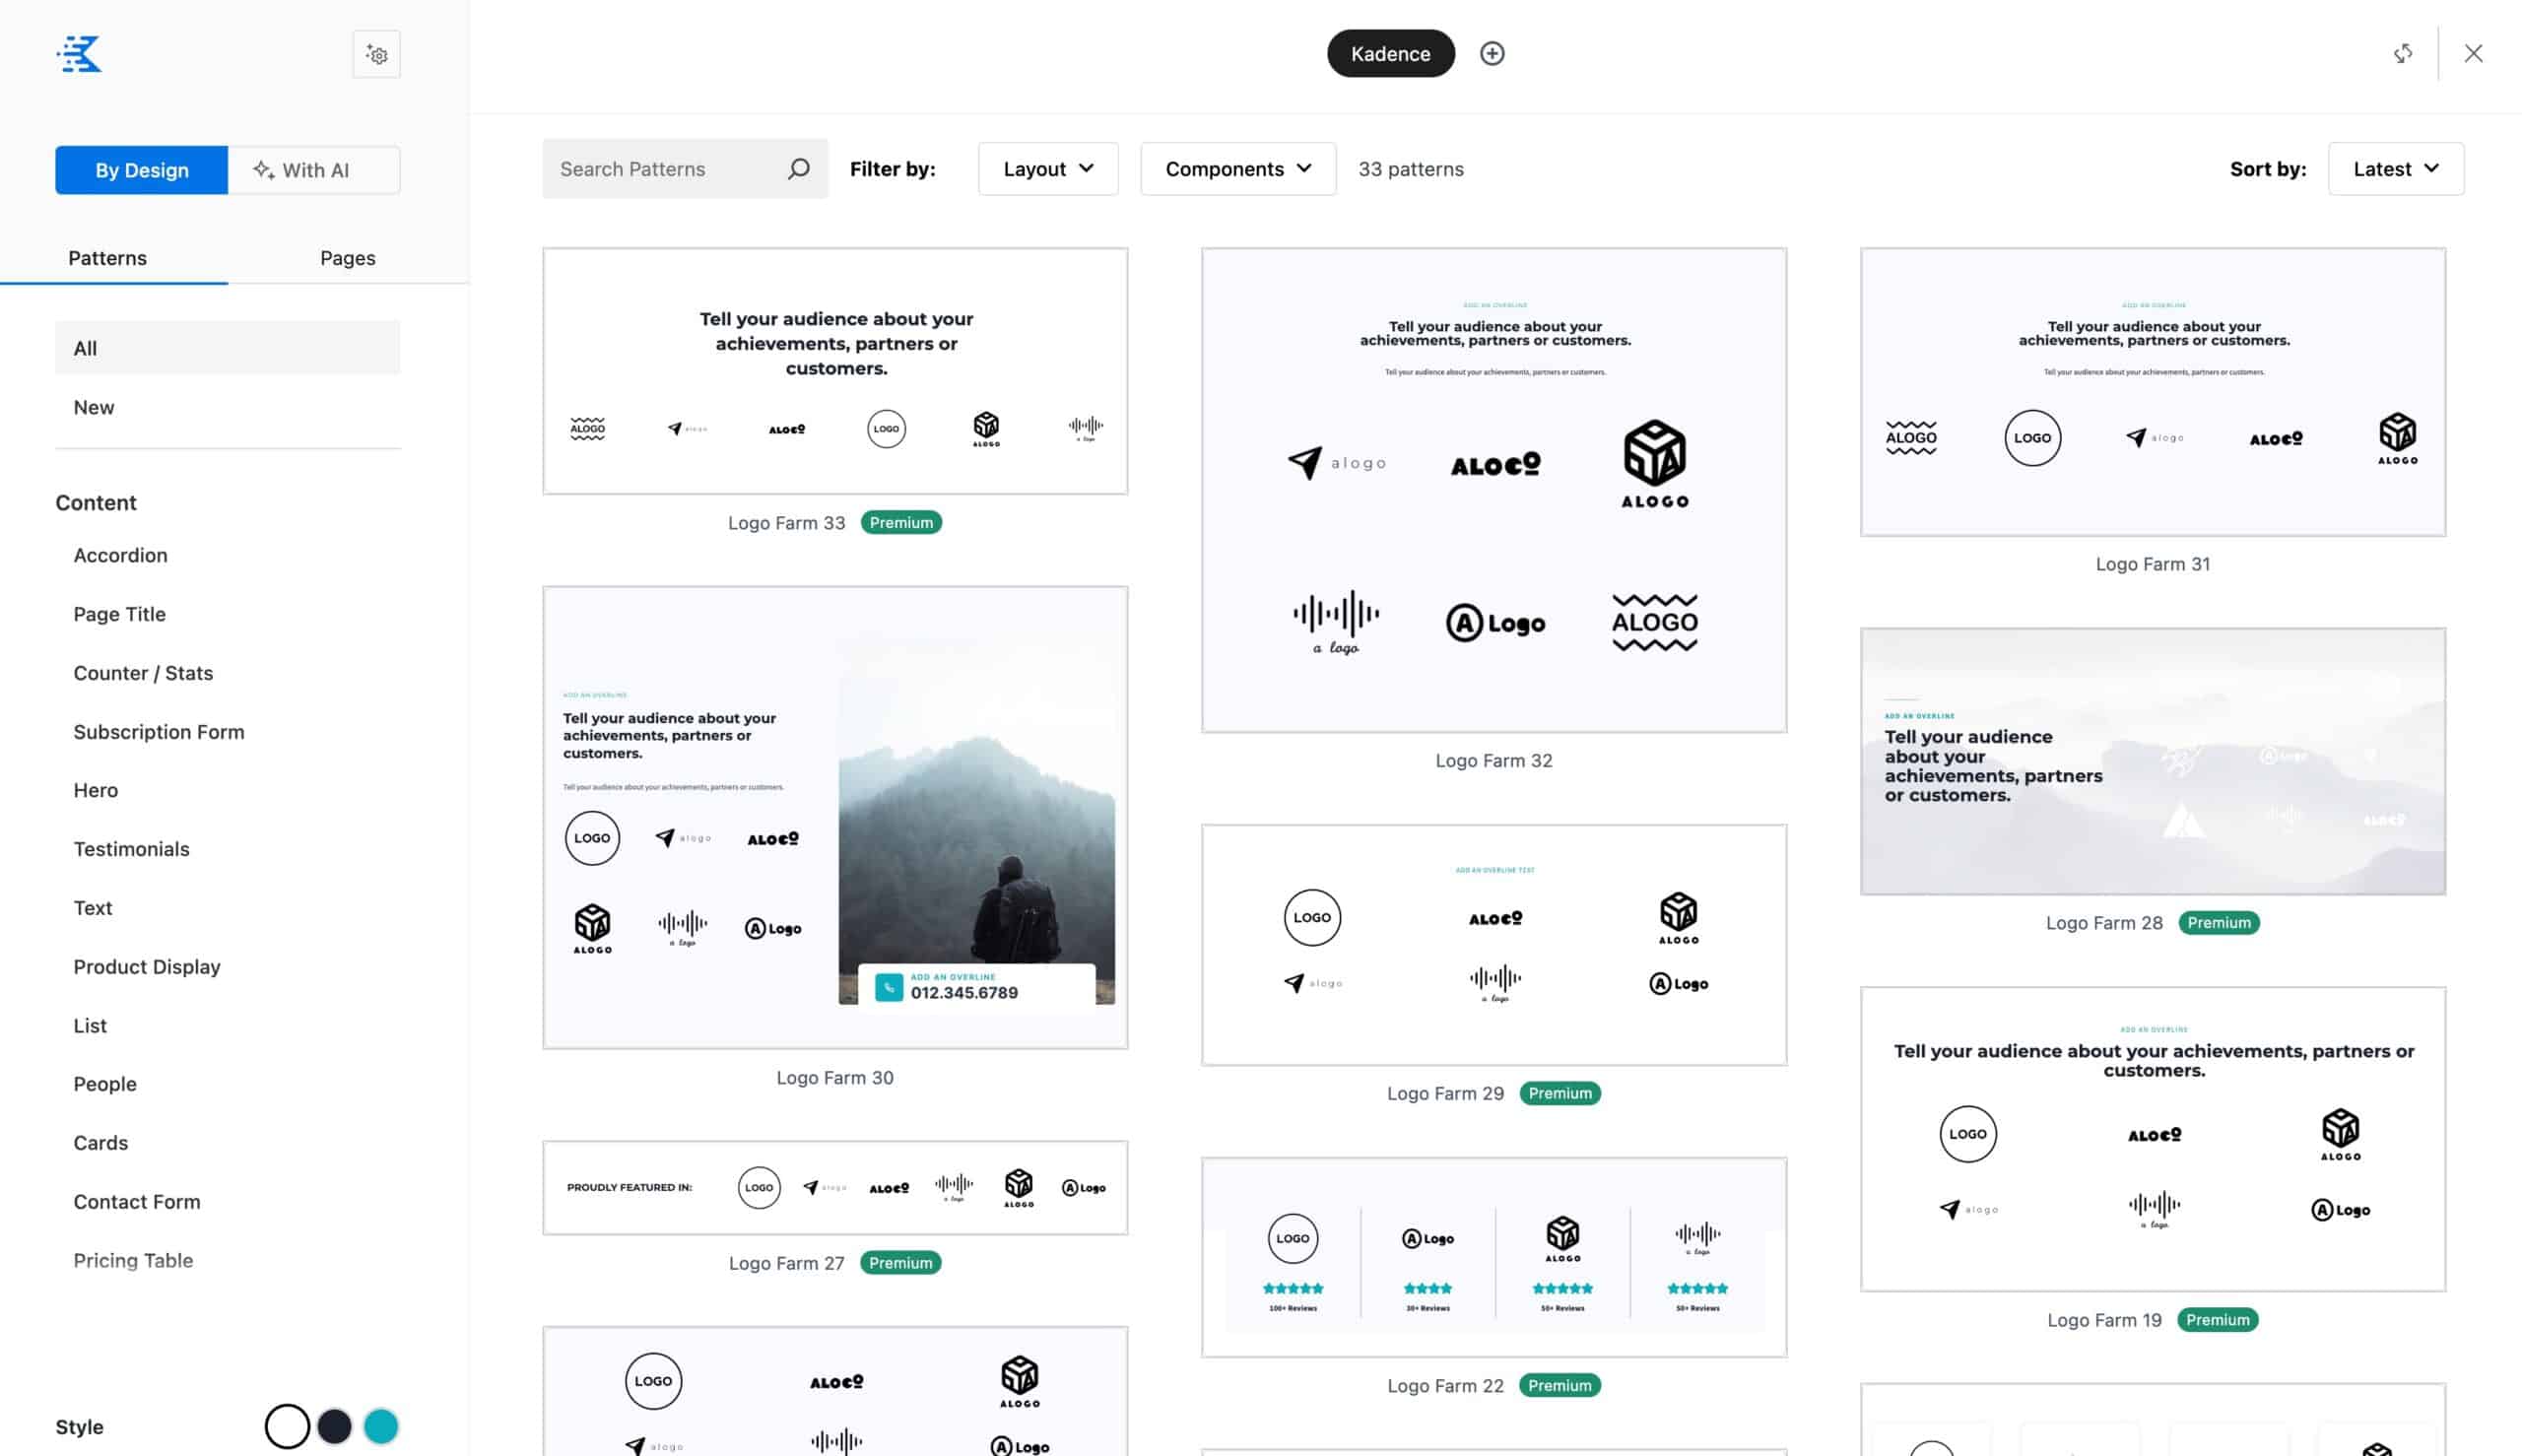
- You can navigate through Patterns or Pages. Each selection offers categories and filtering options to help find what you need.
- Click on a desired pattern to add it to the page and customize it as needed.
Installing Kadence Theme Kit Pro
- From the Kadence account, download the Kadence Theme Pro zip file.
- In the WordPress Dashboard, navigate to Plugins → Add New Plugin.
- Click the Upload Plugin button and then the Upload Plugin button.
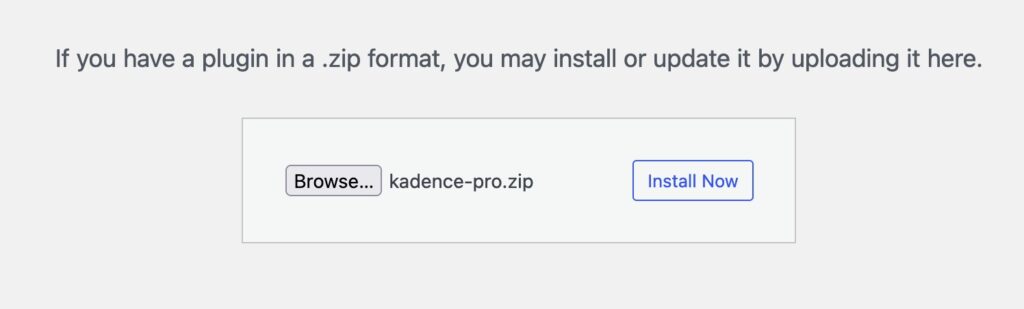
- Choose the zip file and click Install Now.
- After the installation is complete, click Activate.
Theme Kit Pro Features
The Kadence Theme Pro plugin takes the foundational Kadence Theme and adds professional-grade customization features to the WordPress Customizer.
- Header Addons ⧉: Adds over 20 extra header elements beyond what the free theme provides. Such as a second button, contact details, search bar, toggle panels, widget areas, and more
- Hooked Elements ⧉: Enables the creation of custom content or a template with Kadence Blocks and places it anywhere on a website, such as before or after posts or in a specific location on a page.
- This pairs well with Dynamic Content from Kadence Blocks Pro.
- Mega Menus ⧉: Extends the primary navigation with advanced features for creating multi-column mega menus.
- Header/Footer Scripts ⧉: Makes it easy to insert custom scripts (for analytics, tracking, pixels, etc.) directly into your header or footer via the Customizer, without needing to edit theme files.
To view all of the Theme Kit Pro features in detail, view the Kadence Theme Kit Pro documentation list ⧉.
The Kadence Theme Kit Pro plugin adds premium, extensive features to the Free Kadence Theme. To see all the possibilities with Kadence Theme + Theme Kit Pro, check out the Kadence Theme Knowledge Base.
Using Premium Starter Templates
Once the Kadence Blocks Pro and Theme Kit Pro plugins are installed and activated, you can import a premium starter template directly from the WordPress Dashboard.
- Navigate to Site Assist → Starter Templates. You can either use AI-Powered Starter Templates or a Pre-Designed Starter Template.

- For a full overview of how AI-Powered Starter Templates work, refer to the official document: Kadence AI-Powered Starter Templates ⧉.
- To learn more about using the Classic/Pre-Designed Starter Templates, refer to the official document: Getting Started with a Pre-Designed Starter Template ⧉.
- Browse the template library. Premium templates are marked with a “Premium” label. The Plus Plan unlocks premium templates for both AI-Powered and Pre-Designed Starter Templates.
- Click on a chosen premium template and follow the wizard to import it, just as with a free template.

Additional Plugins
Below is a list and overview of additional plugins also available in the Plus Plan that haven’t been covered in the previous topics. The products listed below include links to individual documents to help understand the installation process and features included.
Kadence Custom Fonts
The Kadence Theme and plugins offer native built-in support for Google Fonts. However, you may have a non-Google font that you wish to use. In this case, Kadence Custom Fonts is a plugin you want to use. The Kadence Custom Fonts plugin allows users to upload and use any font file on a website, providing complete control over typography. This works for manually uploading a file or connecting to Adobe for Adobe TypeKit Fonts.
- From a Kadence account, download the Kadence Custom Fonts plugin from your Kadence dashboard.

- Install it on the site using the standard upload method (Plugins → Add New Plugin → Upload Plugin). Once finished, activate the plugin.
- Navigate to the Dashboard → Appearance → Kadence → Custom Fonts page to upload font files. Click on the Add New button to add a new font. This will bring you to the font importer, where you can fill out font-related details and upload font files.
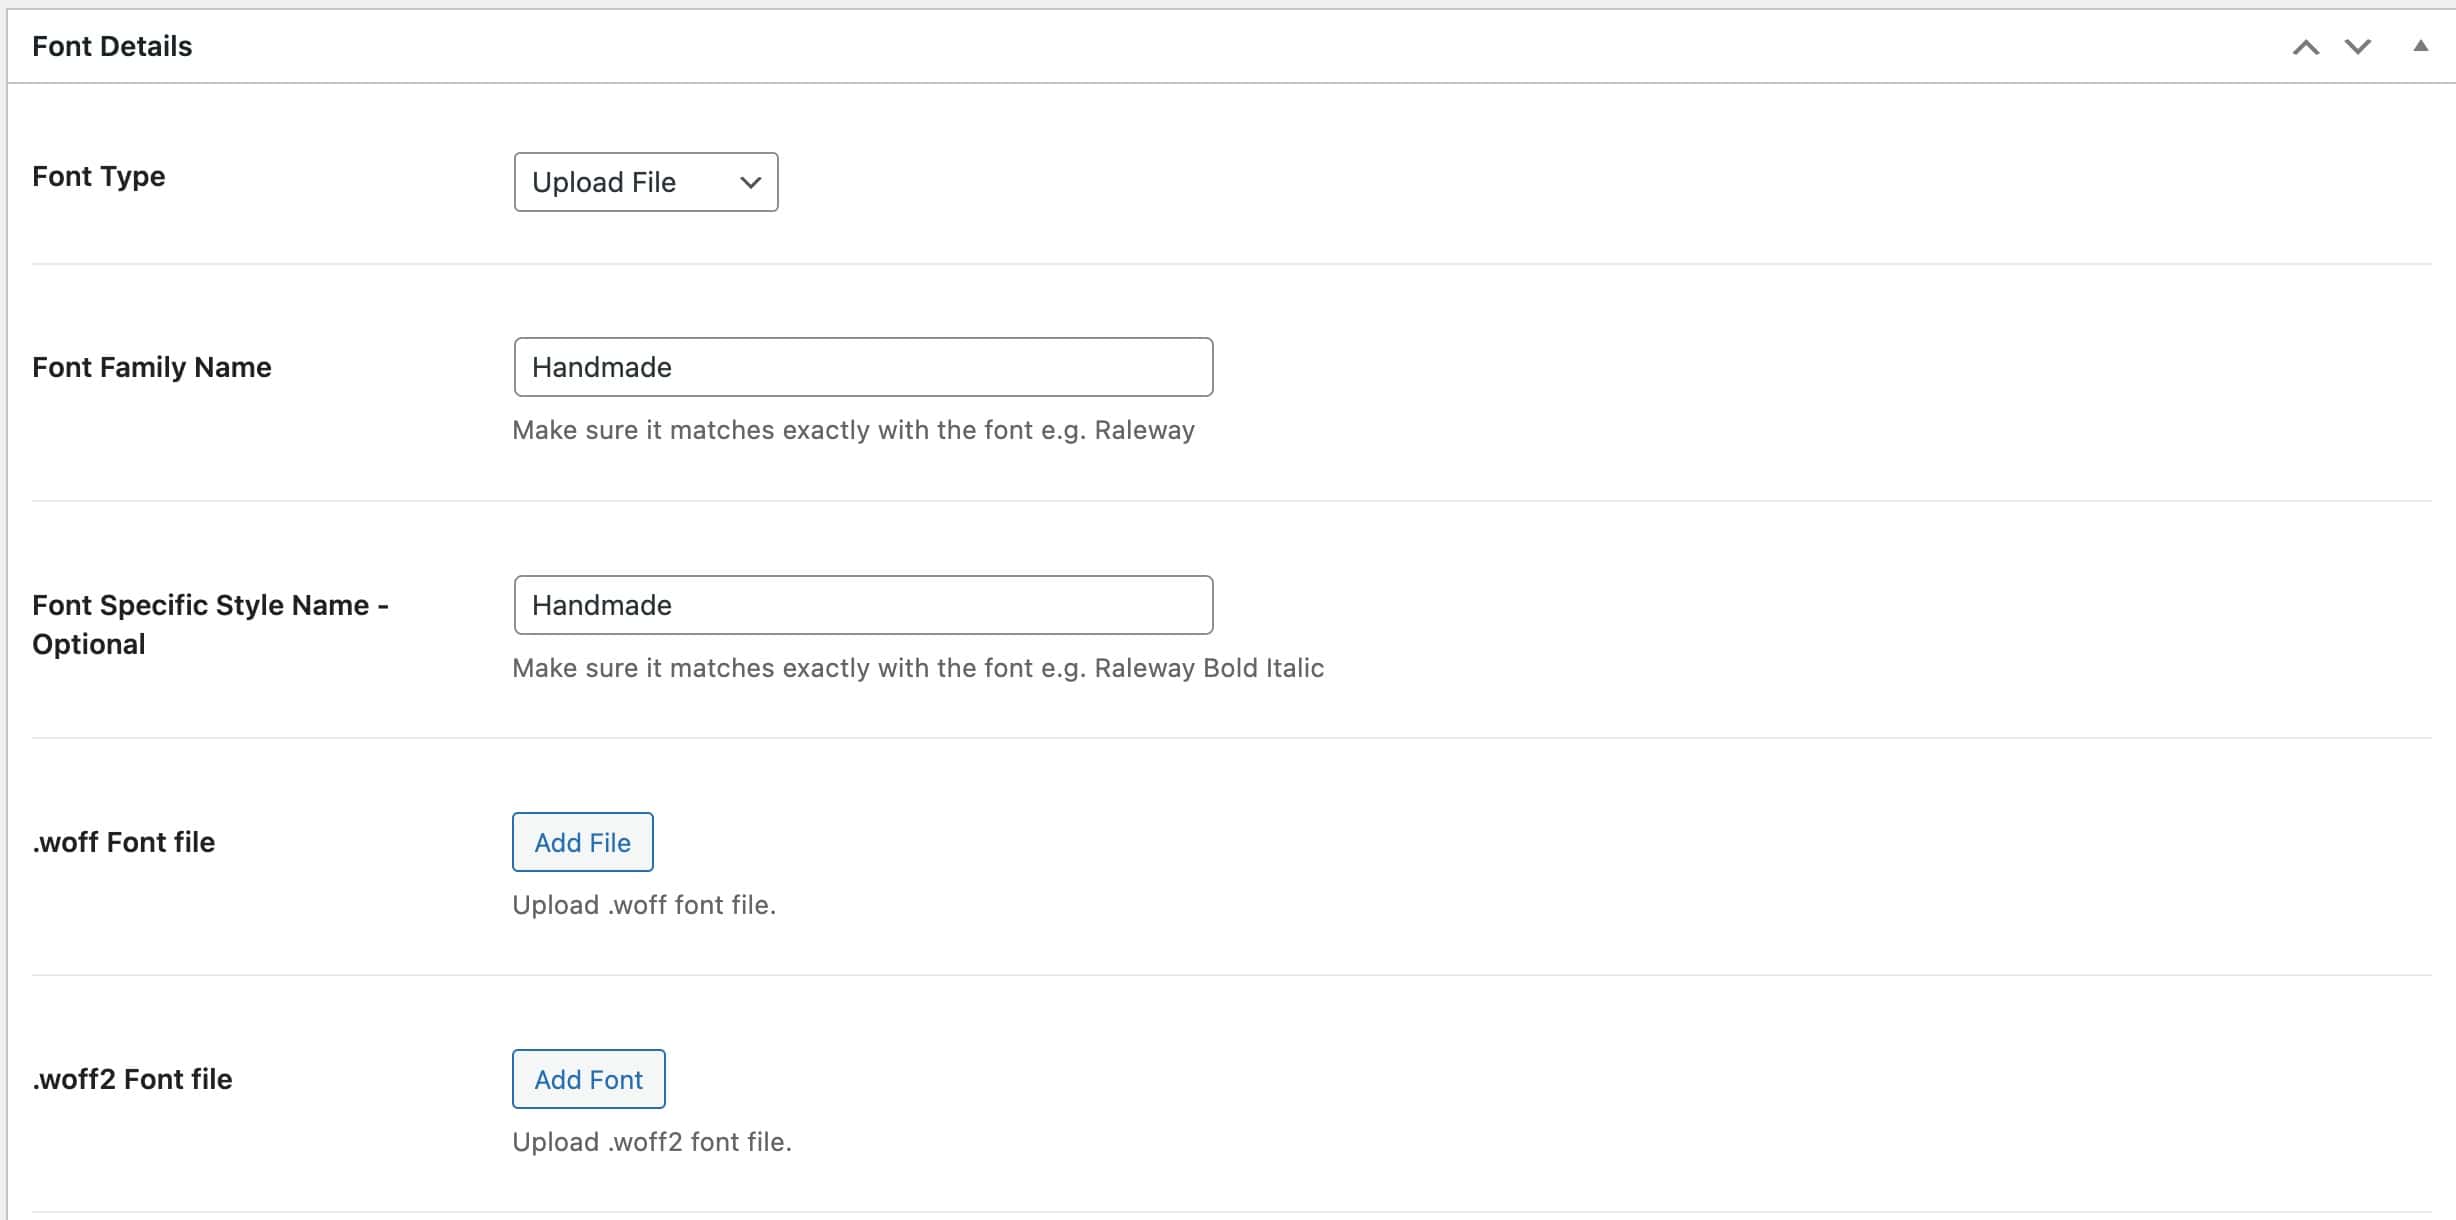
- From the Font Type dropdown, you can also use Adobe Type Kit Fonts, if preferred. Learn more ⧉.

- From the Font Type dropdown, you can also use Adobe Type Kit Fonts, if preferred. Learn more ⧉.
- Once a font is uploaded, it becomes available in the WordPress Customizer (Appearance → Customize → Colors & Fonts → Typography) and in the block editor’s typography font controls. These fonts also apply to the Kadence Blocks plugin and other areas where you can select fonts with Kadence.
For a complete overview of the Kadence Custom Fonts plugin, view the Kadence Custom Fonts document ⧉.
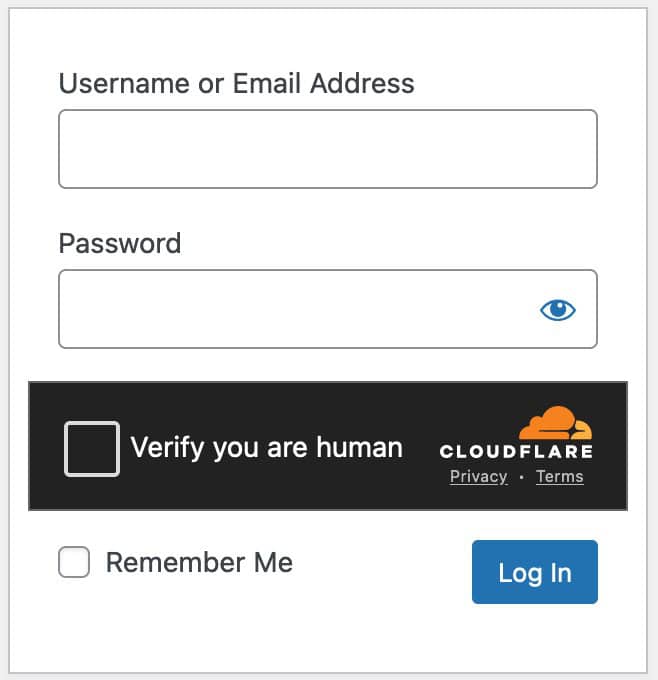
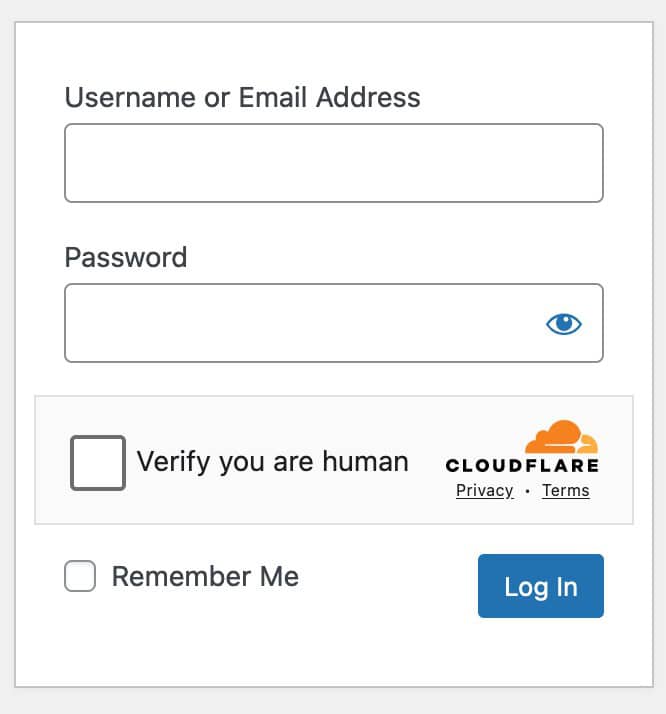
Kadence CAPTCHA
The Kadence CAPTCHA plugin helps protect your website forms from spam and automated bot submissions. It integrates seamlessly with WordPress and WooCommerce forms, adding a simple verification step for users. This ensures that critical forms, like login, checkout, and other non-block-based forms, stay secure from bad actors.
Both the Kadence Form Block (Learn more ⧉) and the Advanced Form Block (Learn more ⧉) also include built-in CAPTCHA options. However, these are configured differently from the CAPTCHA plugin. The Kadence CAPTCHA plugin specifically secures forms that are not created with Kadence Blocks.
- From a Kadence account, download the Kadence CAPTCHA plugin. Install and activate it on the WordPress site.
- After installation, go to the WordPress Dashboard and navigate to the Settings → CAPTCHA page to access the CAPTCHA settings.
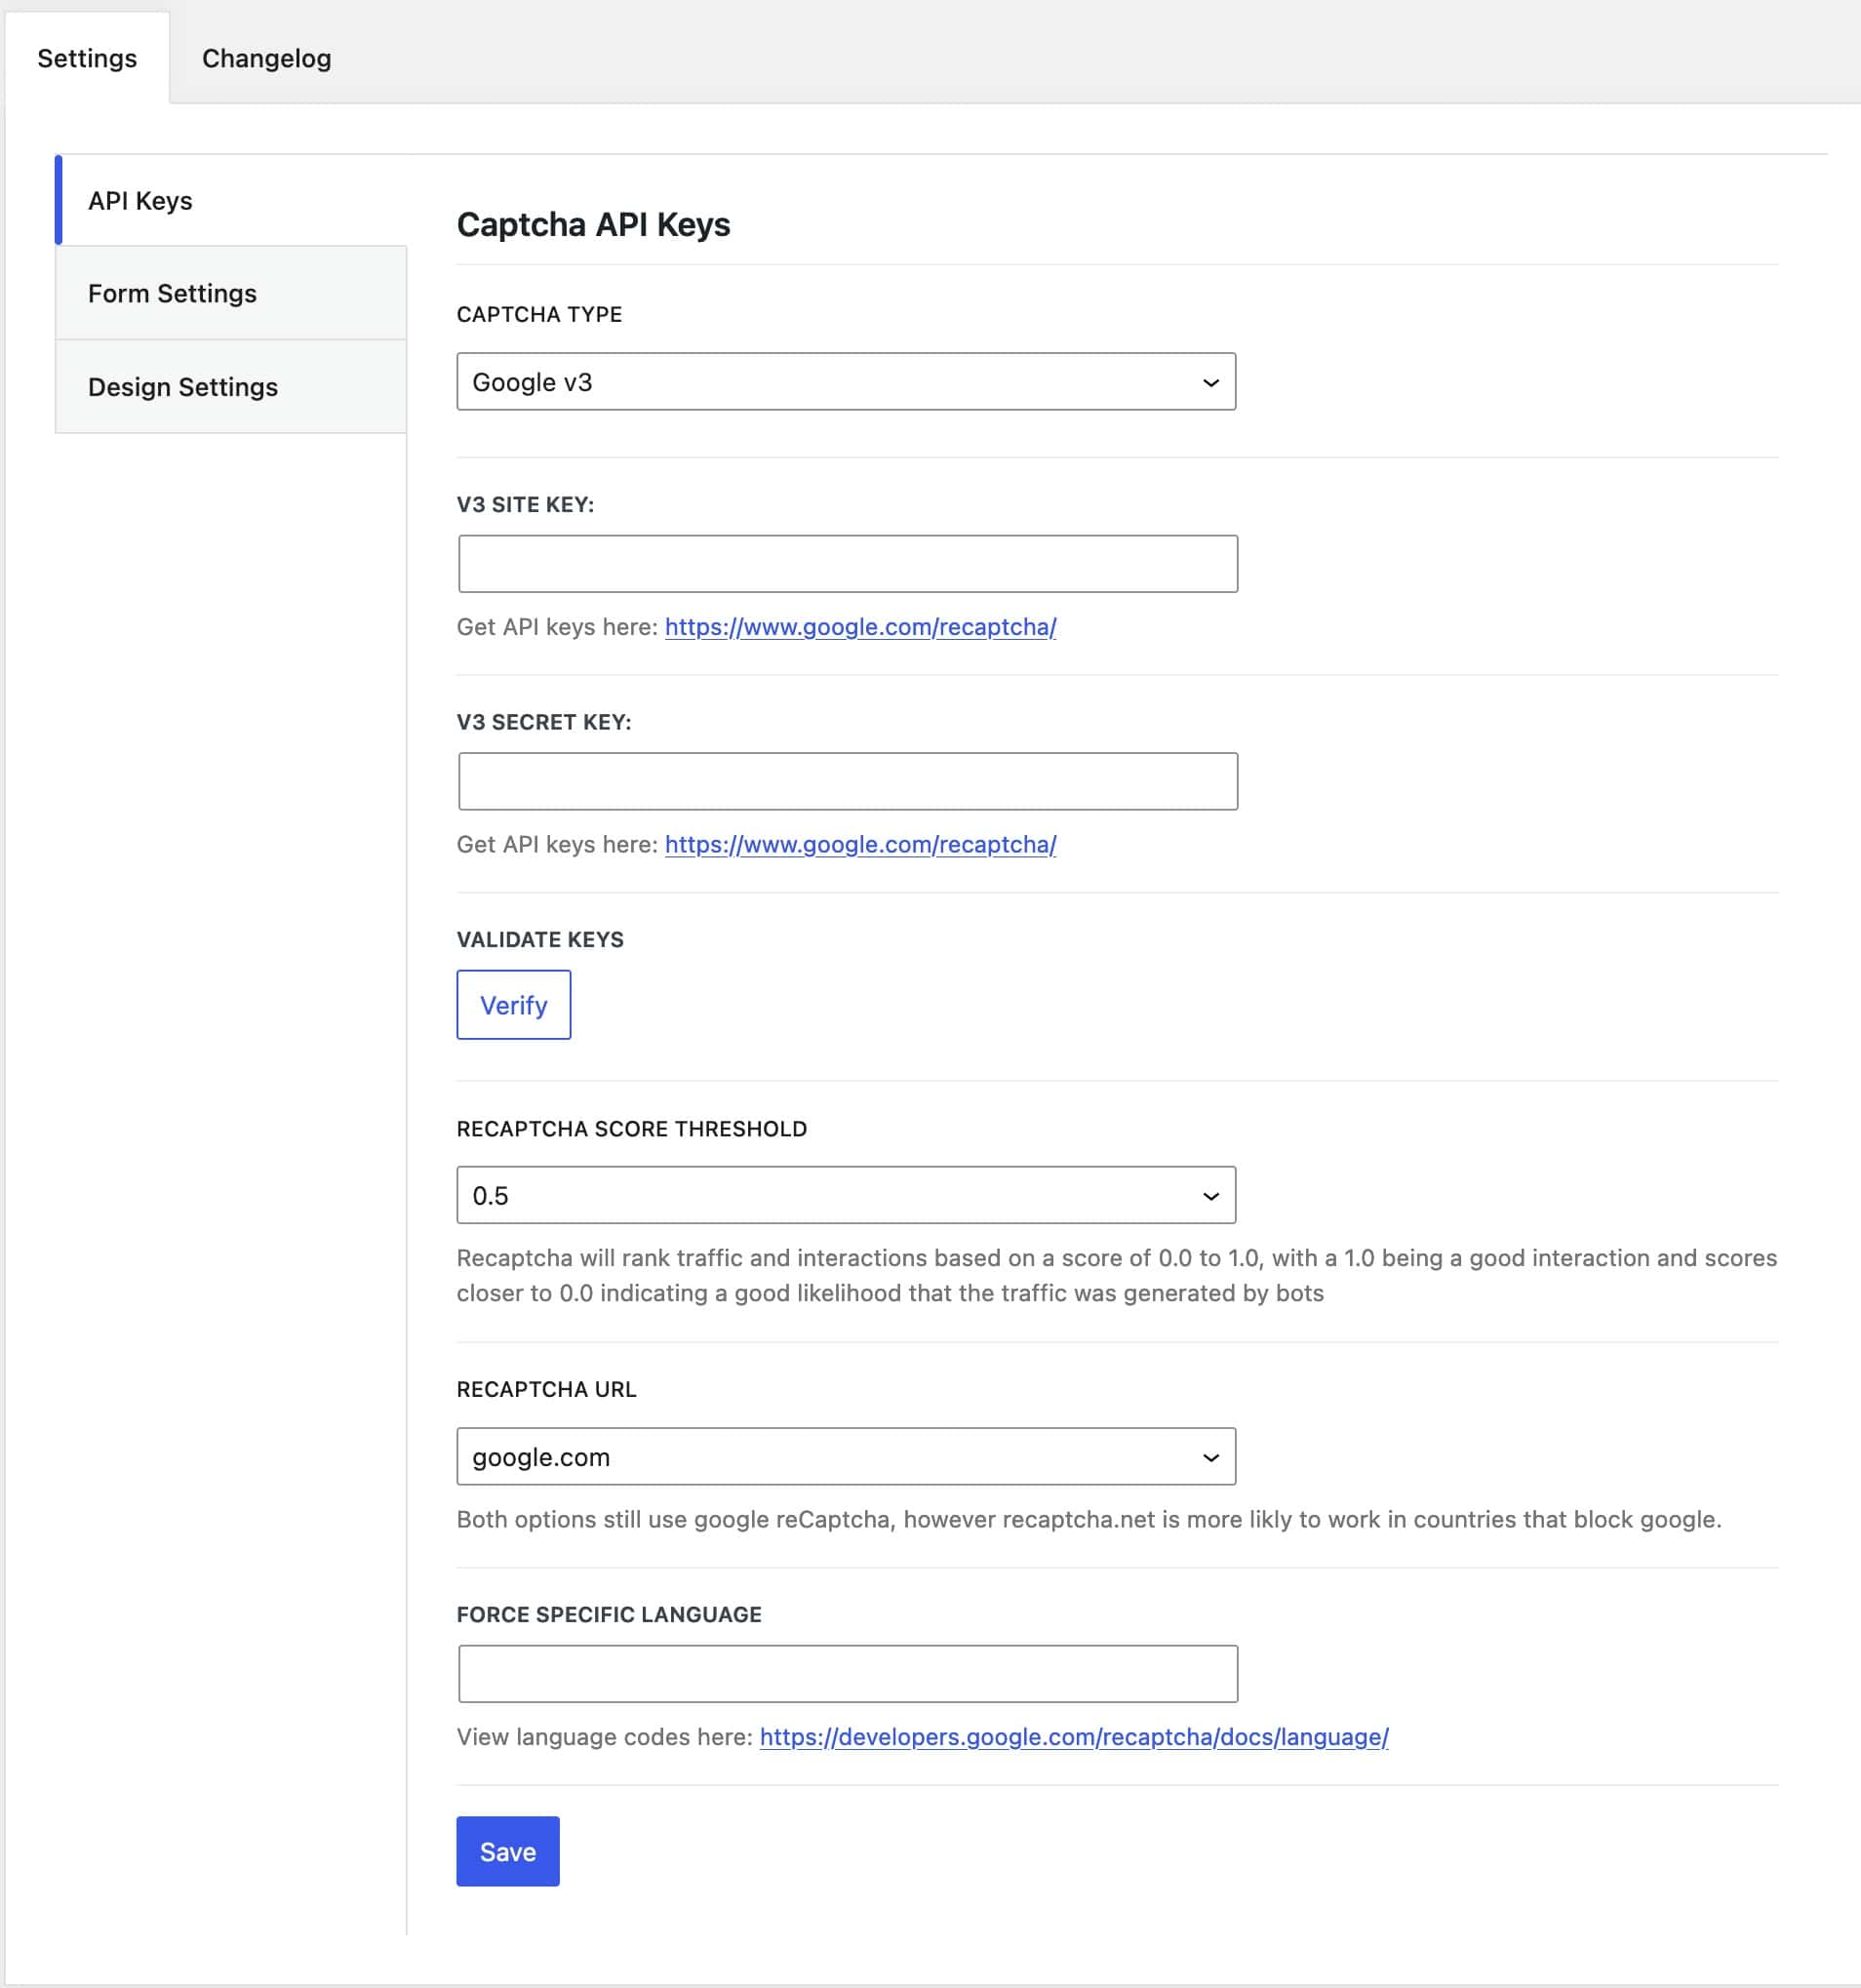
- Google reCAPTCHA – Kadence CAPTCHA supports Google reCAPTCHA v2 and v3. Learn more about setting up Google reCAPTCHA with Kadence ⧉.
- Cloudflare Turnstile – Kadence CAPTCHA also supports Cloudflare Turnstile. Learn more about setting up Cloudflare Turnstile with Kadence ⧉.
- From here, you can enable CAPTCHA for forms and connect to your preferred source API.
For more details on the Kadence CAPTCHA plugin, view the official Kadence CAPTCHA document ⧉.
Can’t find what you’re looking for, or running into technical issues? We’re here to help!
